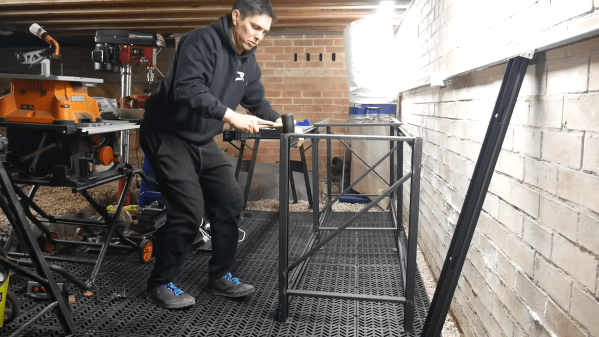
There were a few challenges that needed to be addressed first. He had to dig out the crawlspace to provide a level surface, though the depth was limited by the concrete footers the building stands on. The house is sitting on and around large amounts of limestone, which is excellent from a stability standpoint but causes problems for [Michael]. Water can easily travel through limestone, meaning it ends up in his newly dug-out crawlspace. He dug trenches for water to exit and laid down gravel. After a few attempts to level the floor, he found some recycled plastic floor mats and finally got them where he liked them.
Wheeling his tools down a long and steep hill to the shop looks like most of the challenge. But with a few additions to the shop, like hard tube dust extractions and a french cleat system, he has an incredibly functional dedicated shop space.
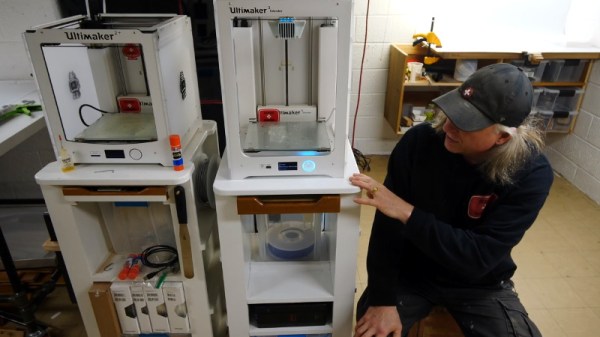
Even if you’ve got a decent sized workshop, there’s only so much stuff you can have sitting on the bench at one time. That’s why [Eric Strebel], ever the prolific maker, decided to build this slick cart for his fairly bulky Ultimaker 3 Extended printer. (Video, embedded below.) While the cart is obviously designed to match the aesthetics of the Ultimaker, the video below is sure to have some useful tips and tricks no matter which printer or tool you’re looking to cart around the shop in style.
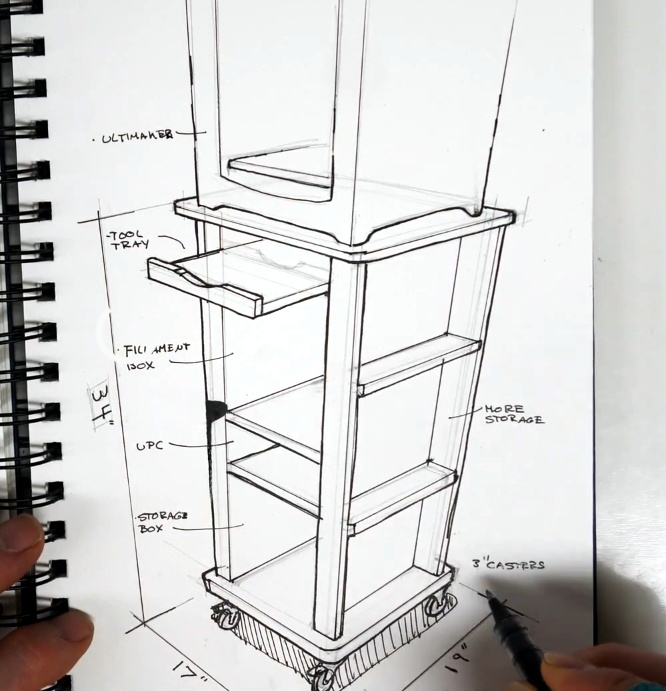
[Eric] made a second video on sketching out the design.On the surface this might look like a pretty standard rolling cart, and admittedly, at least half of the video is a bit more New Yankee Workshop than something we’d usually be interested in here on Hackaday. But [Eric] has built a number of neat little details into the cart that we think are worth mentally filing away for future projects.
For example, we really liked his use of magnets to hold the plastic totes in place, especially his method of letting the magnets align themselves first before locking everything down with screws and hot glue. The integrated uninterruptible power supply is also a nice touch, as it not only helps protect your prints in the event of a power outage, but means you could even move the cart around (very carefully…) as the printer does its thing.
But perhaps the most interesting element of the cart is that [Eric] has relocated the Ultimaker’s NFC sensors from the back of the printer and into the cart itself. This allows the printer to still read the NFC chip built into the rolls of Ultimaker filament, even when they’re locked safely away from humidity in a sealed box.
Now all you’ve got to do is apply for the loan it will take to pay for all of the MDF you’ll need to build your own version. At this point, we wouldn’t be surprised if encasing your 3D printer in metal would end up being cheaper than using wood.
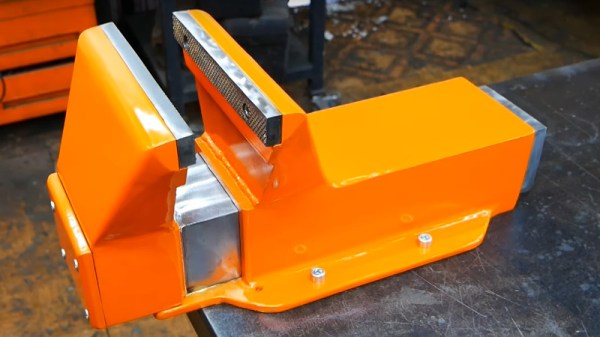
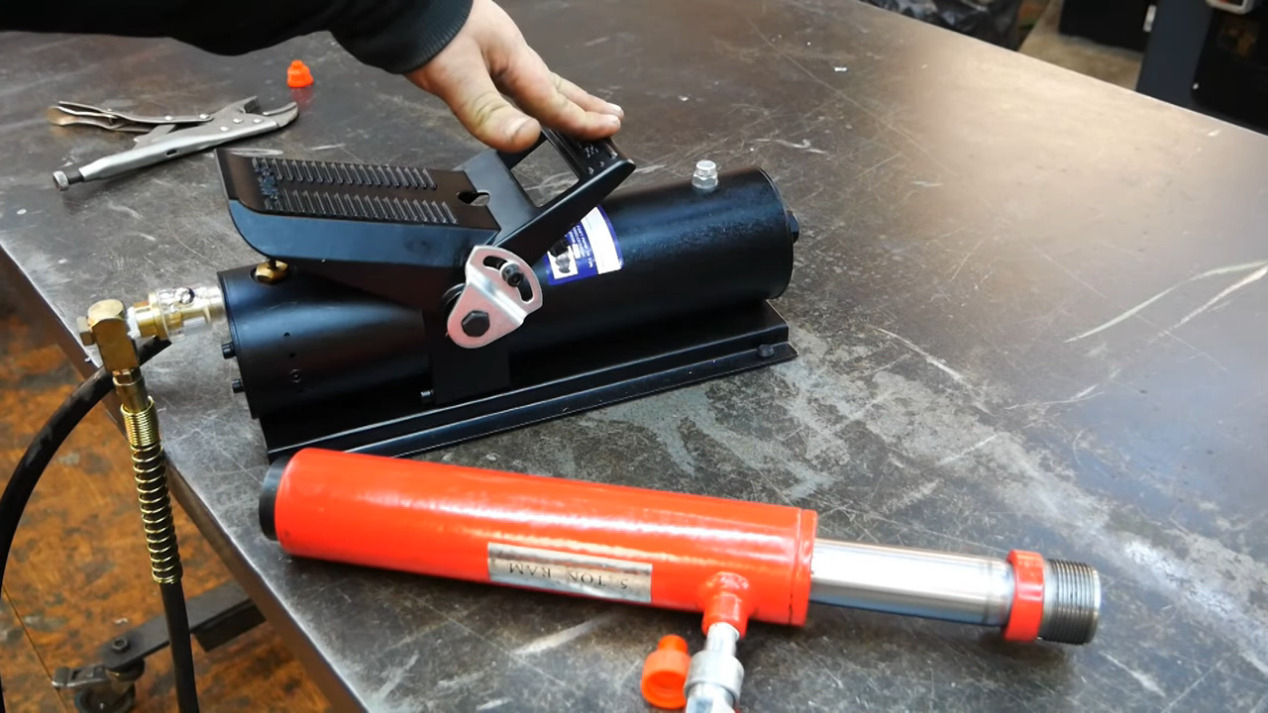
When we sit down to a build video and see that it’s from [Workshop From Scratch], we know it’ll be a good one, full of plenty of gratuitous metal-wrangling with the promise of an ingenious and useful take on a workshop essential at the end. The home made hydraulic bench vise is the latest from that particular workshop, so settle down with the video below the break for a treat.
Unlike the lead screw we’d expect from a more conventional vise, this one uses a hydraulic pull cylinder and its associated compressor which is powered by compressed air. A substantial vise frame is constructed around the cylinder from thick steel plate, with some careful welding and grinding to ensure a smooth finish. The result is substantial clamping force with a very smooth and quick action, which doesn’t overhang the edge of the bench in the way a more traditional one does. The hydraulic tube is tucked away through a hole in the bench, and the foot-operated pump lies out of sight on the floor.
Looking at this vise with blacksmith-trained eyes, it raises the question of how it might perform were something in it to be hammered. Overhanging vises are vulnerable to splitting when hammered, so there’s the possibility that this one with its flat mounting might fare a little better. Either way it would be an asset to any workshop.
Have you dipped your toe into the SDR ocean? While hacker software-defined radio has been a hot topic for years now, it can be a little daunting to try it out for the first time. Here’s your change to get your legs under you with the SDR overview workshop presented by Josh Conway during the 2020 Hackaday Remoticon.
Josh’s presentation starts with a straightforward definition of SDR before moving to an overview of the hardware and software that’s out there. Hardware designs for radios can be quite simple to build, but they’ll be limited to a single protocol — for instance, an FM radio can’t listen in on 433 Mhz wireless doorbell. SDR breaks out of that by moving to a piece of radio hardware that can be reconfigured to work with protocols merely by making changes to the software that controls it. This makes the radio hardware more expensive, but also means you can listen (and sometimes transmit) to a wide range of devices like that wireless doorbell or automotive tire pressure sensors, but also radio-based infrastructure like airplane transponders and weather satellites.
This is the quickstart you want since it explains a lot of topis at just the right depth. The hardware overview covers RTL-SDR, ADALM-PLUTO, HackRF, KerberosSDR, and BladeRF (which we just featured over the weekend used on the WiFi procotol). For software, Josh recaps GQRX, SDR#, SDRAngel, ShinySDR, Universal Radio Hacker, Inspectrum, SigDigger, RPITX, GnuRadio Companion, and REDHAWK. He also takes us through a wide swath of the antenna types that are out there before turning to questions from the workshop attendees.
If SDR is still absent in your toolbox, now’s a great time to give it another look. Once you’ve made it through the ‘hello world’ stage, there’s plenty to explore like those awesome RF Emissions testing tricks we as in another Remoticon talk.
These days we’re surrounded by high-speed electronics and it’s no small feat that they can all play nicely in near proximity to each other. We have RF emissions standards to thank, which ensure new products don’t spew forth errant signals that would interfere with the data signals traveling through the ether. It’s long been the stuff of uber-expensive emissions testing labs, and failure to pass can leave you scratching your head. But as Alex Whittimore shows in this workshop from the 2020 Hackaday Remoticon, you can do a lot of RF emissions debugging with simple and inexpensive tools.
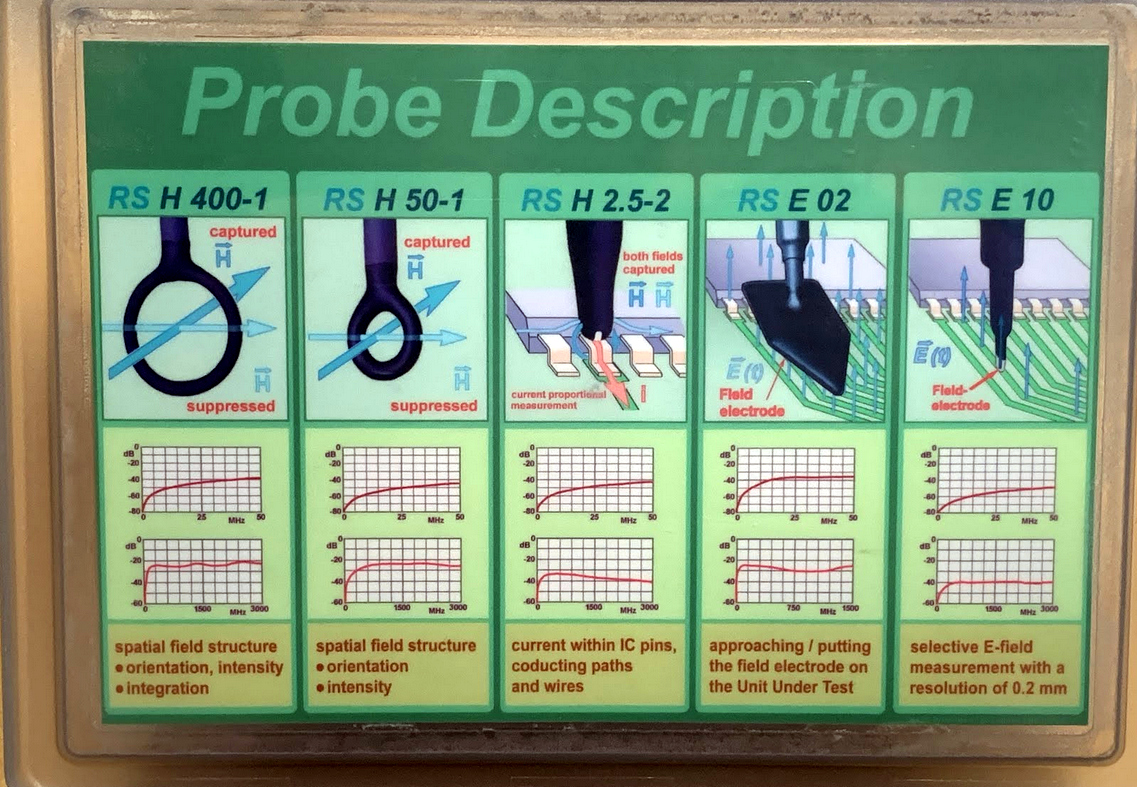
Professionally-made probes in several sizes
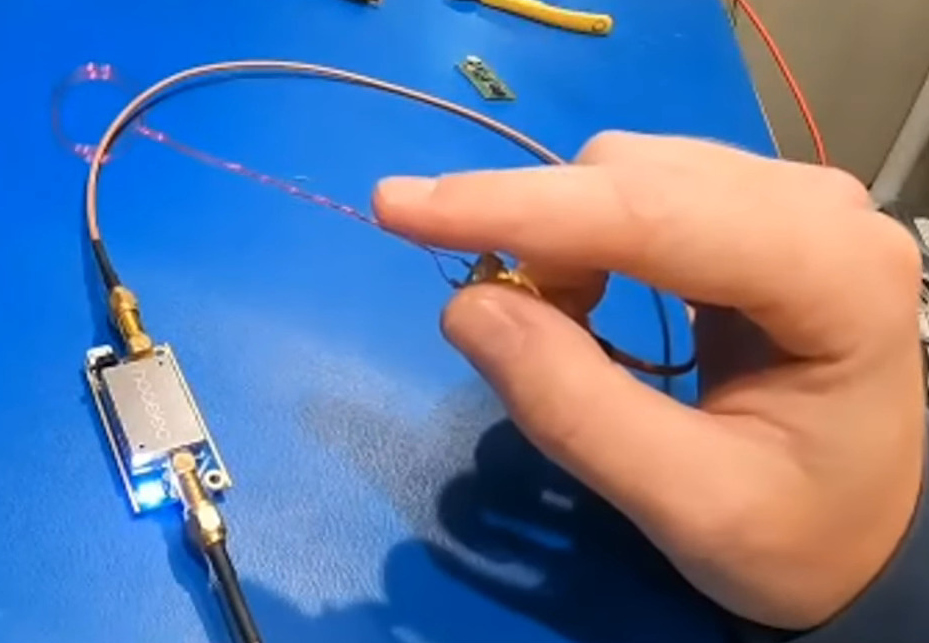
Build your own probes from magnet wire
You can get a surprisingly clear picture of what kind of RF might be coming off of a product by probing it on your own workbench. Considering the cost of the labs performing FCC and other certifications, this is a necessary skill for anyone who is designing a product headed to market — and still damn interesting for everyone else. Here you can see two examples of the probes used in the process. Although one is a pack of professional tools and other is a bit of enameled wire (magnet wire), both are essentially the same: a loop of wire on which a magnetic field will induce a very small current. Add a Low-Noise Amplifier (LNA) and you’ll be up and measuring in no-time.
I really enjoyed how Alex started his demo with “The Right WayTM” of doing things — using a proper spectrum analyzer to visualize data from the probes. But the real interesting part is “The Hacker WayTM” which leverages an RTL-SDR dongle and some open-source software to get the same job done. Primarily that means using SDRAngel and QSpectrumAnalyzer which are both included in the DragonOS_LTS which can be run inside of a virtual machine. Continue reading “Remoticon Video: Basics Of RF Emissions Debugging Workshop”→
Designing your own integrated circuits as a one-person operation from your home workshop sounds like science fiction. But 20 years ago, so did rolling your own circuit boards to host a 600 MHz microcontroller with firmware you wrote yourself. Turns out silicon design isn’t nearly as out of reach as it used to be and Matt Venn shows us the ropes in his Zero to ASIC workshop.
Held during the 2020 Hackaday Remoticon, this is a guided tour of the tools used in the Skywater PDK — the Process Design Kit that is an open-source ASIC toolkit produced in a partnership between Google and SkyWater Technology. We covered the news when first announced back in June, but this the most comprehensive look we’ve seen into the actual design process.
Drawing N-channel MOSFET in silicon
Matt builds up the demo starting from the very simple design of an N-channel MOSFET with click-and-drag tools similar to graphics editing software. The good news it that although you can draw your own structures like this, for digital designs you won’t have to. A wide variety of IP has been contributed to the open source project allowing basic building blocks to be pulled in using HDL. However, the power of drawing structures will certainly be the playground for those needing analog design as part of their projects.
As with EDA software used for circuit boards, the PDK includes design rule checks to ensure you aren’t violating the limits of the 130 nm chip fab. There’s some other black magic in there too, as Matt specifically mentions an antenna rules check to safeguard your design from being fried by induced current on “large” (microscopically so) metalized runs during the fabrication process.
Part of a massive logic flow chart for an IC counter design
The current workflow involves grinding through a large number of configuration files, something Matt admits took him a long time to wrap his head around. However, what’s available for proofing your design is very impressing. He demonstrates SPICE simulation to calculate timings, and shows numerous examples of verification drawings generated by the compilation process, either in the form of seeing the structures as they will be laid out, or as logical flow charts. This is crucial as a single run will take 2-3 months to come back from fab — you want to get things right before buttoning up the project. Incidentally, that’s know as “tapeout”, a term you’ve likely heard before and he says it comes from reels of magnetic tape containing the design being removed from the computer and sent to production. Who knew? (This tidbit in strikethrough appears to be incorrect).
But wait, there’s more to this than just designing the things. Part of the intrigue of the Skywater-PDK project is that Google bought into covering a group run about once per quarter so that open-source designs can be ganged onto a multi-project wafer free of charge to the people submitting them. That’s pretty awesome and we’re giddy to hear news of people getting their wafer-level chip scale devices — also known as flip chips — back for testing. Matt is planning a more in-depth paid course on the topic. For now, get a taste of what’s involved from this excellent workshop found after the break.
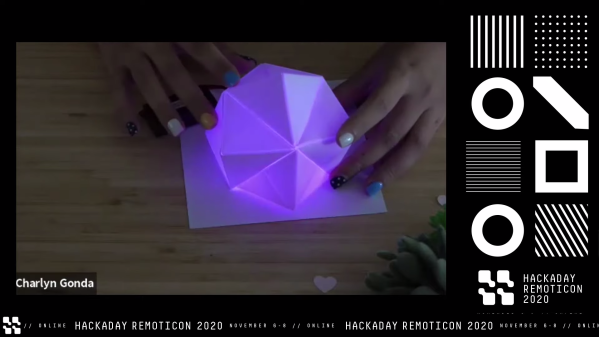
Hacking is about pushing the envelope to discover new and clever ways to use things in ways their original designers never envisioned. [Charlyn Gonda]’s Hackaday Remoticon workshop “Making Glowly Origami” was exactly that; a combination of the art of origami with the one of LEDs. Check out the full course embedded below, and read on for a summary of what you’ll find. Continue reading “Remoticon Video: Making Glowy Origami With Charlyn Gonda”→