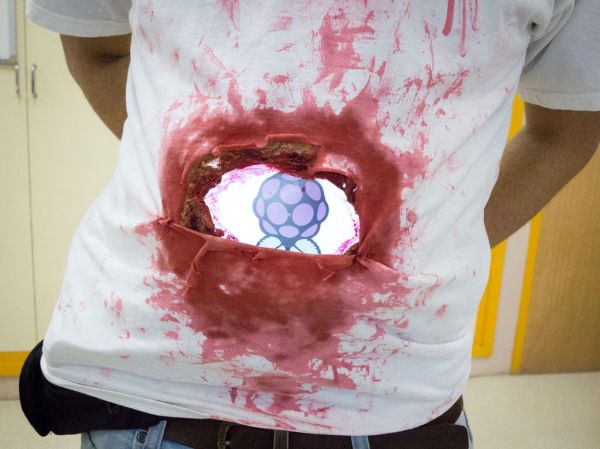
"Stomach Shot" lets you see through your zombie corpse.

“Stomach Shot” Halloween Costume

Halloween may have come and gone, but [Luis] sent us this build that you’ll want to check out. An avid Walking Dead fan, he put in some serious effort to an otherwise simple bloody t-shirt and created this see-through “stomach shot” gunshot wound.

The project uses a Raspi running the Pi Camera script to feed video from a webcam on the back of his costume to a 7″ screen on the front. [Luis] attached the screen to a GoPro chest harness—they look a bit like suspenders—to keep it centered, then built up a layer of latex around the display to hide the hard edges and make it more wound-like. Power comes from a 7.4V hobby Lipo battery plugged into a 5V voltage converter.

After ripping a small hole in the back of his t-shirt for the webcam and a large hole in the front for the screen, [Luis] applied the necessary liberal amount of fake blood to finish this clever shotgun blast effect.

IP camera hack

How To Backup And Restore Your IP Camera Firmware

[Filipe] has been playing around with custom firmware for inexpensive IP cameras. Specifically, he has been using cameras based on a common HI3815 chip. When you are playing around with firmware like this, a major concern is that you may end up bricking the device and rendering it useless. [Filipe] has documented a relatively simple way to backup and restore the firmware on these cameras so you can hack to your heart’s content.

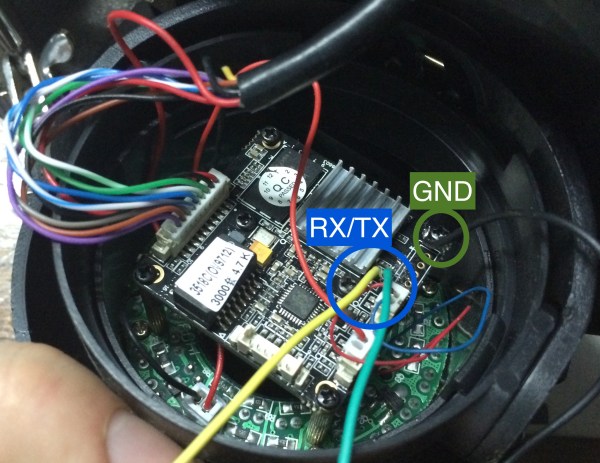
The first part of this hack is hardware oriented. [Filipe] cracked open the camera to reveal the PCB. The board has labeled serial TX and RX pads. After soldering a couple of wires to these pads, [Filipe] used a USB to serial dongle to hook his computer up to the camera’s serial port.

Any terminal program should now be able to connect to the camera at 115200 baud while the camera is booting up. The trick is to press “enter” during the boot phase. This allows you to log in as root with no password. Next you can reset the root password and reboot the camera. From now on you can simply connect to the phone via telnet and log in as root.

From here, [Filipe] copies all of the camera’s partitions over to an NFS share using the dd command. He mentions that you can also use FTP for this if you prefer. At this point, the firmware backup is completed.

Knowing how to restore the backup is just as important as knowing how to create it. [Filipe] built a simple TFTP server and copied the firmware image to it in two chunks, each less than 5MB. The final step is to tell the camera how to find the image. First you need to use the serial port to get the camera back to the U-Boot prompt. Then you configure the camera’s IP address and the TFTP server’s IP address. Finally, you copy each partition into RAM via TFTP and then copy that into flash memory. Once all five partitions are copied, your backup is safely restored and your camera can live to be hacked another day.

Retrotechtacular: How To Teletypewriter

This week, you’re going to learn the ins and outs of the AN/GRC-46 thanks to this army training film from 1963. What is the AN/GRC-46, you ask? Why it’s a complete mobile-tactical sheltered radio-teletypewriter rig capable of CW, voice, and teletype transmission.

The film covers the components that make up the AN/GRC-46, their functions, the capabilities of the system, and proper operation procedures. There’s a lot going on in the tiny 1400lb. steel shelter, so each piece will be introduced from the ground up.

You’ll become familiar with the voltage distribution system and the AN/GRC-46’s included accessories. This introduction will be followed by a short course in RF signal transmission and the Frequency-Shift Keying (FSK) that is performed by the modulator. The ranges of both the transmitter and receiver are discussed, along with the capabilities mentioned before: CW operation using the keyer, voice operation, teletype operation, and reperforation of teletype tape.

Finally, you’ll observe a seasoned operator make contact and send a teletype message with movements so careful and deliberate that they border on mesmerizing. When he’s not sending messages or taking long walks on the beach, he can usually be found cleaning and/or lubricating the transmitter filter.

Continue reading “Retrotechtacular: How To Teletypewriter”

Hackaday Printing Press Upgrade

There comes a time when your movable type becomes so over-used that you no longer get a legible print off of the printing press. For months now we’ve been at work on a new site design that maintains the essence of Hackaday while ejecting the 10-year-old dregs of the site. With each small success we’ve actually ruined ourselves on viewing the old design. It is with great relief that we unveil a site design built specifically for Hackaday’s needs.

The most notable change is in the content of our landing page. For ten years, loading Hackaday.com resulted in the most recent blog posts. The blog concept is proven, but provides little opportunity to highlight quality original content and information about upcoming events. We have tried the use of “sticky” posts but honestly I find them somewhat annoying. The solution to this is not immediately apparent, but I feel we have found the most efficient solution to our complex set of needs..

We have a lot of community members who participate in Hackaday in numerous ways. Changes found in this design are driven by that fact. The landing page will, from this point forward, be a somewhat more persistent collection of notable content from the blog, our community site (hackaday.io), as well as news regarding live events, store features, contest highlights, and more. Those hard-core fans — a label I also assign to myself — will find the same reading experience as always on the new blog URL: hackaday.com/blog.

Aesthetically, we hope that all will agree the new design far supersedes the old. There was a lot to fix, and the work of the Hackaday crew who designed and implemented this new interface is truly amazing. I hope you will take the time to leave a positive comment about their work. As with any major transition, there will be some bumps in the road. Right now most of our sidebar widgets have not been migrated but that and any other problems will be fixed soon.

In this design we strived to highlight the title and image of each post to immediately convey the core concepts of the projects shown here. The author by-line and comment count remain core to the presentation of the articles, and our link style continues to be immediately apparent in the body of each article. I think we have far surpassed the readability of the comments section, in addition to the content itself. We knew we could rebuilt it… we have the technology… long live articles worth reading.

UPDATE: We are working very hard to fix all the parts that don’t look quite right. Thanks for your patience!

UPDATE 2: Infinite scrolling isn’t a feature, it’s a regression. On our test server all the blog listings were paginated just like always. When our host, WordPress VIP, pushed live the infinite scrolling manifested itself. We’ve filed a ticket with them and are hoping for a solution shortly.

UPDATE 3: Infinite scrolling has now been fixed and the blog layout now paginates. The mouse-over zoom effect has been removed. Slideshow speed has been adjusted and if you hover you mouse over a feature it will pause the scrolling.

An Interview With Tesla Battery Hacker [wk057]

We covered [wk057] and his Tesla Model S battery teardown back in September. Since then we had some time to catch up with him, and ask a few questions.

You’ve mentioned that you have a (non hacked) Tesla Model S. What do you think of the car?

It’s the best car I’ve ever driven or owned, period. Not to get too into it, but, I love it. I’ve put almost 20,000 miles on it already in under a year and I have no real complaints. Software feature requests… but no complaints. After almost a year, multiple 1700-miles-in-a-weekend trips, and an overall great experience… I can never go back to a gas vehicle after this. It would be like going back to horses and buggies.

A salvage Tesla Lithium battery had to be expensive compared to a Lead Acid setup. What made you go with the Tesla?

Actually, if you consider that the Model S battery is already pre-setup as a high-capacity pack, contains the wiring to do so, and the modules are much more energy and power dense than any lead acid battery bank, it’s actually almost cheaper than a comparable lead acid bank and all the trimmings.

I haven’t officially weighed them, but the modules from the Model S battery are roughly 80 lbs. 80 lbs for a 5.3 kWh battery is around 15 lbs per kWh, which is impressive. For comparison, a decent lead acid battery will have a little over 1 kWh (of low-rate discharge capacity) and weigh almost the same.

Also, the Tesla pack is much more powerful than a lead acid bank of the same capacity.
Generally a lead acid battery bank would have a capacity that would only be realized with slow discharges, so, 1/20C. Much over that and you sacrifice capacity for power. 1/20C for an 85kWh pack is only 4.25kW, barely enough for a central air unit and some lights without losing capacity.

Now the Tesla pack can be discharged (based on how it does so in the vehicle) at up to 3.75C for short periods, and at 1/2C continuously without really affecting the overall capacity of the pack. That means I can run 10x more power than lead acid without a loss in overall charge capacity. Leads to a much more flexible battery solution since the loads will, in reality, always be so low that this will not even come into play with the Tesla pack, but would almost always be a factor with lead acid.

Charging is also somewhat better with the Tesla battery. Charge a lead acid battery at a 1/2C and it will boil. Charge the Tesla pack at 1/2C (42kW) and it might warm up a few degrees. Oh, and the charging losses at high rates are much less than lead acid also.
Overall, without continuing to yack about the technical aspects, it’s just a much better battery, takes up less space, weighs less, and has more power available.

There are likely decent arguments for other solutions, but the rest aside, this one won out because it was definitely more interesting.

Click past the break to read the rest of our interview with [wk057]!

Continue reading “An Interview With Tesla Battery Hacker [wk057]”

Tiny R/C P-51D Mustang Tips The Scales At 3 Grams

Commercial R/C aircraft have been getting smaller and smaller with each passing year. In the early 2000’s, a palm-sized plane or helicopter was the dream of many an R/C enthusiast. Today, you can pick them up for around $20 USD at the local mall. The smallest models however, are still built by an elite group of modelers. Weighing in at a mere 3 grams, [Martin Newell’s] P-51D mustang model certainly puts him into that group. While the P-51’s 11.6 cm wingspan may not make it the smallest plane in the world, its many functions make it incredible.

The Mustang is an 8 channel affair, with elevator, throttle, rudder, ailerons, flaps, navigation lights, working retracts, and flashing cannon lights. That’s Wright, we did say retracts, as in retractable landing gear on a 3 gram model.

All the Mustang’s flight surfaces feature fully proportional control. However, there are no closed loop servos involved. The flight surfaces use magnetic actuators, consisting of a tiny neodymium magnet surrounded by a coil of magnet wire. We’re not sure if the signals to these actuators is straight PWM or if [Martin] is varying the frequency, but the system works. The retracts use heat-sensitive Nitinol “muscle wire” along with a bellcrank system to make sure the landing gear is up and locked after takeoff, and comes down again before a landing.

We don’t have any in-flight video of the Mustang, but we do have footage of an even smaller 1.2 gram plane [Martin] has been flying lately. Click past the break to check it out!

Continue reading “Tiny R/C P-51D Mustang Tips The Scales At 3 Grams”

Test Your Signal With The WiFi Cup

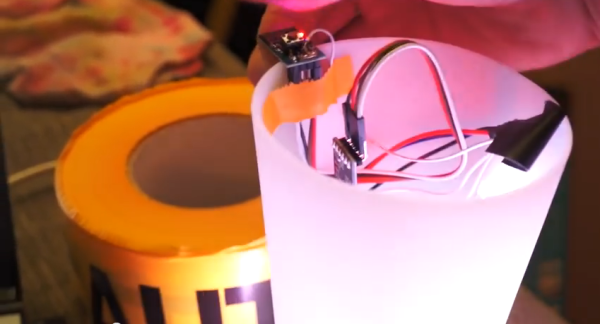
[CNLohr] wanted to test the WiFi range in his house. One look at his roommate’s cup and an unorthodox idea was born. The WiFi Cup used an ESP8266 to connect to his home network. For output, [CNLohr] also added a WS2812 LED strip to the cup. The ESP8266 was programmed to send UDP packets to [CNLohr’s] laptop. When the laptop responded back, the ESP8266 turned on the LEDs, lighting up the cup. The cup’s response to signal strength was very quick – about a second.

[CNLohr] took the WiFi Cup around the house. He was surprised to detect the connection in corners he didn’t expect; in fact, the signal wasn’t weakening at all! He proceeded to walk outside with it, hoping to see the signal strength decrease. As a testament to his roommate’s robust router, the cup merely flickered. Hoping for a better test, [CNLohr] switched out the router for a cheaper TP-Link with shorter antennas. While the initial ping test showed a slower response time, the cup detected WiFi around the house just fine. It only wavered for a couple of moments when it was placed inside a metal bucket. We have to wonder how thin [CNLohr’s] walls are. WiFi never works that well in our house!

Continue reading “Test Your Signal With The WiFi Cup”