Lint And Dog Hair Supercapacitor

[Mechanicus] has made a supercapacitor with a claimed 55 Farads per gram of active material. And he’s made it using dryer lint and dog hair. And he’s done it in 24 hours. That’s the short story. The longer story is an epic journey of self-discovery and dog ownership, and involves a cabin in the Wyoming backwoods.

So how did he do it?

He started with a home-made crucible that you maybe wouldn’t want to carry around in public as it bears more than a passing resemblance to a pipe bomb. Into that he packed his dog hair and lint, along with a generous helping of ammonia. An hour or two in a woodstove glowing red, and he’d made a rod of mostly carbon with the required high surface area. He sawed off a carbon slice, bathed it in lithium sulphate and potassium iodide electrolyte, and with the addition of a couple of pieces of stainless steel he had a supercapacitor.

Full details of his build can be found on the hackaday.io pages linked above, but there is also a handy YouTube video below the break.

Continue reading “Lint And Dog Hair Supercapacitor”

Re-Capping An Ancient Apple PSU

It sometimes comes as a shock when you look at a piece of hardware that you maybe bought new and still consider to be rather high-tech, and realise that it was made before someone in their mid-twenties was born. It’s the moment from that Waylon Jennings lyric, about looking in the mirror in total surprise, hair on your shoulders and age in your eyes. Yes, those people in their mid-twenties have never even heard of Waylon Jennings.

[Steve] at Big Mess o’Wires has a Mac IIsi from the early 1990s that wouldn’t power up. He’d already had the life-expired electrolytic capacitors replaced on the mainboard, so the chief suspect was the power supply. That miracle of technology was now pushing past a quarter century, and showing its age. In case anyone is tempted to say they don’t make ’em like they used to, [Steve]’s PSU should dispel the myth.

It’s easy as an electronic engineer writing this piece to think: So? Just open the lid, pop out the old ones and drop in the new, job done! But it’s also easy to forget that not everyone has the same experiences and opening up a mains PSU is something to approach with some trepidation if you’re not used to working with line power. [Steve] was new to mains PSUs and considered sending it to someone else, but decided he *should* be able to do it so set to work.

The Apple PSU is a switch-mode design. Ubiquitous today but still a higher-cost item in those days as you’ll know if you owned an earlier Commodore Amiga whose great big PSU box looked the same as but weighed ten times as much as its later siblings. In simple terms, the mains voltage is rectified to a high-voltage DC, chopped at a high frequency and sent through a small and lightweight ferrite-cored transformer to create the lower voltages. This means it has quite a few electrolytic capacitors, and some of them are significantly stressed with heat and voltage.

Forum posts on the same PSU identified three candidates for replacement – the high voltage smoothing capacitor and a couple of SMD capacitors on the PWM control board. We’d be tempted to say replace the lot while you have it open, but [Steve] set to work on these three. The smoothing cap was taken out with a vacuum desoldering gun, but he had some problems with the SMD caps. Using a hot air gun to remove them he managed to dislodge some of the other SMD components, resulting in the need for a significant cleanup and rework. We’d suggest next time forgoing the air gun and using a fine tip iron to melt each terminal in turn, the cap only has two and should be capable of being tipped up with a pair of pliers to separate each one.

So at the end of it all, he had a working Mac with a PSU that should be good for another twenty years. And he gained the confidence to recap mains power supplies.

If you are tempted to look inside a mains power supply you should not necessarily be put off by the fact it handles mains voltage as long as you treat it with respect. Don’t power it up while you have it open unless it is through an isolation transformer, and remember at all times that it can generate lethal voltages so be very careful and don’t touch it in any way while it is powered up. If in doubt, just don’t power it up at all while open. If you are concerned about high voltages remaining in capacitors when it is turned off, simply measure those voltages with your multimeter. If any remain, discharge them through a suitable resistor until you can no longer measure them. There is a lot for the curious hacker to learn within a switch mode PSU, why should the electronic engineers have all the fun!

This isn’t the first recapping story we’ve covered, and it will no doubt not be the last. Browse our recapping tag for more.

Is It A Stepper? Or Is It A Servo?

Almost everyone who is involved with 3D printing thinks to themselves at some point, “this could all be done using a closed-loop system and DC motors”. Or at least everyone we know. There’s even one commercial printer out there that uses servo control, but because of this it’s not compatible with the rest of the (stepper-motor driven) DIY ecosystem.

[LoboCNC] wanted to change this, and he’s in a unique position to do so, having previously built up a business selling PIC-based servo controllers. His “servololu” is essentially a microcontroller and DC motor driver, with an input for a quadrature encoder for feedback. The micro takes standard step/direction input like you would use to drive a stepper motor, and then servos the attached DC motor to the right position. It even signals when it has an error.
Continue reading “Is It A Stepper? Or Is It A Servo?”

Hacklet 105 – More Mind And Brain Hacks

A mind is a terrible thing to waste – but an awesome thing to hack. We last visited brain hacks back in July of 2015. Things happen fast on Hackaday.io. Miss a couple of days, and you’ll miss a bunch of great new projects, including some awesome new biotech hacks. This week, we’re checking out some of the best new mind and brain hacks on Hackaday.io

We start with [Daniel Felipe Valencia V] and Brainmotic. Brainmotic is [Daniel’s] entry in the 2016 Hackaday Prize. Smart homes and the Internet of Things are huge buzzwords these days. [Daniel’s] project aims to meld this technology with electroencephalogram (EEG). Your mind will be able to control your home. This would be great for anyone, but it’s especially important for the handicapped. Brainmotic’s interface is using the open hardware OpenBCI as the brain interface. [Daniel’s] software and hardware will create a bridge between this interface and the user’s home.


biofeed1Next we have [Angeliki Beyko] with Serial / Wireless Brainwave Biofeedback. EEG used to be very expensive to implement. Things have gotten cheap enough that we now have brain controlled toys on the market. [Angeliki] is hacking these toys into useful biofeedback tools. These tools can be used to visualize, and even control the user’s state of mind. [Angeliki’s] weapon of choice is the MindFlex series of toys. With the help of a PunchThrouch LightBlue Bean she was able to get the EEG headsets talking on Bluetooth. A bit of fancy software on the PC side allows the brainwave signals relieved by the MindFlex to be interpreted as simple graphs. [Angeliki] even went on to create a Mind-Controlled Robotic Xylophone based on this project.

brainhelmetNext is [Stuart Longland] who hopes to protect brains with Improved Helmets. Traumatic Brain Injury (TBI) is in the spotlight of medical technology these days. As bad as it may be, TBI is just one of several types of head and neck injuries one may sustain when in a bicycle or motorcycle accident. Technology exists to reduce injury, and is included with some new helmets. Many of these technologies, such as MIPS, are patented. [Stuart] is working to create a more accurate model of the head within the helmet, and the brain within the skull. From this data he intends to create a license free protection system which can be used with new helmets as well as retrofitted to existing hardware.

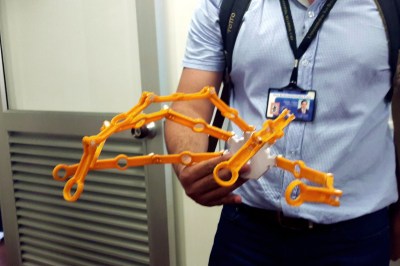
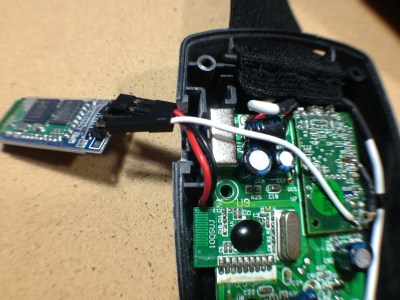
mindwaveFinally we have [Tom Meehan], whose entry in the 2016 Hackaday Prize is Train Your Brain with Neurofeedback. [Tom] is hoping to improve quality of life for people suffering from Epilepsy, Autism, ADHD, and other conditions with the use of neurofeedback. Like [Angeliki ] up above, [Tom] is hacking hardware from NeuroSky. In this case it’s the MindWave headset. [Tom’s] current goal is to pull data from the TAGM1 board inside the MindWave. Once he obtains EEG data, a Java application running on the PC side will allow him to display users EEG information. This is a brand new project with updates coming quickly – so it’s definitely one to watch!

If you want more mind hacking goodness, check out our freshly updated brain hacking project list! Did I miss your project? Don’t be shy, just drop me a message on Hackaday.io. That’s it for this week’s Hacklet, As always, see you next week. Same hack time, same hack channel, bringing you the best of Hackaday.io!

Megaprocessor Is A Macro Microprocessor

If we have to make a list of Projects that are insane and awesome at the same time, this would probably be among the top three right up there. For the past few years, [James Newman] has been busy building Megaprocessor – a huge micro-processor made out of transistors and LED’s, thousands of ’em. “I started by wanting to learn about transistors. Things got out of hand.” And quite appropriately, he’s based out of Cambridge – the “City of perspiring dreams“. The Why part is pretty simple – because he can. We posted about his build as recently as 10 months back, but he’s made a ton of progress since then and an update seemed in order.

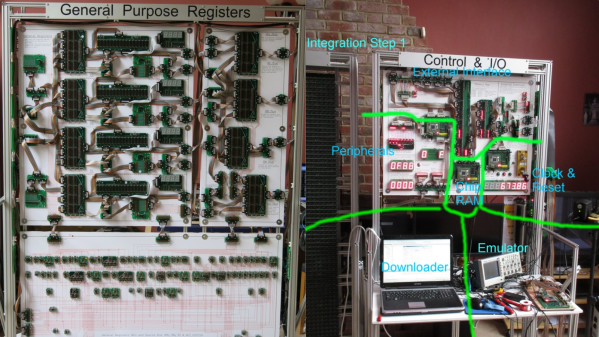
megaprocessor_04How big is it ? For starters, the 8-bit adder module is about 300mm (a foot) long – and he’s using five of them. When fully complete, it will stretch 14m wide and stand 2m tall, filling a 30 sq.m room, consisting of seven individual frames that form the parts of the Megaprocessor.

The original plan was for nine frames but he’s managed to squeeze all parts in to seven, building three last year and adding the other four since then. Assembling the individual boards (gates), putting them together to form modules, then fitting it all on to the frames and putting in almost 10kms of cabling is a slow, painstaking job, but he’s been on fire last few months. He has managed to test and integrate the racks shown here and even run some code.

The Megaprocessor has a 16-bit architecture, seven registers, 256bytes of RAM and a questionable amount of PROM (depending on his soldering endurance, he says). It sips 500W, most of it going to light up all the LED’s. He guesses it weighs about half a ton. The processor uses up 15,300 transistors and 8,500 LED’s, while the RAM has 27,000 transistors and 2,048 LED’s. That puts it somewhere between the 8086 and the 68000 microprocessors in terms of number of transistors. He recently got around to calculating the money he’s spent on this to date, and it is notching up over 40,000 Quid (almost $60,000 USD)!  You can read a lot of other interesting statistics on the Cost and Materials page.

Continue reading “Megaprocessor Is A Macro Microprocessor”

Windows 95 On An Apple Watch

What happens if the slick user interface and tight iOS integration of your Apple Watch leave you wanting more? A real operating system, from the days when men were men and computers were big grey boxes!

[Nick Lee] solved this unexpected problem with his Watch by getting a working copy of Windows 95 to run on it. On paper it shouldn’t be at all difficult, with a 520 MHz ARM, 512 MB of RAM, and 8GB of storage you might think that it would eclipse the quick 486s and low-end Pentiums we ran ’95 on back in the day with ease. But of course, the ability to run aged Redmond operating systems on a Watch was probably not at the top of the Apple dev team’s feature list, so [Nick] had to jump through quite a few hoops to achieve it.

As you might expect, the ’95 installation isn’t running directly on the Watch. In the absence of an x86 processor his complex dev process involved getting the Bochs x86 emulator to compile for the Watch, and then giving that a ’95 image to boot. The result is comically slow, with a 1-hour boot time and a little motor attached to the Watch to vibrate it and stop it going to sleep. It’s not in any way a useful exercise, after all who’d really want to use ’95 on a Watch? Internet Explorer 3 and The Microsoft Network, how handy! But it’s one of those “because you can” exercises, and we applaud [Nick] for making it happen. If you want to give it a try, his Bochs-forWatchOS code is on Github.

The video below the break shows the process of booting the ’95 Watch, opening the Start Menu, and running one of the card games. One can almost feel the lengthening shadows outside as it goes.

Continue reading “Windows 95 On An Apple Watch”

Don’t Tempt The Demo Gods

Including a live technical demonstration as part of a presentation is a lot like walking a tightrope without a net. Which isn’t to say that we don’t do it — we just keep our fingers crossed and bring our lucky horseshoe. The demo gods have smote [Quinn] a mighty blow, in front of a class at Stanford, no less.

IMG_1873-600x448

[Quinn]’s scratch-built computer, Veronica, failed to boot in front of a hall of eager students. When the pressure was off, in the comfort of her own lab, [Quinn] got to debugging. You should read her blog post if you’re at all interested in retrocomputing or troubleshooting of low-level hardware bugs. But if you just can’t spare the five minutes for a pleasant read, here’s a spoiler: watch out for flaky card-edge connectors. All’s well that ends well, with a game of pong.

We’ve been following Veronica from her very first clock cycles, so we’re happy to see her back on her feet again. Good job, [Quinn]!