Hackaday Prize Entry: SunLeaf

If there’s one place where the Internet of Things makes sense, it’s agriculture. From vast fields of soybeans, corn, and a different variety of corn, to the backyard garden, knowing how much sun, and rain crops get can vastly increase yields. For their Hackaday Prize project, [Adam] and [Shane] are building  a board designed explicitly for plants. It’s called the SunLeaf, and it has all the sensors and radios a good remote sensing board needs.

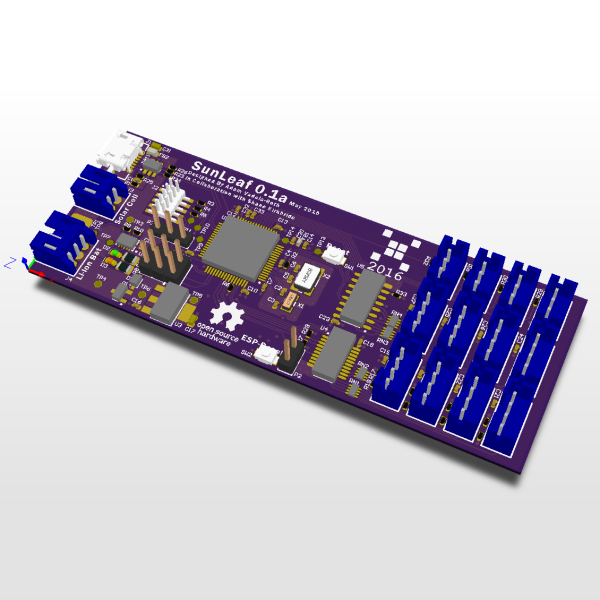
The SunLeaf is built around an ARM Cortex M4 microcontroller with an ESP8266 module for WiFi connectivity. Sensors are important for any remote sensing board, and for this the guys are going with SeeedStudio Grove connectors, providing four UARTs, four I2C, and four analog ports.For remote sensing applications, you generally can’t rely on mains power, so SunLeaf includes a port for a solar panel and a battery charger.

Although this project was originally a redesign of [Adam] and [Shane]’s Hackaday Prize entry from last year, what they’ve come up with is a great device for data logging, autonomous control, and environmental sensing for anything, from farms to weather stations.

The HackadayPrize2016 is Sponsored by:

GPS And SDR Combine Forces

Software-defined radio (or SDR) is a relatively new (to average tinkerers, at least) way of sending and receiving radio signals. The interest in SDR exploded recently with the realization that cheap USB TV tuner cards could be used to start exploring the frequency spectrum at an extremely reduced cost. One of the reasons that this is so advantageous is because of all of the options that a general-purpose computer opens up that go beyond transmitting and receiving, as [Chris] shows with his project that ties SDR together with GPS.

The goal of the project was to automatically tune a radio to the local police department’s frequency, regardless of location. To do this, a GPS receiver on a computer reports information about the current location. A JavaScript program feeds the location data to the SDR, which automatically tunes to the local emergency services frequencies. Of course, this relies on good data for what those frequencies are, but this is public information in most cases (at least in the US).

There are a lot of opportunities here for anyone with SDR. Maybe an emergency alert system that can tune to weather broadcasts if there’s a weather alert, or any of a number of other captivating projects. As for this project, [Chris] plans to use Google’s voice recognition software to transcribe the broadcasts as well. The world of SDR is at your fingertips to do anything you can imagine! And, if you’re looking to get started in it, be sure to check out the original post covering those USB TV tuner dongles.

This Arduino Console Has 64 Bit Graphics

Numbers are wonderful things when applied to technical specifications. Take [Bobricius]’ handheld Arduino-based game console. With an 8×8 LED matrix for a display it’s not going to win any prizes, but while he’s pushing the boundaries of dubious specification claims he’s not strictly telling any lies with his tongue-in-cheek statement that the graphics are 64-bit.

Jokes aside, it’s a neatly done build using a DIP version of the Arduino MCU and all through-hole components on a custom PCB. Power comes from a CR2032 cell, and it includes three buttons and a small piezoelectric speaker. He’s implemented a whole slew of games, including clones of Pong, Breakout, and Tetris, and judging by the video below it’s surprisingly playable.

Now you might look at this console and wonder what the big deal is. After all, there are plenty of similar designs to be found, and it’s nothing new. Of course, it’s a neat project for any hacker or maker, but we can see that this would make a great starter project for the younger person in your life who wants to try their hands at building something electronic. All through-hole construction for easy soldering, and a neat game at the end of it all.

He’s posted a full write-up of the design process as well as the hackaday.io page linked above, so if you fancy building one yourself there’s nothing to stop you too squeezing 64 bits of graphical goodness from an Arduino.

Continue reading “This Arduino Console Has 64 Bit Graphics”

Crappy Robots World Championship Announced

[Daiju Ishikawa] wrote us to announce that the world championship Hebocon is taking place this August in Tokyo, and the registration has just opened. When you get a mail in the tip line that reads “From all over the world, crappy robots with low technological ability will gather and fight to determine the worst made robot in the world.” you know it’s Hackaday!

“Heboi” is Japanese for clumsy or crappy. If your idea of fun is poorly made, but hilarious, robots trying to shove each other out of a sumo ring, then a local Hebocon might be for you. And if you think you’ve got what it takes to be a world champion, start looking into tickets to Japan. (It’s not coincidentally on the same day as Maker Faire Tokyo.)

Either way, you should check out the video, embedded below, which is a great introduction to the sport/pastime/whatever. It’s a fun introduction to the gentle art of robotry, for people who are more creative than technical. We think that’s awesome.

Continue reading “Crappy Robots World Championship Announced”

Hacklet 113 – New Robots

I start each day checking out the new and updated projects over on Hackaday.io. Each day one can find all manner of projects – from satellites to machine vision to rockets. One type of project which is always present are robots- robot arms, educational ‘bots, autonomous robots, and mobile robots. This week’s Hackaday.io had a few great robot projects show up on the “new and updated” page, so I’m using the Hacklet to take a closer look.

bot1We start with [Jack Qiao] and Autonomous home robot that does things. [Jack] is building a robot that can navigate his home. He’s learned that just creating a robot that can get itself from point A to point B in the average home is a daunting task. To make this happen, he’s using the Simultaneous Localization and Mapping (SLAM) algorithm. He’s implementing SLAM with the help of Robotic Operating System (ROS).  The robot started out as a test mule tethered to a laptop. It’s evolved to a wooden base with a mini ITX motherboard. Mapping data comes in through a Kinect V2, which will soon be upgraded to a Neato XV-11 LIDAR system.


tyrobotNext up is [Tyler Spadgenske] with TyroBot. TyroBot is a walking robot with some lofty goals, including walking a mile in a straight line without falling down. [Tyler’s] inspiration comes from robots such as Bob the Biped and Zowi. So far, TyroBot consists of legs and feet printed in PLA. [Tyler] is going to use a 32 bit processor for [TyroBot’s] brain, and wants to avoid the Arduino IDE at any cost (including writing his own IDE from scratch). This project is just getting started, so head on over to the project page and watch TyroBot’s progress!


friendbotNext is [Mike Rigsby] with Little Friend. Little Friend is a companion robot. [Mike] found that robots spend more time charging batteries than interacting. This wouldn’t do for a companion robot. His solution was to do away with batteries all together. Little Friend is powered by super capacitors. An 8 minute charge will keep this little bot going for 75 minutes. An Arduino with a motor shield controls Little Friend’s DC drive motors, as well as two animated eyes. If you can’t tell, [Mike] used a tomato as his inspiration. This keeps Little Friend in the cute zone, far away from the uncanny valley.


logi-botFinally we have the walking robot king, [Radomir Dopieralski], with Logicoma-kun. For the uninitiated, a Logicoma is a robot tank (or “logistics robot”) from the Ghost in the Shell series. [Radomir] decided to bring these cartoon tanks to life – at least in miniature. The bulk of Logicoma-kun is built carefully cut and sculpted acrylic sheet. Movement is via popular 9 gram servos found all over the internet. [Radomir] recently wrote an update outlining his new brain for Logicoma-kun. An Arduino Pro Mini will handle servo control. The main computer will be an ESP8266 running Micropython. I can’t wait to see this little ‘bot take its first steps.

If you want more robotic goodness, check out our brand new mobile robot list! Did I miss your project? Don’t be shy, just drop me a message on Hackaday.io. That’s it for this week’s Hacklet, As always, see you next week. Same hack time, same hack channel, bringing you the best of Hackaday.io!

Crowdfunding: A Wireless Oscilloscope

One of the most ingenious developments in test and measuring tools over the last few years is the Mooshimeter. That’s a wireless, two-channel multimeter that can measure voltage and current simultaneously. If you’ve ever wanted to look at the voltage drop and power output on a souped up electrified go-kart, the Mooshimeter is the tool for you.

A cheap, wireless multimeter was only the fevered dream of a madman a decade ago. We didn’t have smartphones with Bluetooth back then, so any remote display would cost much more than the multimeter itself. Now this test and measurement over Bluetooth is bleeding over into the rest of the electronics workbench with the Aeroscope,  a wireless Bluetooth oscilloscope.

[Alexander] and [Jonathan], the devs for the Aeroscope got the idea for this device while debugging a mobile robot. The robot would work on the bench, but in the field the problem would reappear. The idea for a wireless troubleshooting tool was born out of necessity.

The specs for the Aeroscope are about equal to the quite capable ‘My First Oscilloscope’ Rigol DS1052E. Analog bandwidth is 100MHz, sample rate is 500 Msamples/second, and the memory depth is 10k points. Resolution per division is 20mV to 10V, and the Aeroscope “Deluxe Package” that includes a few leads, tip, clip, USB cable, and case is about the same price as the Rigol 1052E. The difference, of course, is that the Aeroscope is a single channel, and wireless. That’s fairly impressive for two guys who aren’t a team of Rigol engineers.

As is the case with all Bluetooth test and measurement devices, the proof is in the app. Right now, the Aeroscope only supports iOS 9 devices, but according to the crowdfunding campaign, Android support is coming. Since the device is Open Source, you can always bang something out in Python if you really need to.

While this is a crowdfunding campaign, it’s hosted on Crowd Supply. Crowd Supply isn’t Indiegogo or Kickstarter; there are people at Crowd Supply vetting projects. The campaign still has a month to go, but the first few pledges are putting the Aeroscope right on track to a successful campaign.

Easy Bubble Watch Oozes Retro Charm

[Rafael] made a sweet little retro watch that’s a fantastic introduction to hardware DIY. If you’ve programmed an Arduino before, but you’ve never had a board made, and you are up for some SMD soldering, this might be for you. It’s got some small components, so ease off the coffee before soldering, but it’s nothing that you won’t be able to do. In the end, you’ll have something awesome.

Aesthetically, the centerpiece is the bubble display, which reminds us of the old HP calculator that our parents kept in the junk drawer, long after it had ceased to be relevant. It would return 3.9999999 for the square-root of 16, but we loved to play with it anyway. This watch will let you vicariously reclaim our childhood.

But that’s not all! It’s also an Arduino and RTC clock. Functions that are already implemented include clock, calendar, stopwatch, and “temperature”. (Temperature is from the AVR’s internal thermometer, which isn’t super-accurate and is probably just going to tell you how hot your wrist is anyway…) It’s got buttons, and tons of free flash space left over. It’s begging to be customized. You know what to do.

It’s not a smart watch, but it’s a great project. “The nostalgic retro bubble display is certain to flatter any hacker’s outfit.” Or something. OK, but we want one.

[via OSHpark’s Hackaday.io feed]