A Brief History Of Keyboard Encoding

Photoelectric encoder keyboard configured as ASCII

While typing away on our DIN, PS/2, USB or Bluetooth keyboards one of the questions which we rarely concern ourselves with is that of how the keyboard registers which keys we’re pressing. One exception here is when the keyboard can only register a limited number of simultaneous keypresses (rollover). Even though most keyboards today use a matrix which connects the keys, there are many configuration choices even here, which much like other keyboard configurations come with their own advantages and disadvantages. As a good primer we can look at this article by [Daniel Beardsmore] as he takes us through both historical and current-day keyboards.

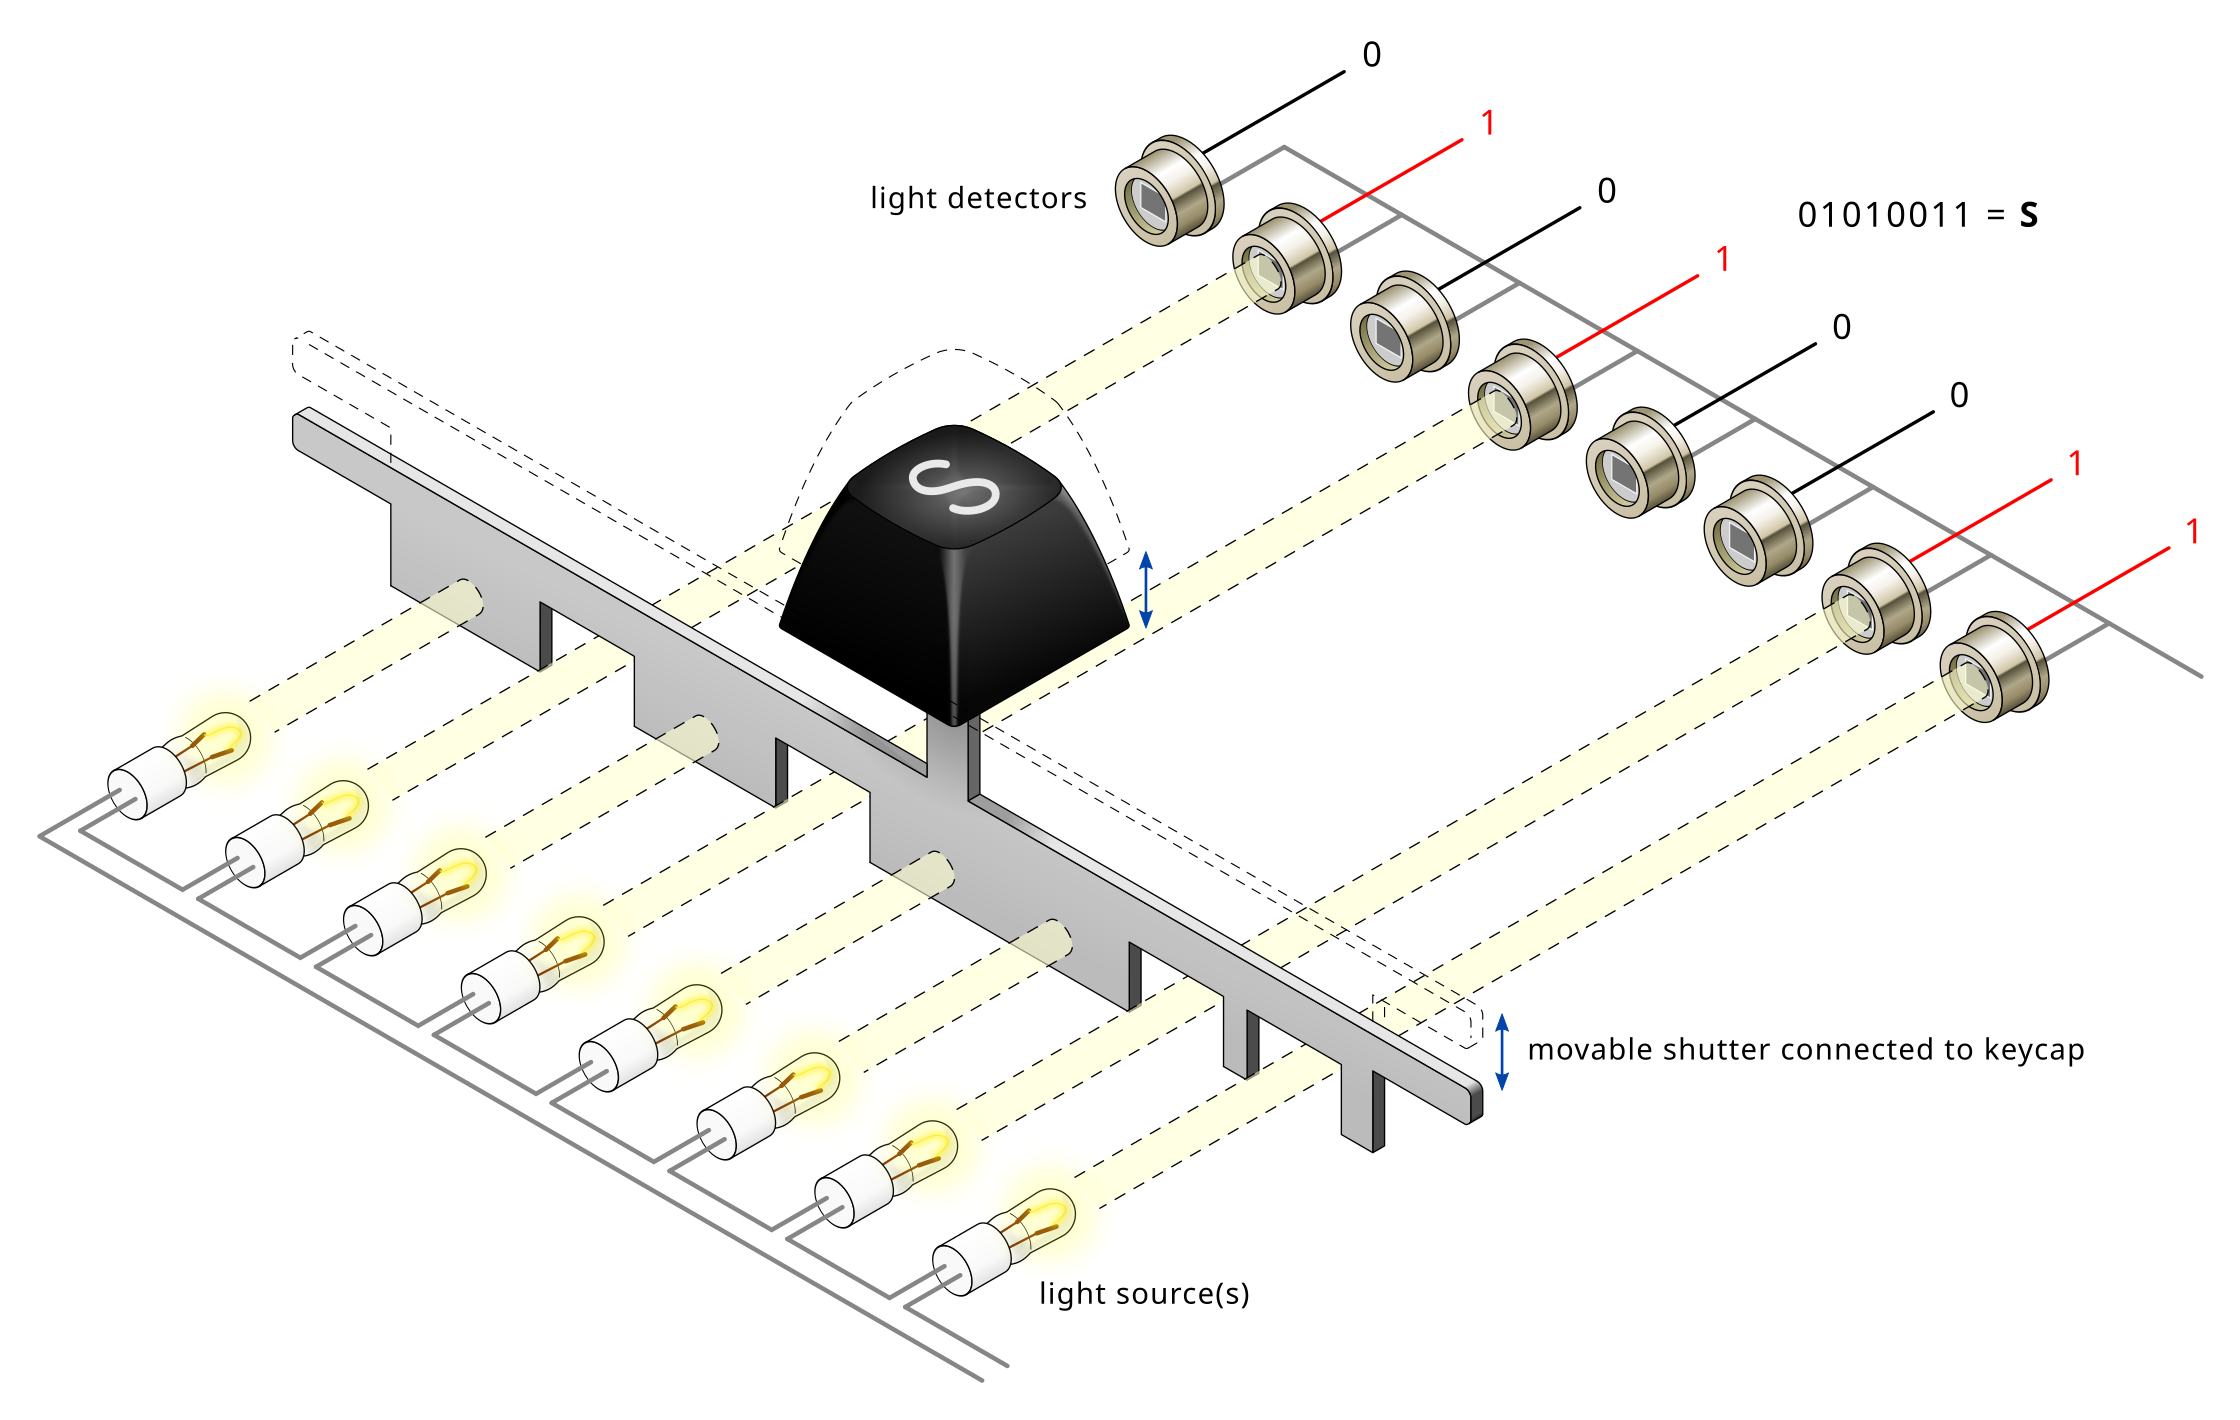
Especially before  it was realistic to just put an entire microcontroller with a look-up table into every keyboard, more inventive approaches were required to not only register keypresses, but also encode them for the host computer. The photoelectric approach of the 1960s was one such encoding method, before diode matrices became popular, along with more exotic encoding switches that contained their code already hard-wired on their multitude of pins. One inevitable limitation with these was that of a lack of multi-key support, leading to the development of matrix scan technology around 1970.

Matrix scanning keyboards allow for multiple key presses at the same time, tackle debouncing of keys and were at the forefront of what gives us the ubiquitous and generally boringly reliable keyboards which we use today.

On the left, the main board of the dual board computer, with the CPU and a bunch of connectors visible. On the right, the addon board is shown, with all the extra connectors as described in the article

A Nifty F1C100S Dual-Board Computer

The F1C100S (and the F1C200S) is a super simple CPU to use – it’s QFN, it has RAM built-in, and it can run Linux. It just makes sense that we bring it up to you once again, this time, on this dual-board computer by [minilogic]. The boards look super accessible to build for a Linux computer, and it’s alright if you assemble only one of them, too – the second board just makes this computer all that much nicer to use!

One the main board, you get the CPU itself, a couple USB ports, headphone and mic jacks, a microphone, a microSD socket, power management, SPI flash chip, plus some buttons, headers and USB-UART for debug. Add the second board, however, and you get a HDMI video output socket, a RGBTTL LCD header, LiIon battery support, RTC, and even FM radio with TV input.

One problem with this computer – it’s not open-source in the way that we expect and respect, as there’s no board files to be seen. However, at least the schematics are public, so it shouldn’t be hard, and the author provides quite a bit of example code for the F1C100S, which softens the blow. Until the design files are properly published, we can at least learn from the idea and the schematics. If you like what the F1C100S CPU offers, there are other projects you can take things from too, like this low-cost handheld we’re patiently waiting for, or this Linux-powered business card.

3D Printing Computer Space

The first computer game available as a commercial arcade cabinet is unsurprisingly, a rare sight here in 2024. Nolan Bushnel and Ted Dabney’s 1971 Computer Space was a flowing fiberglass cabinet containing a version of the minicomputer game Spacewar! running on dedicated game hardware. The pair would of course go on to found the wildly successful Atari, leaving their first outing with its meager 1500 units almost a footnote in their history.

Unsurprisingly with so relatively few produced, few made it out of the United States, so in the UK there are none to be found. [Arcade Archive] report on a fresh build of a Computer Space cabinet, this time not in fiberglass but via 3D printed plastic.

The build itself is the work of [Richard Horne], and in the video he takes us through the design process before printing the parts and then sticking them all together to make the cabinet. Without a real machine to scan or measure he’s working from photographs of real machines, working out dimensions by reference to other cabinets such as PONG that appear alongside them. The result is about as faithful a model of the cabinet as could be made, and it’s cut into the many pieces required for 3D printing before careful assembly.

This is the first in a series, so keep following them to see a complete and working Computer Space take shape.

Continue reading “3D Printing Computer Space

A Single Transistor Solid State Tesla Coil

Tesla coils are one of those builds that capture the interest of almost anybody passing by. For the naïve constructor, they look simple enough, but they can be finicky beasts—beasts that can bite if not treated with respect. [Mirko Pavleski] has some experience with them and shares it with us over on Hackaday.io. One of the first big improvements of this build style is the shift from the originally used spark gap commutator to that of a direct AC drive via a MOSFET oscillator. This improves the primary drive power for its size and eliminates that noisy spark gap. That’s one less source of broadband RF noise and the audible racket these produce.

A hand holding a secondary coil for a Tesla coil build
You can buy ready-wound secondary coils from the usual CN suppliers

The primary side of a Tesla coil is usually a handful of turns of thick wire to handle the current without melting. This build runs at two or three amps, giving a primary power of around 150 Watts. However, this is quite a small unit; with larger ones, the power is much higher, and the resulting discharge sparks much longer. On the secondary side, the air-coupled coil is formed from 520 turns of much thinner wire since it doesn’t need to convey so much current. That’s the thing with transformers with large turns ratios — the secondary voltage will be much higher, and the current will be correspondingly much lower. The idea with Tesla coils is that the secondary circuit forms a resonant circuit with the ‘top load’, usually some hollow metal can. This forms an LC circuit with a corresponding resonant frequency dependent on the secondary inductance values, the object’s capacitance and anything else connected. The primary circuit is designed to resonate at this same frequency to give maximum power coupling across the air gap. Changing either circuit can spoil this balance unless there is a feedback circuit to keep it in check. This could be with a sense coil, a local antenna or something more direct, like in this case.

To ensure the primary circuit doesn’t melt, it needs to be able to drive a reasonable current at this frequency, often in the low MHz range. This leads to a common difficulty: ensuring the switching transistor and rectifying diode are fast enough at the required current level with enough margin. [Mirko] points out several components that can achieve the operating frequency of around 1.7 MHz, which his top load configuration indicates.

For a bit more info on building these fascinating devices, you could check out our earlier coverage, like this useful guide. Of course, simple can be best. How about a design with just three components?

Continue reading “A Single Transistor Solid State Tesla Coil”

2024 Home Sweet Home Automation: [HEX]POD – Climate Tracker And Digital Nose

[eBender] was travelling India with friends, when one got sick. Unable to find a thermometer anywhere during COVID, they finally ended up in a hospital. After being evacuated back home, [eBender] hatched an idea to create a portable gadget featuring a few travel essentials: the ability to measure body temperature and heart rate, a power bank and an illumination source. The scope evolved quite a lot, with the concept being to create a learning platform for environmental multi-sensor fusion. The current cut-down development kit hosts just the air quality measurement components, but expansion from this base shouldn’t be too hard.

ML for Hackers: Fiddle with that Tensor Flow

This project’s execution is excellent, with a hexagon-shaped enclosure and PCBs stacked within. As everyone knows, hexagons are the bestagons. The platform currently hosts SCD41 and SGP41 sensors for air quality, a BME688 for gas detection, LTR-308 for ambient light and motion, and many temperature sensors.

On top sits a 1.69-inch IPS LCD, with an OLED display on the side for always-on visualization. The user interface is completed with a joystick and a couple of buttons. An internal blower fan is ducted around the sensor array to pull not-so-fresh air from outside for evaluation. Control is courtesy of an ESP32 module, with the gory details buried deep in the extensive project logs, which show sensors and other parts being swapped in and out.

On the software side, some preliminary work is being done on training TensorFlow to learn the sensor fusion inputs. This is no simple task. Finally, we would have a complete package if [eBender] could source a hexagonal LCD to showcase that hexagon-orientated GUI. However, we doubt such a thing exists, which is a shame.

There are many air quality sensors on the market now, so we see a few hacks based on them, like this simple AQ sensor hub. Let’s not forget the importance of environmental CO2 detection; here’s something to get you started.

Probes connected from a Pi Pico board to the SPI flash chip, with other end of the probes connected tot the level shifter circuit resistors

Motherboard Revived With Simplest 1.8V SPI Shifter Ever

If you have ever had to fix a modern desktop motherboard, you might have noticed that the BIOS (UEFI) SPI flash is 1.8V – which means you can no longer use a Raspberry Pi or a CH341 adapter directly, and you’d need to use a 1.8V level shifter of some sort. Now, some of us can wait for a 1.8V level shifter adapter from an online store of your choosing, but [treble] got a “BIOS flash failed” motherboard from Facebook Marketplace, and decided to make it work immediately.

She tells us a story about reviving the motherboard, and there’s one thing she shows that is interesting in particular – a very simple way to level shift 3.3V signals from a serprog-flashed Pi Pico down to the 1.8V that the flash chip required, something you are guaranteed to be able to build out of the parts in your parts bin, only requiring nine resistors and an NPN transistor. If you ever need to reflash BIOS on a modern motherboard, take note. As for 1.8V rail, she ended up tapping the 1.8V power pin of the SPI chip the motherboard itself to power the chip while programming it.

In the end, after swapping the two BIOS chips places and fixing a broken trace mishap, the motherboard booted, and works wonderfully to this day, a much-needed upgrade to [treble]’s toolkit that allows her to do RISC-V cross-compiling with ease nowadays. This is not the first time we see people reflash modern boards with 1.8V chips – if you want to learn more, check out this incredibly detailed writeup! Need to do some further debugging? Use your Pico as a POST card!

A map of the world with continents in light grey and countries outlined in dark grey. A nuber of yellow and grey circles with cartoon factories on them are connected with curved lines reminiscent of airplane flight paths. The lines have seemingly-arbitrary binary ones and zeros next to them. All of the grey factories are in the Americas, likely since IoP is currently focused on Africa and Europe.

Internet Of Production Alliance Wants You To Think Globally, Make Locally

With the proliferation of digital fabrication tools, many feel the future of manufacturing is distributed. It would certainly be welcome after the pandemic-induced supply chain kerfuffles from toilet paper to Raspberry Pis. The Internet of Production Alliance (IoP) is designing standards to smooth this transition. [via Solarpunk Presents]

IoP was founded in 2016 to build the infrastructure necessary to move toward a global supply chain based on local production of goods from a global database of designs instead of the current centralized model of production with closed designs. Some might identify this decentralization as part of the Fourth Industrial Revolution. They currently have developed two standards, Open Know-Where [PDF] and Open Know-How.

Open Know-Where is designed to help locate makerspaces, FabLabs, and other spaces with the tools and materials necessary to build a thing. The sort of data collected here is broken down in to five categories: manufacturing facility, people, location, equipment, and materials. Continue reading “Internet Of Production Alliance Wants You To Think Globally, Make Locally”