Custom Media Center Maintains Look Of 70s Audio Components

Slotting a modern media center into an old stereo usually means adding Bluetooth and a Raspberry Pi to an amp or receiver, and maybe adding a few discrete connectors on the back panel. But this media center for a late-70s Braun hi-fi (translated) goes many steps beyond that — it fabricates a component that never existed.

The article is in German, and the Google translation is a little spotty, but it’s pretty clear what [Sebastian Schwarzmeier] is going for here. The Braun Studio Line of audio components was pretty sleek, and to avoid disturbing the lines of his stack, he decided to create a completely new component and dub it the “M301.”

The gutted chassis of an existing but defunct A301 amplifier became the new home for a Mac Mini, Blu-Ray drive, and external hard drive. An HDMI port added to the back panel blends in with the original connectors seamlessly. But the breathtaking bit is a custom replacement hood that looks like what the Braun designers would have come up with if “media center” had been a term in the 70s.

From the brushed aluminum finish, to the controls, to the logo and lettering, everything about the component that never was shows an attention to detail that really impresses. But if you prefer racks of servers to racks of audio gear, this media center built into a server chassis is sure to please too.

Thanks to [Sascho] and [NoApple4Me] for the nearly simultaneous tips on this one.

Introducing The Hackaday Passive Aligned Ferrite Active Quantum Crystal Nanoparticle Reference Sticker

As you know, here at Hackaday we take our audio equipment very seriously indeed. We’ve seen it all over the years and have a pretty jaded view of a lot of the audiophile products that come past our door, but once in a while along comes something that’s a bit special. That’s why today we’d like to introduce you to a new product, The Hackaday Passive Aligned Ferrite Active Quantum Crystal Nanoparticle Reference Sticker.

Here’s the problem: we’re surrounded by electrical noise. You can’t see it, you can’t touch it, and you can’t hear it, but your audio equipment can, and when that happens it will degrade your listening experience without your realising it. You might have shelled out your life savings on a top-end Hinari amp, Marc Vincent surround sound processor, Friedland carillon wire cables and a set of Saisho floor-standing speakers, but if you haven’t dealt with your system’s magnetic compatibility they’re never quite going to reach their potential and you’ll always be left wondering why your broader soundstage just doesn’t zing. You need an HPAFAQCNRS.

Continue reading “Introducing The Hackaday Passive Aligned Ferrite Active Quantum Crystal Nanoparticle Reference Sticker”

I Think I Failed. Yes, I Failed.

Down the rabbit hole you go.

In my particular case I am testing a new output matching transformer design for an audio preamplifier and using one of my go to driver circuit designs. Very stable, and very reliable. Wack it together and off you go to test and measurement land without a care in the world. This particular transformer is designed to be driven with a  class A amplifier operating at 48 volts in a pro audio setting where you turn the knobs with your pinky in the air sort of thing. Extra points if you can find some sort of long out of production parts to throw in there for audiophile cred, and I want some of that.

img_2857-2
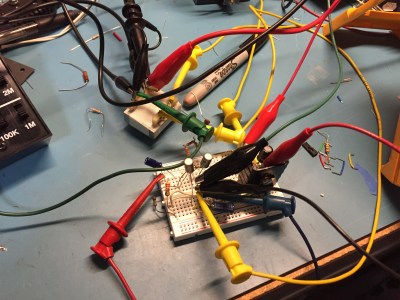
Lets use some cool retro transistors! I merrily go along for hours designing away. Carefully balancing the current of the long tailed pair input. Picking just the right collector power resistor and capacitor value to drive the transformer. Calculating the negative feedback circuit for proper low frequency cutoff and high frequency stability, and into the breadboard the parts go — jumper clips, meter probes, and test leads abound — a truly joyful event.

All of the voltages check out, frequency response is what you would expect, and a slight tweak to the feedback look brought everything right into happiness. Time to fire up the trusty old HP 334A Distortion Analyzer. Those old machines require you to calibrate the input circuit and the volt meter, tune a filter to the fundamental frequency you are applying to the device under test and step down to lower and lower orders of distortion levels until the meter happily sits somewhere in the middle of a range.

Most modern circuits in even cheap products just go right down to sub .1% total harmonic distortion levels without even a thought and I expected this to be much the same. The look of horror must have been pronounced on my face when the distortion level of my precious circuit was something more akin to a clock radio! A frantic search began. Was it a bad jumper, or a dirty lead in the breadboard, or an unseated component? Was my function generator in some state of disrepair? Is the Stephen King story Maximum Overdrive coming true and my bench is going to eat me alive? All distinct possibilities in this state of panic.

Continue reading “I Think I Failed. Yes, I Failed.”

Simple Vacuum Tube Preamp Results In A Beautiful Build

We have no intention of wading into the vacuum tube versus silicon debates audiophiles seem to thrive on. But we know a quality build when we see it, and this gorgeous tube preamp certainly looks like it sounds good.

The amp is an attempt by builder [Timothy Cose] to give a little something back to the online community of  vacuum tube aficionados that guided him in his journey into the world of electrons under glass. Dubbed a “Muchedumbre” – Spanish for “crowd” or “mob”; we admit we don’t get the reference – the circuit is intended as a zero-gain preamp for matching impedance between line level sources and power amplifiers. Consisting of a single 12AU7 in a cathode-follower design and an EZ81 for rectification, where the amp really shines is in build quality. The aluminum and wood chassis looks great, and the point-to-point wiring is simple and neat. We especially appreciate the neatly bent component leads and the well-dressed connections on the terminal strips and octal sockets. There’s a nice photo gallery below with shots of the build.

As much as we appreciate the miracles that can be accomplished with silicon, there’s still magic aplenty with vacuum tubes. For more thermionic goodness, check out these minimalist homebrew vacuum tubes or these artisanal vacuum tubes.

Continue reading “Simple Vacuum Tube Preamp Results In A Beautiful Build”

DSP 01: Real, Legit Audiophile Goodness

About six months ago, we saw [tshen2]’s work on the DSP 01, a 2-input, 6-output DSP and crossover for extreme audiophiles, and we’re not talking about oxygen free rooms here. The DSP 01 turns a USB audio output into six outputs that will give you perfectly flat eq across bass, mids, and highs, integrates with a 6x100W amplifier, and compensates for room noise. There was a huge update to the project recently and [tshen] is more than happy to share the details

Getting to this phase of the project hasn’t been without its problems. To get the DSP communicating to a computer through a USB port, [tshen2] found a potential solution in the CP2114 USB to I2S Bridge. This device should function as a USB audio sink, translating digital audio into something the DSP understands. This chip did not work in [tshen]’s design. The CP2114 simply does I2S wrong; the I2S spec says the clock must be continuous. This chip implements I2S with a SPI, firmware, and a few other things, making it incompatible with to-spec I2S.

While there was some problems with getting audio in to the device, the core of the device has remained unchanged. [tshen2] is still using the Analog Devices DSP, with the interesting SigmaStudio being used to compensate for the frequency response of the room. This real, legit, science-based audiophile territory here, and an impressive development for a field that – sometimes understandably – doesn’t get the respect it deserves.

tweeter

Repairing Burnt Speakers With A Steady Hand

[Martin] seems to have a knack for locating lightly damaged second-hand audio gear. Over the years he’s collected various types of gear and made various repairs. His most recent project involved fixing two broken tweeter speakers.

He first he needed to test the tweeters. He had to remove them from the speaker cabinet in order to gain easier access to them. The multimeter showed them as an open-circuit, indicating that they had likely been burned. This is an issue he’s seen in the past with this brand of speaker. When too much power is pumped through the speaker, the tiny magnet wire inside over heats and burns out similar to a fuse.

The voice coil itself was bathing in an oily fluid. The idea is to help keep the coil cool so it doesn’t burn out. With that in mind, the thin wire would have likely burned somewhere outside of the cooling fluid. It turned out that it had become damaged just barely outside of the coil. [Martin] used a sharp blade to sever the connection to the coil. He then made a simple repair by soldering the magnet wire back in place using a very thin iron. We’ve seen similar work before with headphone cables.

He repeated this process on the second tweeter and put everything back together. It worked good as new. This may have ultimately been a very simple fix, but considering the amount of money [Martin] saved on these speakers, it was well worth the minimal effort.

DIY Gas Can Speakers Blast Your Tunes

Gas Can Speaker

Have you ever wanted to build your own speakers, but were a bit overwhelmed with all the information out there on cases and packaging? A recent Instructable by [Txje] goes over how to build a set of simple gas can speakers.

While using gas cans as speaker housings will not result in the best audiophile quality sound or be the cheapest option out there, it sure looks awesome, and is a great way to get started with building your own speakers. After testing out the speakers and electronics, holes in the gas cans are cut and the terminals and speakers are installed. “As an added bonus, the pour spout serves to release pressure in the speaker can. You can get everything you need for ~$69 from Amazon and/or Home Depot.” Not a bad price point for two very cool looking speakers.  Once you have built the speakers, now you can experiment with different fill material to see what results in better sound quality.

This is a simple, yet fun looking build. Something like this can make a nice gift for someone who spends a lot of time in their garage. What other crazy objects have you used for speaker enclosures?