Hand-Built Metal Mouse Is Beautifully Engraved

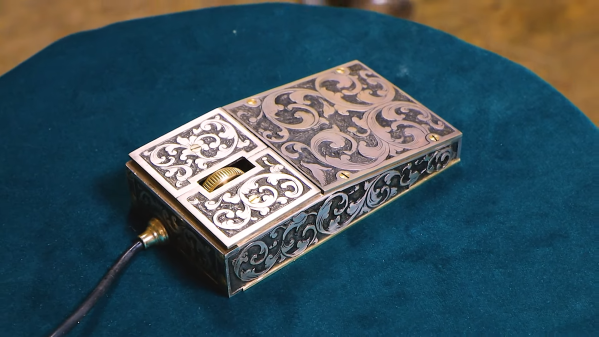
Computer mice, like computers themselves, used to be built almost solely in hideous beige designs. These days, things are a bit more stylish, but they’re still largely following a simple plastic formula. [Uri Tuchman] decided to build a fancy metal engraved computer mouse for a little more style on the desktop.

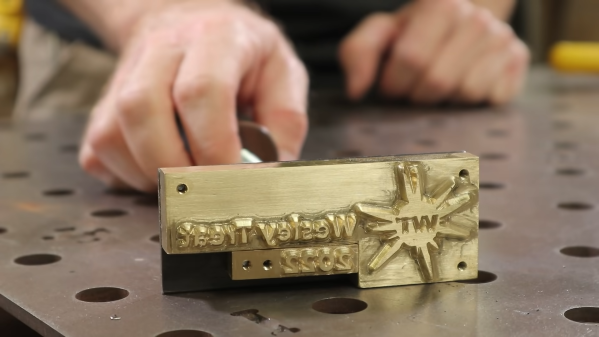
The build starts by gutting a simple three-button scroll mouse, as there’s really no sense in reinventing the wheel where the electronics is concerned. The PCB inside is pulled out and assembled on a brass baseplate, along with standoffs and supports for the mouse wheel as needed. It’s paired with a hefty brass enclosure with a nice gentle slope to sit well in the hand. Or, as well as it can, given the square  metal edges of the finished product.

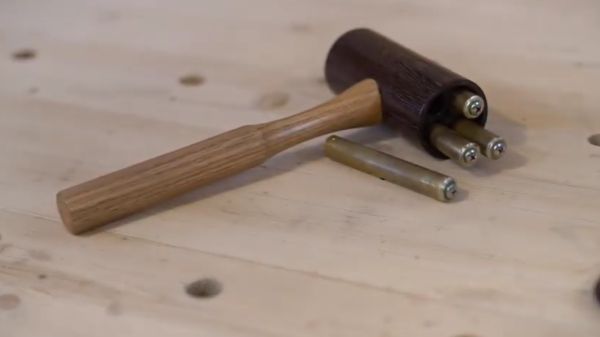
The build is full of fun details, like [Uri] trying to form a hex shaft by hand, and the work that goes into the engraving is similarly impressive. In any case, it’s a build that would pair wonderfully with a proper steampunk keyboard. Alternatively, if you hate the idea of having to do all that engraving by hand, think about building your own CNC machine. Video after the break.

Continue reading “Hand-Built Metal Mouse Is Beautifully Engraved”

Building A Custom Branding Iron With Swappable Date Blocks

Branding can be done on wood with just about any old bit of hot metal, but if you want to do it well, properly-crafted tooling will go a long way. [Wesley Treat] has built just that with this modular branding iron design.

The branding tooling itself is machined out of brass on an X-Carve CNC router, using [Wesley]’s own logo. The part is sanded after machining to remove tooling marks. A smaller brass slug is then machined with the numerals for various years with which [Wesley] may wish to stamp his projects.

Rather than hacking something sloppy together, the iron itself is assembled with a beautifully wood-turned handle of his own creation and a steel backing plate to hold the tooling. The date is separately removable from the main logo itself for easy changes in future. Naturally, the tool graphics are done in reverse so as to register the right way around when burned onto wood.

The tool is used with a torch to heat the brass up such that it can leave its impression on wooden surfaces. The final results are solid, if not quite perfect; getting the temperature across the tool perfectly matched would be key to getting the cleanest results. An electric heating element running in closed loop could be a way to achieve this.

Fundamentally, it’s a tidy way to mark your wooden projects in a hurry. We’ve seen wood burning reach even greater heights, too, such as with this CNC pyrography machine. Video after the break.

Continue reading “Building A Custom Branding Iron With Swappable Date Blocks”

Brass screen is soldered together into a large mold for cardboard pulp.

How To Make A Classy, Brassy Cardboard Pulp Mold

When we last checked in with prolific prototypist [Eric Strebel], he was perfecting the design of an eco-friendly wireless charger and turning his initial paper prototype into a chipboard version 2.0 that takes manufacturing concerns into consideration. At the end of this second video in a series, [Eric] was printing out the early versions of the form by which he would eventually make a brass screen mold for working with cardboard pulp. You know, the stuff that some egg cartons are made from.

Soldering brass screen into a mold.In the video below, it’s time to build the pulp mold by creating three smaller molds and then joining them into one horizontal mold. The result is a single piece that then gets folded up into a charging stand, much like the egg carton. [Eric] is using brass screen here, but says that copper would be a good choice, too.

After cutting the brass with scissors and pounding them flat, he uses the 3D-printed molds from the previous video to press them into the correct shapes. Each of the three pieces needs a frame, which [Eric] makes from more brass screen, then stitches it to the mold piece with loose screen threads before securing the unions with solder.

Since the weight of all the water would likely bend the brass out of shape, [Eric] finished off the mold by soldering on a frame of flat brass strip. Check out this awesome process below, and stay tuned for the next video when [Eric] pulps some cardboard and pumps out some eco-friendly chargers.

Does this look too complicated? You could always skip the whole mesh mold thing and shape your cardboard confetti directly into 3D printed parts.

Continue reading “How To Make A Classy, Brassy Cardboard Pulp Mold”

Robert Murray Smith Discusses Rivets and Riveting

Old School Fastener Tutorial Is Riveting

Whether you’re making, repairing, or hacking something together, we all need fastners. Screws, nuts and bolts, and pop rivets are handy sometimes. Various resins and even hot glue are equally useful. In some cases however the right fastener for the job eludes us, and we need another trick up our sleeve.

[Robert Murray Smith] found himself in such a position. His goal was to join two pieces of aluminum that need a nice finish on both sides. Neither glue, pop rivets, screws, nuts or bolts would have been appropriate.  [Robert] is always flush with ideas both new and old, and he resorted to using an old school fastener as explained as explained in his video “How To Make And Use Rivets“.

In the video below the break, [Robert] goes into great detail about making a simple rivet die from a 5mm (3/16”) piece of flat steel, creating the rivet from a brass rod, and then using the flush rivet to join two pieces of aluminum. The simple tooling he uses makes the technique available to anybody with a propane torch, a vise, some basic tools, and a simple claw hammer. We also appreciate [Robert]’s discussion of cold riveting, hot riveting, and annealing the rivets as needed.

Not only is riveting a technique thousands of years old, its advancement and application during the Industrial Revolution enabled technologies that couldn’t have existed otherwise. Hackaday’s own [Jenny List] did a wonderful write up about rivets in 2018 that you won’t want to miss!

Continue reading “Old School Fastener Tutorial Is Riveting”

Adjustable, Piston-Damped Hammer

When all you have is a hammer, every problem is a constant quest for an even better hammer, as the popular saying goes. At least, that seems to be [Ebenisterie Éloïse]’s situation. She wanted a deadblow hammer that not only had an aesthetically pleasing wood and brass construction, but also one that included adjustable dampers to make sure that each hammer swing is as efficient as possible.

For those unfamiliar with specialty hammers, dead blow hammers typically have some movable mass such as sand or lead shot within the hammer head. This mass shifts forward when the hammer strikes an object, reducing rebound of the hammer off of the object and transferring more energy into each strike. This hammer omits a passive mass in favor of four custom-machined brass tubes, each of which holds a weighted fluid, a spring, and brass weight. Each piston acts as a damper in a similar way to a shock absorber on a vehicle, and a screw and o-ring at the top of each one allows them to be adjustable by adding different weight fluids as needed. Some detailed testing of the pistons shows a marked improvement over any of the passive mass varieties as well.

Not only is this an incredible amount of detail and precision for a tool that is often wielded in a non-precise way (at least among those of us for who aren’t skilled craftspeople), but it is also made out of wood, leather, and brass which gives it an improved look and feel over a plastic and fiberglass hammer that is typical of most modern deadblow hammers. It even rivals this engineer’s hammer with its intricate custom engraving in craftsmanship alone.

Continue reading “Adjustable, Piston-Damped Hammer”

High-End Case Mods To A PlayStation 5

Modern consoles bring joy to televisions around the globe, but they’re fundamentally mass-produced totems to gaming excellence. That wasn’t good enough for [Matt], who decided that his PlayStation 5 needed a total case makeover. (Video, embedded below.)

The material of choice is brass. Capable of being polished to a mirror-like shine while being readily workable and available, it’s perfect for making a PlayStation 5 look just a little more deluxe. While [Matt] has worked with brass before, replicating the PS5’s case in the metal pushed him to learn new skills. The main center divider was easy enough, with paper used to create a cutting template to match the form which bends through 90 degrees. The real challenge, however, was the side panels. With complex curves across several axes, manually bending metal plates to match the shape proved impossible. Instead, a custom wooden and plaster jig was made, onto which brass plates could be clamped to match the curves. A blowtorch was then used to release the plate’s internal stresses in a process called normalisation.

[Matt] does a great job of making the whole thing look easy. With that said, the final results are stunning enough that we’re sure it would be difficult to replicate without a lot of experience and attention to detail. In particular, the deft way the side panel clips were dealt with had us nodding in sage approval. The final console makes a great companion for the brass-housed monitor [Matt] created for his [DIY Perks] channel quite recently. Video after the break.

Continue reading “High-End Case Mods To A PlayStation 5”

DIY USB-C Touch Monitor Is All Polished Brass

We’ve known for a while that you can buy interface boards to turn old laptop screens into standalone monitors, but complete sets with 4K panels and control boards are also now becoming widely available on sites like eBay and AliExpress, and prices are dropping. These sets are also available with low-profile connectors like micro HDMI and USB-C, which allow for some very compact builds.

[Matt] from [DIY Perks] used one of these sets to build a slimline USB-C monitor with a brass enclosure. Video after the break. The enclosure consists of brass sheets and U-channel pieces soldered and screwed together. There is quite a bit of residue and discoloration after soldering, but this was removed with a bit of sanding and polishing. A pair of adjustable legs were added to allow it to stand on its own, and an additional chamber on the back holds the control board, an old smartphone battery, and a battery protection circuit. [Matt] also added a pair of removable speakers, which are sealed speaker units covered in brass mesh and plate.

We’ve covered several DIY monitor builds over the years, and they are perfect as an additional monitor for a laptop, or for pairing with the Raspberry Pi 400 with its integrated keyboard. We really [Matt]’s builds, which include a smartphone-based 4K projector, and a very effective cooling system for an expensive DSLR camera. Continue reading “DIY USB-C Touch Monitor Is All Polished Brass”