True Networked KVM Without Breaking The Bank

For administering many computers at once, an IP KVM is an invaluable piece of equipment that makes it possible to get the job done over the network without having to haul a keyboard, monitor, and mouse around to each computer. The only downside is that they can get pricey, unless of course you can roll one out based on the Raspberry Pi and the PiKVM image for little more than the cost of the Pi itself.

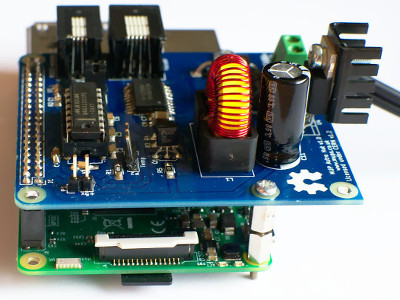
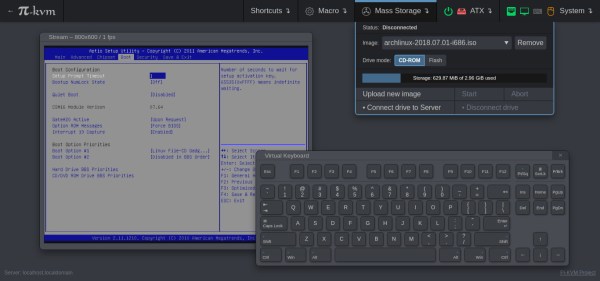
The video linked below shows how to set all of this up, which involves flashing the image and then setting up the necessary hardware. The build shows an option for using HDMI over USB, but another option using the CSI bus would allow for control over options like video resolution and color that a USB HDMI dongle doesn’t allow for. It also makes it possible to restart the computer and do things like configure BIOS or boot from removable media, which is something that would be impossible with a remote desktop solution like VNC.

The creator of PiKVM was mentioned in a previous post about the creation of the CSI bus capture card, and a Pi hat based on this build will be available soon which would include options for ATX controls as well. Right now, though, it’s possible to build all of this on your own without the hat, and is part of what makes the Pi-KVM impressive, as well as its very low cost.

Continue reading “True Networked KVM Without Breaking The Bank”

Baseball Cap Mouse Provides A Look-And-Click Interface

Once upon a time, the computer mouse didn’t exist. Early computers used a variety of other input devices, from the typical keyboard to more esoteric options such as joysticks or light pens. While the mouse as we know it dominates all, it doesn’t mean other tools can’t find their place. One such device is this hat mouse, from [Jacek Fedorynski].

The mouse consists of an Adafruit Feather nRF52840 Sense, mounted upon a basic baseball cap. The development board packs in a 9 degree-of-freedom motion sensor package featuring the ST LSM6DS33 acceleromater/gyro and LIS3MDL magnetometer. Through a robust sensor fusion algorithm, this enables the board to measure the orientation and motion of the wearer’s head with a great degree of finesse. This allows the user to look at different parts of the screen to move the mouse cursor, with the system working in an absolute rather than relative fashion. Commands are sent to the attached PC with the Feather’s built-in Bluetooth, avoiding the need for dangly cables running down the user’s neck. Files are available on Github for those eager to spin up their own.

Combined with some built-in accessibility aids in Windows, the setup allows the user to move the mouse well, with foot switches used to activate the left and right mouse buttons. For those who find using a traditional mouse difficult, this could be a great tool for better productivity. Of course, if you wish to learn more, it pays to take a look back at the very earliest days of mouse technology. Video after the break.

Continue reading “Baseball Cap Mouse Provides A Look-And-Click Interface”

A Baseball Cap That Films The Past

The vast majority of cameras will start recording at the press of a button. This is perfectly acceptable behaviour if you wish to film something that hasn’t happened yet. If you want to film something that’s already over, you’re out of luck. [Johan Link] has built a camera designed to do just that, however, and put it on a cap.

The project consists of a Raspberry Pi 3B, combined with a 1080p USB webcam and a 5000 mAh power bank. These are attached to a baseball cap in order to shoot footage from the point of view of the wearer. The camera records continuously, saving the last 7 seconds of recorded video when the button is pressed — perfect for capturing things just after they’ve happened.

It’s a rolling record feature similar to that included with many dashcams and action cameras. Software is available on Github for those interested. While [Johan] has chosen a New York Yankees hat as the basis for the build, we’re confident it should work similarly well with your Seattle Seahawks cap. Raiders fans should contact the garment manufacturer.

Sound-Triggered Eye Protection For The Forgetful Among US

Eyes are fragile things. They tend to fail under extreme heat, pressure, and are easily damaged by flying objects. Enterprising humans have developed a wide range of eye protection solutions, but most only work when the user remembers to put them on. [gocivici] had just such a problem, forgetting to put his safety glasses back on when working. Naturally, the solution was found through hacking.

The build starts with a regular baseball cap. [gocivici] fitted an Arduino nano, which is connected to a small microphone. The Arduino uses the microphone to determine the sound level in the room. Above a certain trigger level, the Arduino triggers a servo to move protective glasses into place in front of the wearer’s eyes, protecting them from flying shrapnel from whatever they may be working on.

It’s a fun build, that obviously still has the pitfall that you’re going to get hurt if you forget to wear your magic hat for the day. Another approach could be putting your multimeter display in your goggles so you never want to take them off in the first place. Video after the break.

Continue reading “Sound-Triggered Eye Protection For The Forgetful Among US”

A Drum Set In Your Pocket

Cargo pants can fit drumsticks in the pockets if you don’t mind them sticking out. They can also hold this drum set and still have enough room for a pair of headphones, some pens, and a small notebook. At least, guy’s cargo pants can fit all that. Now your pocket is decked out with enough music gear to compose and drum few drum loops and even scribble some notes. We can’t speak for [Tomash Ghz] carrying a notebook, but he wanted a drum set in his pocket badly enough to make a custom circuit board to bring to the 2017 Fasma Festival in Athens. He wrote code for a Teensy 3.2 which fits on the back of his PCB next to a 9V battery. Don’t be afraid, the smallest components are 0805 so even clumsy fingers will be able to build their own. The Gerber files and BOM are all available, so nothing is stopping you.

On the board, we find an array of op-amps to support headphone and line-level outputs, four big ole’ buttons to activate each type of drum: kick, tom, snare, and hat. Then we have four potentiometers to change the sound of each like pitch, decay/length, modulation, and distortion. Once the perfect pattern is recorded, it can be saved in non-volatile memory in case you run out of juice although it can run up to seven-and-a-half hours on one battery. If you find yourself invested in the hardware, there is also a video walk-through about using the drum machine so grab your notebook and beat it.

We have seen simpler drums in simpler chips, and even drums on an entirely different type of chip.

Continue reading “A Drum Set In Your Pocket”

A Gif-Playing Top Hat For FRC 2018!

In gearing up to mentor a team at the 2018 FIRST Robotics Competition, redditor [dd0626] wanted to do something cool that resonated with this year’s 8-bit gaming theme. Over the course of a few days, they transformed a top hat into a thematically encapsulating marquee: a LED matrix display loaded with gifs!

The display is actually a sleeve — made from shipping foam, a pillow case, and an old t-shirt — that fits over the hat, leaving it intact and wearable for future events. A Teensy3.6 displays the gifs on four WS2812 16×16 RGB LED matrices, and while a sheer black fabric diffuses the light, it’s still best viewed from several feet away. This is decidedly not intended to be a stealthy hat display.

To mitigate current draw, [dd0626] is using a 5V 30A DC/DC converter and keeping the brightness at a minimum — otherwise, each panel can pull up to 15A! To offset any dip in performance, they’ve bundled in a massive 22,400mAh, 24V battery pack to keep the hat running for a while. Despite all the hardware, the hat weighs under two pounds — eminently wearable for a long day of competition. Continue reading “A Gif-Playing Top Hat For FRC 2018!”

Astro Cat: Raspberry Pi Telescope Controller

When somebody tackles an engineering problem, there are two possible paths: they can throw together a quick and dirty fix that fits their needs (the classic “hack”, as it were), or they can go the extra mile to develop a well documented solution that helps the community as a whole. We cover it all here at Hackaday, but we’ve certainly got a soft spot for the latter approach, even if some may feel it falls into the dreaded territory of “Not A Hack”.

When [Gary Preston] wanted to control his telescope and astrophotography hardware, he took the second path in a big way. Over the course of several posts on his blog, [Gary] walks us though the creation of his open source Raspberry Pi add-on board that controls a laundry list of sensors and optical gear. Just don’t call it a HAT, while it may look the part, [Gary] is very specific that it does not officially meet the HAT specifications put out by the Raspberry Pi Foundation.

Even if you aren’t terribly interested in peering into the infinite void above, the extremely detailed write-up [Gary] has done contains tons of multidisciplinary information that you may find useful. From showing how to modify the Pi’s boot configuration to enable true hardware UART (by default, the Pi 3 ties it up with Bluetooth) and level shifting it with a ST3232 to a breakdown of the mistakes he made in his PCB layout, there’s plenty to learn.

Astro CAT is a completely open source project, with the hardware side released under the CERN Open Hardware License v1.2, and the INDI driver component is available under the GPL v3.

If this looks a bit daunting for your first stab at astrophotography with the Raspberry Pi, fear not. We’ve covered builds which can get you up and running no matter what your budget or experience level is.