5G Power Usage Is Making Phones Overheat In Warm Weather

As reported by ExtremeTech, the brand new 5G network is running into a major snag with mobile devices as Qualcomm 5G modems literally cannot handle the heat. After just a few minutes of use they’re going into thermal shutdown and falling back to measly 4G data rates. Reports by both PCMag and the Wall Street Journal (paywall) suggest that 5G-enabled phones consistently see problems when used in environments where temperatures hit or exceed 29.5 °C (85.1 °F).

The apparent cause is the increased power draw required by current 5G modems which make heavy use of beam forming and other advanced technologies to increase reception and perform processing on the received data. Unlike 4G and older technologies, 5G needs to have multiple antennas (three or more) to keep a signal, especially when you grab your shiny new smartphone with your millimeter-wave blocking hands.

The spin-off from all of this seems to be that perhaps 5G technology isn’t ready for prime-time, or that perhaps our phones need to have bigger batteries and liquid cooling to keep the 5G modem in it happy. Anyone up for modding a liquid cooling loop and (tiny) radiator into their phone?

Making Instant Ramen A Bit More Instant

Instant ramen, the favoured repast of the impecunious would-be tech genius! It’s cheap, of dubious nutritional value, and it only takes a minute to cook. But what if you are in the creative Zone to the extent that five minutes to boil water is too much? For that you need an automatic ramen cooker, which is what [Mayermakes] has created from an upcycled electric filter coffee maker.

A filter coffee maker is a surprisingly effective instant ramen cooker without modification, in that it already contains a hotplate and water boiler to dribble hot water on some noodles. But it lacks any means of adding the seasoning or the essential hot sauce, so he created a 3D-printed rotating hopper driven by a stepper motor, and a servo driven syringe, while coffee maker itself is given a solid state relay to switch it on.

Controlling the show is an Arduino MKR board, which serves up a web interface with the option of ramen as it comes, or ramen with hot sauce. The result is an automated pot of $0.49 noodles that will set no gourmet’s heart a-flutter. Then again, fine dining is not why instant ramen exists.

This appears to be our first ramen-cooking coffee pot, but we have seen a guitar made from noodles!

Continue reading “Making Instant Ramen A Bit More Instant”

Hackaday Links Column Banner

Hackaday Links: July 21, 2019

Ordering a PCB used to be a [Henry Ford]-esque experience: pick any color you like, as long as it’s green. We’ve come a long way in the “express yourself” space with PCBs, with slightly less than all the colors of the rainbow available, and some pretty nice silkscreening options to boot. But wouldn’t it be nice to get full-color graphics on a PCB? Australian company Little Bird thinks so, and they came up with a method to print graphics on a board. The results from what looks like a modified inkjet printer are pretty stunning, if somewhat limited in application. But I bet you could really make a splash with these in our Beautiful Hardware contest.

The 50th anniversary of the Apollo 11 landing has come and gone with at least as much fanfare as it deserves. Part of that celebration was Project Egress, creation of a replica of the Columbia crew hatch from parts made by 44 hackers and makers. Those parts were assembled on Thursday by [Adam Savage] at the National Air and Space Museum in an event that was streamed live. A lot of friends of Hackaday were in on the build and were on hand, like [Fran Blanche], [John Saunders], [Sophy Wong], and [Estefannie]. The Smithsonian says they’ll have a recording of the stream available soon, so watch this space if you’re interested in a replay.

From the “Don’t try this at home” department, organic chemist [Derek Lowe] has compiled a “Things I won’t work with” list. It’s real horror show stuff that regales the uninitiated with all sorts of chemical nightmares. Read up on chlorine trifluoride, an oxidizer of such strength that it’s hypergolic with anything that even approaches being fuel. Wet sand? Yep, bursts into flames on contact. Good reading.

Continuing the safety theme, machinist [Joe Pieczynski] offers this lathe tip designed to keep you in possession of a full set of fingers. He points out that the common practice of using a strip of emery cloth to polish a piece of round stock on either a wood or metal lathe can lead to disaster if the ends of the strip are brought into close proximity, whereupon it can catch and act like a strap wrench. Your fingers don’t stand a chance against such forces, so watch out. [Joe] doesn’t share any gory pictures of what can happen, but they’re out there. Only the brave need to Google “degloving injury.” NSFL – you’ve been warned.

On a happier note, wouldn’t it be nice to be able to print water-clear parts on a standard 3D printer? Sure it would, but the “clear” filaments and resins all seem to result in parts that are, at best, clearish. Industrial designer [Eric Strebel] has developed a method of post-processing clear SLA prints. It’s a little wet sanding followed by a top coat of a super stinky two-part urethane clearcoat. Fussy work, but the results are impressive, and it’s a good technique to file away for someday.

A Baseball Cap That Films The Past

The vast majority of cameras will start recording at the press of a button. This is perfectly acceptable behaviour if you wish to film something that hasn’t happened yet. If you want to film something that’s already over, you’re out of luck. [Johan Link] has built a camera designed to do just that, however, and put it on a cap.

The project consists of a Raspberry Pi 3B, combined with a 1080p USB webcam and a 5000 mAh power bank. These are attached to a baseball cap in order to shoot footage from the point of view of the wearer. The camera records continuously, saving the last 7 seconds of recorded video when the button is pressed — perfect for capturing things just after they’ve happened.

It’s a rolling record feature similar to that included with many dashcams and action cameras. Software is available on Github for those interested. While [Johan] has chosen a New York Yankees hat as the basis for the build, we’re confident it should work similarly well with your Seattle Seahawks cap. Raiders fans should contact the garment manufacturer.

An Epic Tale Of Thermistors: Tricks For Much Better Temperature Sensing

For years [Edward] has been building professional grade underwater sensing nodes at prices approachable for an interested individual without a government grant. An important component of these is temperature, and he has been on a quest to get the highest accuracy temperature readings from whatever parts hit that sweet optimum between cost and complexity. First there were traditional temperature sensor ICs, but after deploying numerous nodes [Edward] was running into the limit of their accuracy. Could he use clever code and circuitry to get better results? The short answer is yes, but the long answer is a many part series of posts starting in 2016 detailing [Edward]’s exploration to get there.

Orange is 12 bits, red is 24

The first step is a thermistor, a conceptually simple device: resistance varies with temperature (seriously, how much more simple can a sensor get?). You can measure them by tapping the center of a voltage divider the same way you’d measure any other resistance, but [Edward] had discarded this idea because the naive approach combined with his Arduino’s 10 bit ADC yielded resolution too poor to be worthwhile for his needs. But by using the right analog reference voltage and adjusting the voltage divider he could get a 20x improvement in resolution, down to 0.05°C in the relevant temperature range. This and more is the subject of the first post.

What comes next? Oversampling. Apparently fueled by a project featured on Hackaday back in 2015 [Edward] embarked on a journey to applying it to his thermistor problem. To quote [Edward] directly, to get “n extra bits of resolution, you need to read the ADC four to the power of n times”. Three bits gives about an order of magnitude better resolution. This effectively lets you resolve signals smaller than a single sample but only if there is some jitter in the signal you’re measuring. Reading the same analog line with no perturbation gives no benefit. The rest of the post deals with the process of artificially perturbing the signal, which turns out to be significantly complex, but the result is roughly 16 bit accuracy from a 10 bit ADC!

What’s the upside? High quality sensor readings from a few passives and a cheap Arduino. If that’s your jam check out this excellent series when designing your next sensing project!

External Buffer Boosts 3D Printer Filament Splicing On The Palette 2

There was a time when most of us thought the next logical step for desktop 3D printing was to add additional extruders and hotends, allowing the machine to print in multiple colors or materials. Unfortunately such arrangements quickly become ungainly, and even with just two extruders, calibration can be a nightmare. Because of this, development has been trending towards systems that use just one hotend and simply alternate the filament being fed into it. But such systems have their own problems.

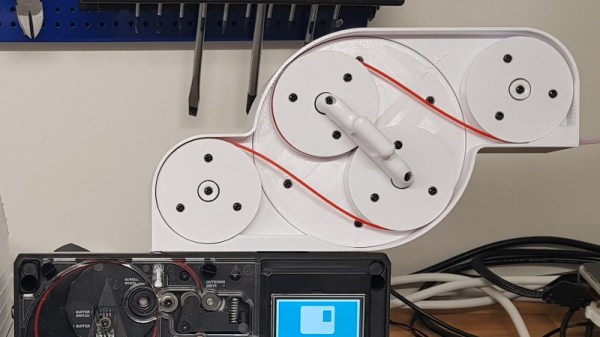
Arguably the biggest issue is how long it takes to switch filaments. The Palette 2 uses a physical buffer of spliced filament to try and keep ahead of the printer, but as [Kurt Skauen] demonstrates, there are considerable performance gains to be had by building a bigger buffer. He says there’s still some calibration issues to contend with, but judging by the video after the break, we’d say he is certainly on the right track.

The buffer is necessary to give the spliced filament time to cool and bond before being fed into the printer, but as currently designed, the machine simply can’t store enough of it to keep up with high print speeds. The stock buffer area holds 125mm worth of spliced filament, but the modification [Kurt] has designed adds a whopping 280mm on top of that to reach more than three times the stock capacity.

He’s successfully tested printing at speeds as high as 200mm/s with his upgraded buffer, a big improvement over what he was seeing with the original buffer area. This despite the fact that Mosaic (the company that produces the Palette) claim the original buffer size was already more than sufficient. It seems we’ve found ourselves in the middle of a debate between Mosaic and some very vocal members of the community, and while we don’t want to take sides, it’s hard to ignore [Kurt]’s findings.

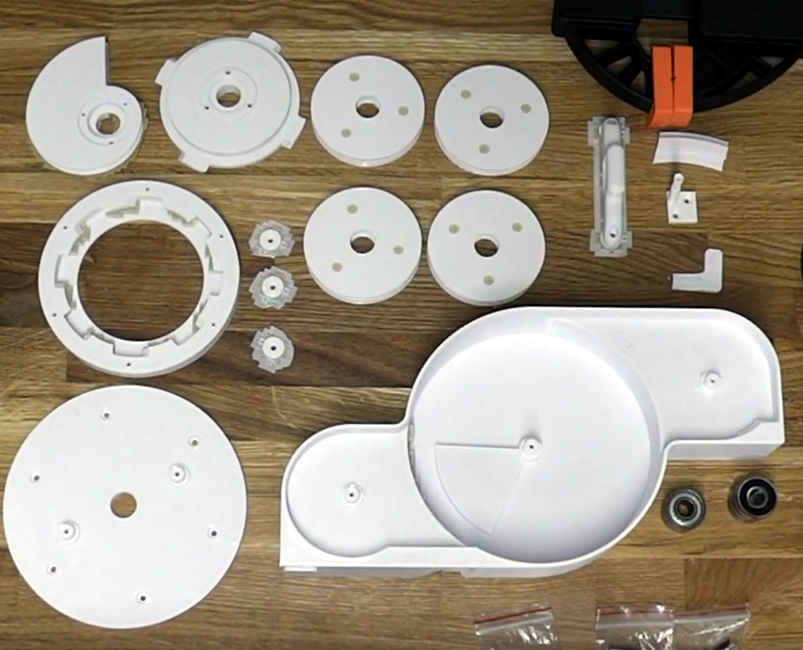
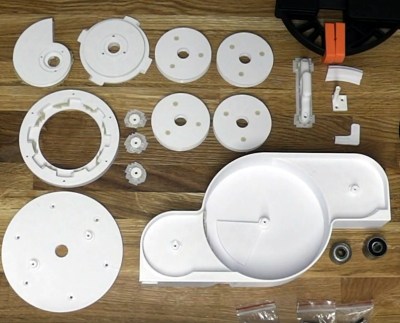
Want to make your own? [Kurt] has released all the information necessary for others to duplicate his work, including the STLs for all printed parts and a list of the bearings, springs, and fasteners you’ll need to put it together. It looks like a fairly large undertaking, but with the potential for such a considerable speed boost, we don’t doubt others will be willing to take the plunge. One person who printed and assembled an earlier version of the buffer upgrade reports their print speeds with a 0.8 mm nozzle have more than doubled.

The Palette has come a long way from we first saw it in 2016, and since then, Prusa has thrown their orange hat into the ring with their own filament-switching upgrade. Neither machine is without its niggling issues, but they’re still probably our best shot at taking desktop 3D printing to the next level.

Continue reading “External Buffer Boosts 3D Printer Filament Splicing On The Palette 2”

A New Motherboard For Amiga, The Platform That Refuses To Die

If you go out and buy a computer right now, how many choices do you really have? Generally speaking, there’s PC or Mac. If we were being generous you could consider Chromebook and perhaps even mobile, but let’s be honest, computing is a two-party system with the ability to dump the OS and run Linux as the obvious third-party disruptor. It wasn’t always like this.

In the early years of personal computing there were a slew of serious contenders. A PC, a Mac, an Atari ST, an Amiga, and several more that all demanded serious consideration on the general purpose desktop computer market. Of all these platforms, the Amiga somehow stubbornly refuses to die. The Amiga 1200+ from [Jeroen Vandezande] is the latest in a long procession of post-Commodore Amigas, and as its name suggests it provides an upgrade for the popular early-1990s all-in-one Amiga model.

It takes the form of a well-executed open-source PCB that’s a drop-in replacement for the original A1200 motherboard. CPU, RAM, and video are broken out onto daughterboards, with PCMCIA replaced by an SD card slot. The catch: it does require all the custom Amiga chips from a donor board.

The original Amiga 1200 was a significant upgrade to the architecture of the 1980s originals, and this certainly provides a much-needed enhancement to its underwhelming 68EC020 processor. It’s fair to say that this is the Amiga upgrade we’d all have loved to see in about 1996 rather than waiting until 2019. It’s still a delight for a retrogaming enthusiast; many of those who keep it alive remember the Amiga was the best multimedia platform that could be had for a few glorious years.

We’ve brought you a host of Amiga projects over the years, including the resurrection of an A500 and of course another A1200 PCB.

Thanks to [Eric Hill] for the tip.