Machinist Tools: Edge Finding

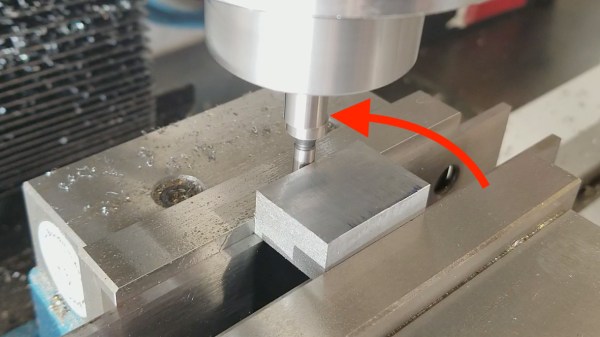
Machinists like to live on the edge, but they always want to know precisely where it is. If you’ve watched any machining videos (*cough*) then you’ve seen heavy use of digital readouts on machines. A “DRO” (as the cool kids call them) is a little computer that knows where the slides are, and thus where your cutter is on the piece. However, there’s a catch. DROs don’t know the absolute position of the spindle, they know the relative position of it. The bottom line is that a DRO is just a fancier version of the graduated scales on the hand wheels. The key difference is that the DRO doesn’t suffer from backlash, because it is measuring the slides directly (via glass scales similar to your digital caliper) rather than inferring position from rotations of the leadscrews. With traditional hand wheels, you have to compensate for backlash every time you change direction, and a DRO saves you from that (among other convenience features).

The point is that, whether old school or new, you still only get a relative coordinate system on your part. You need to establish an origin somehow. A useful way to do this is to set an origin at one corner of the part, based on its physical edges. How do you tell the DRO (or hand wheels) where the edges are? Enter the edge finder.

Continue reading “Machinist Tools: Edge Finding”

Steampunk-Inspired Art Clock!

Getting paid to do what you enjoy is a special treat. A machinist and fabricator by trade — hobbyist hacker by design — [spdltd] was commissioned to build a mechanical art installation with a steampunk twist. Having complete creative control, he convinced his client to let him make something useful: a giant electro-mechanical clock.

Pieced together from copper, brass, steel, aluminium, and stainless steel, this outlandish design uses an Arduino Yun — a combination Linux and Arduino microcontroller board — to control the stepper motor and query the internet for the local time. Upon boot, the clock auto-calibrates by rotating the clock face until a sensor detects an extra peg and uses that to zero on twelve o’clock; the Yun then grabs the local time over the WiFi and sends the stepper motor a-spinning ’till the correct time is displayed.

At first glance, you may find it hard to get an accurate read of what time it is, but an accent piece’s pegs denote the quarter hour once it lines up with the notch above each hour. At least this one doesn’t require you to match colours or do much math to check the time.

Continue reading “Steampunk-Inspired Art Clock!”

Machinist Magic: Gauge Block Wringing

In this age of patent trolls and multi-billion dollar companies that make intellectual property claims on plant genes and photographing objects against a white background, you’d be forgiven for thinking that a patent on a plain steel block would be yet another recent absurdity. But no – [Carl Edvard Johansson] got a patent for his “Gauge Block Sets for Precision Measurement” in 1901. As [AvE] shows us with a video on how gauge blocks can be “wrung” together, there’s more to these little blocks than meets the eye.

Gauge block wringing is probably nothing new to experienced machinists, but for the rest of us, it’s a pretty neat trick. To start the show, [AvE] gives us a little rundown on “Jo blocks” and what they’re good for. Basically, each block is a piece of tool steel or ceramic that’s ground and lapped to a specific length. Available in sets of various lengths, the blocks can be stacked end to end to make up a very precise measuring stick. But blocks aren’t merely placed adjacent to each other – they physically adhere to each other via their lapped surfaces after being wrung together. [AvE] demonstrates the wringing technique and offers a few ideas on how this somewhat mysterious adhesion occurs. It’s pretty fascinating stuff and puts us in the mood to get a gauge block set to try it ourselves.

It’s been a while since we’ve seen [AvE] around Hackaday – last time out he was making carbon foam from a slice of bread. Rest assured his channel has been going strong since then, with his unique blend of laughs and insight into the secret lives of tools. Definitely worth checking out, and still skookum as frig.

Continue reading “Machinist Magic: Gauge Block Wringing”

Fixing A Broken Bandsaw With A Custom Steel Part

When a large bandsaw broke down due to a cast iron part snapping in two, [Amr] took the opportunity to record the entire process of designing and creating a solid steel replacement for the broken part using a (non-CNC) mill and lathe.

For those of us unfamiliar with the process a machinist would go through to accomplish such a thing, the video is extremely educational; it can be sobering both to see how much design work happens before anything gets powered up, and just how much time and work goes into cutting and shaping some steel into what at first glance looks like a relatively uncomplicated part.

Continue reading “Fixing A Broken Bandsaw With A Custom Steel Part”

A Home CNC Built By Someone Who Knows Their Stuff

[thisoldtony] has a nice shop in need of a CNC. We’re not certain what he does exactly, but we think he might be a machinist or an engineer. Regardless, he sure does build a nice CNC. Many home-built CNCs are neat, but lacking. Even popular kits ignore fundamental machine design principles. This is alright for the kind of work they will typically be used for, but it’s nice to see one done right.

Most home-built machines are hard or impossible to square. That is, to make each axis move exactly perpendicular to the others. They also neglect to design for the loads the machine will see, or adjusting for deviation across the whole movement. There’s also bearing pre-loads, backlash, and more to worry about. [thisoldtony] has taken all these into consideration.

The series is a long one, but it is fun to watch and we picked up a few tricks along the way. The resulting CNC is very attractive, and performs well after some tuning. In the final video he builds a stunning rubber band gun for his son. You can also download a STEP file of the machine if you’d like. Videos after the break.

Continue reading “A Home CNC Built By Someone Who Knows Their Stuff”

Incredible Home Made Miniature Engines

On the heels of a small stirling engine we featured, an astute Hackaday reader sent in a few awesome builds from HMEM, the home model engine machinist forum.

First up is a fantastic looking stirling engine made entirely from scratch. The build is modeled on a Moriya Hot Air Fan, but instead of making a fan spin around, [IronHorse] put a flywheel on the engine. It also uses propane instead of an alcohol or other liquid fuel lamp for the heat source.

Next up is a pee-wee sized V8 engine by [stevehuckss396]. Unlike the model engines we’re used to, this one runs on gasoline. The engine started out as a 3 x 3 x 5 inch block of aluminum. This thread goes on an amazing 85 (!) pages and makes for great afternoon reading, but here’s a video of the engine in action.

Last is [keith5700]’s amazing 1/4 scale V8. Not only is this [keith]’s first project, he also completed this entire project on manual mills and lathes. There’s an electric starter thrown in there, and the pictures are simply incredible.

Thanks to [Norberto] for sending this one in, and if you’ve got an example of amazing machining skill, send it on it to the tip line.