Hackaday Podcast 016: 3D Printing With Steel, Molding With Expanded Foam, QUIP-Package Parts, And Aged Solder

Join Editors Elliot Williams and Mike Szczys to recap the week in hardware hacking. This episode looks at microfluidics using Shrinky Dinks, expanding foam to build airplane wings, the insidious effect of time on component solder points, and Airsoft BBs used in 3D printing. Finishing out the episode we have an interview with two brothers who started up a successful business in the Shenzhen electronics markets.

Take a look at the links below if you want to follow along, and as always, tell us what you think about this episode in the comments!

Take a look at the links below if you want to follow along, and as always, tell us what you think about this episode in the comments!

Direct download (60 MB or so.)

Continue reading “Hackaday Podcast 016: 3D Printing With Steel, Molding With Expanded Foam, QUIP-Package Parts, And Aged Solder”

Incredible Atari 800XL Case Restoration

If you’ve been hanging around Hackaday for a while, you know that a large portion of the stuff we publish goes above and beyond what most people would consider a reasonable level of time and effort. One could argue that’s sort of the point: the easy way out is rarely the most exciting and interesting route you can take. We, and by extension our readers, are drawn to the projects that someone has really put their heart and soul into. If the person who created the thing wasn’t passionate about it, why should we be?

That being said, on occasion, even we are left in awe about the lengths some people will go to. A perfect example of this is the absolutely insane amount of time and effort [Drygol] has put into restoring an Atari 800XL that looked like it was run over by a truck. Through trial, error, and a bunch of polyester resin, he’s recreated whole sections of the Atari’s case that were missing.

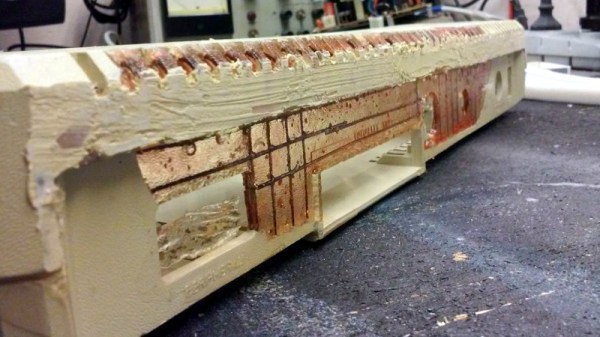
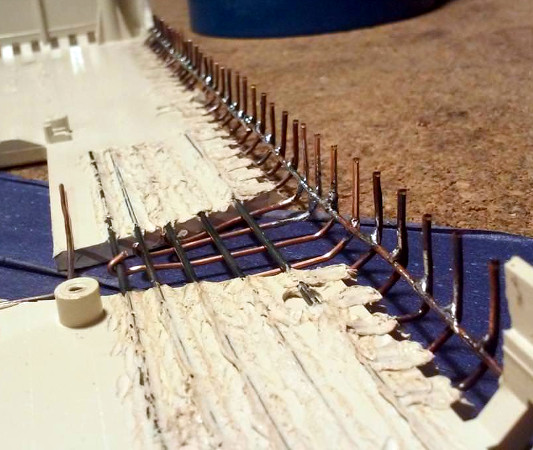
To start the process, [Drygol] used metal rods to bridge the areas where the plastic was completely gone. By heating the rods with a torch and pushing them into the Atari’s case, he was able to create a firm base to work from. Additional rods were then soldered to these and bent, recreating the shape of the original case. With the “skeleton” of the repair in palce, the next step was filling it in.

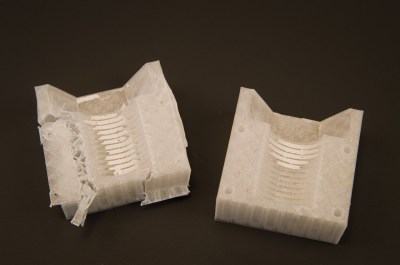
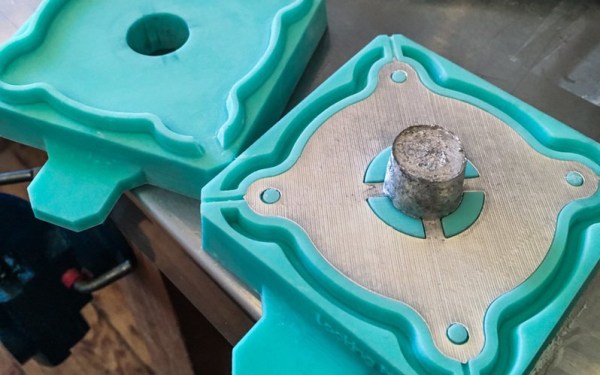
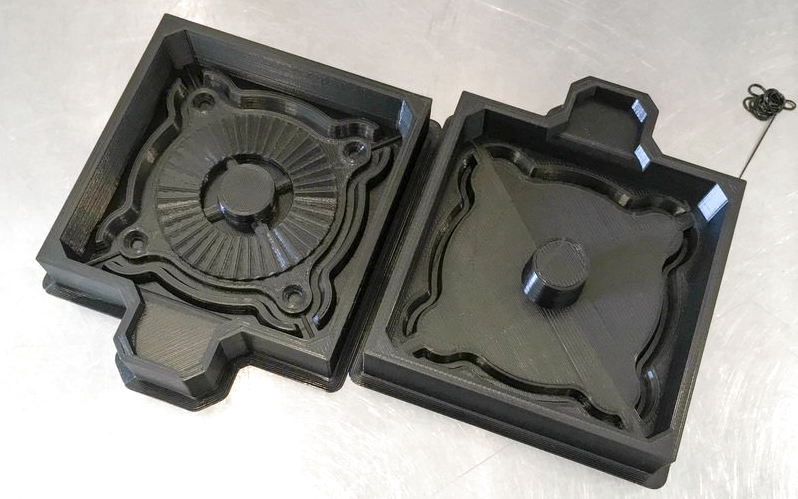
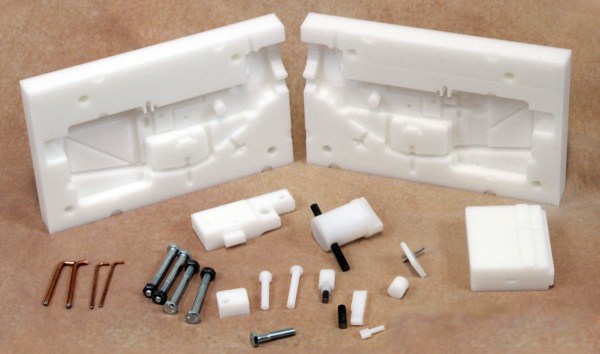
[Drygol] borrowed an intact Atari 800XL case from a friend, and used that to create a mold of the missing sections from his own case. Most of his rear panel was missing, so it took some experimentation to create such a large mold. In the end he used silicone and a custom built tray that the case could sit in vertically, but he does mention that he never quite solved the problem of degassing the silicone. The mold still worked, but bubbles caused imperfections which needed to be filled in manually during the finishing process.

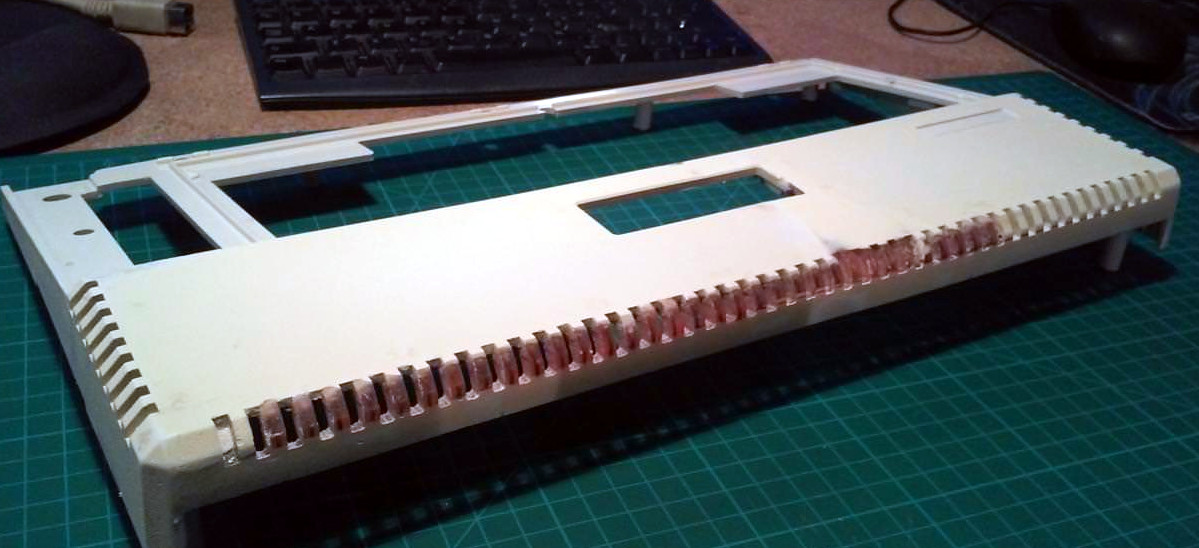
Using his silicone mold and the same tray, he was then able to pour polyester resin over the wire frame. This got him most of the way to rebuilding the case, but there was still plenty of filler and sanding required before the surface finish started to look half-way decent. When he got towards the very end of the finishing process, he used a mold he created of the case surface texture to roughen up the smooth areas left over from the filling process. Add a bit of custom spray paint, and the end result looks absolutely phenomenal considering the condition it was in originally.

We were already impressed by the work he put in during the first stages of the restoration, but this case repair is really on a whole new level. Between this and the incredible instructional videos [Eric Strebel] has been putting out, we’re really gaining a whole new respect for the power of polyester.

Continue reading “Incredible Atari 800XL Case Restoration”

Fail Of The Week: Casting A Bolt In A 3D-Printed Mold

Here’s a weird topic as a Fail of the Week. [Pete Prodoehl] set out to make a bolt the wrong way just to see if he could. Good for you [Pete]! This is a great way to learn non-obvious lessons and a wonderful conversation starter which is why we’re featuring it here.

The project starts off great with a model of the bolt being drawn up in OpenSCAD. That’s used to create a void in a block which then becomes two parts with pegs that index the two halves perfectly. Now it’s time to do the casting process and this is where it goes off the rail. [Pete] didn’t have any flexible filament on hand, nor did he have proper mold release compound. Considering those limitations, he still did pretty well, arriving at the plaster bold seen above after a nice coat of red spray paint.

One side of the mold didn’t make it

He lost part of the threads getting the two molds apart, and then needed to sacrifice one half of the mold to extract the thoroughly stuck casting. We’ve seen quite a bit of 3D printed molds here, but they are usually not directly printed. For instance, here’s a beautiful mold for casting metal but it was made using traditional silicon to create molds of the 3D printed prototype.

Thinking back on it, directly 3D printed molds are often sacrificial. This method of pewter casting is a great example. It turns out gorgeous and detailed parts from resin molds that can stand up to the heat but must be destroyed to remove the parts.

So we put it to you: Has anyone out there perfected a method of reusable 3D printed molds? What printing process and materials do you use? How about release agents — we have a guide on resin casting the extols the virtues of release agent but doesn’t have any DIY alternatives. What has worked as a release agent for you? Let us know in the comments below.

Casting Metal Parts And Silicone Molds From 3D Prints

The invention of the relatively affordable 3D printer for home use has helped bring methods used to produce parts for prototypes, samples, and even manufacturing, closer to designers. This tutorial on how to cast metal parts from 3D printed silicone molds is a perfect example of how useful a 3D printer can be when you are looking to make a custom and durable metal part at home.

After 3D printing a mold design using an Ultimaker 2 [Matt Borgatti] casts the mold using Smooth-On Mold Star 15 that can withstand heat up to 450 °F (232 °C), which he points out is ideal for the low-temp metal casting alloy tin-bismuth comprised of 58% Bismuth and 42% Tin with a melting point of 281 °F.

You may have heard of molds created from 3D printed parts before, but what makes this tutorial great is that the author, [Matt Borgatti], really sets you up to be successful. He offers up plenty of insights including mold-making techniques and terminology like why you would need a well and runners designed as part of your mold when casting with metal.

You can either reproduce his designs or use the tutorial to create your own which makes it a good start for beginners as well as another method to file away for people who already have experience 3D printing molds. This post is also really a twofer. Not only do you get detailed instructions for the method but [Matt Borgatti] uses his casted metal part for a flat-pack camera arm he designed to document projects with which you can also build using his files found on Thingiverse.

To create molds for precision parts and to learn more about using a 3D printer as a tool in the casting process, check out this method for creating higher resolution molds with a resin printer.

Continue reading “Casting Metal Parts And Silicone Molds From 3D Prints”

DIY Injection Mold Design For The Home Shop

3D printing is great for prototyping, and not bad for limited runs of parts. Unfortunately though it really doesn’t scale well beyond a few pieces, so when you’re ready for the mass market you will need to think about injection molding your parts. But something like that has to be farmed out, right? Maybe not, if you know a thing or two about designing your own injection molds.

The video below comes from [Dave Hakkens] by way of his Precious Plastic project, whose mission it is to put the means of plastic recycling into the hands of individuals, rather than relying on municipal programs.  We’ve covered their work before, and it looks like they’ve come quite a way to realizing that dream. This tutorial by [Dave]’s colleague [Jerry] covers the basic elements of injection mold design, starting with 3D modeling in Solidworks. [Jerry] points out the limitations of a DIY injection molding effort, including how the thickness of parts relates to injection pressure. Also important are features like gentle curves to reduce machining effort, leaving proper draft angles on sprues, and designing the part to ease release from the mold. [Jerry] and [Dave] farmed out the machining of this mold, but there’s no reason a fairly complex mold couldn’t be produced by the home gamer.

When you’re done learning about mold design, you’ll be itching to build your own injection mold machine. Precious Plastic’s tutorial looks dead simple, but this machine looks a little more capable. And why CNC your molds when you can just 3D print them?

Continue reading “DIY Injection Mold Design For The Home Shop”

Tools Of The Trade – Thermoforming

Chances are good that you’ve already lost some blood to thermoforming, the plastics manufacturing process that turns a flat sheet of material into an unopenable clamshell package, tray inside a box, plastic cup, or leftover food container.  Besides being a source of unboxing danger, it’s actually a useful technique to have in your fabrication toolchest. In this issue of Tools of the Trade, we look at how thermoforming is used in products, and how you can hack it yourself.

The process is simple; take a sheet of plastic material, usually really thin stuff, but it can get as thick as 1/8″, heat it up so that it is soft and pliable, put it over a mold, convince it to take all the contours of the mold, let it cool, remove it from the mold, and then cut it out of the sheet. Needless to say, there will be details.

https://commons.wikimedia.org/wiki/File:Thermoforming_animation.gif

Continue reading “Tools Of The Trade – Thermoforming”

DIY Cast AR-15 Receivers Are More Interesting Than Expected

For some reason the US News media decided on the AR-15 as the poster child of guns that should not be allowed to be made for, or sold to, the consumer. The words still out on the regulation, but, in a very American response, a whole market sprang up around people saying, “Well, then we’ll just make our own AR-15.”

Ordinarily, we wouldn’t cover this sort of thing, but the work [AR-15Mold] is doing is just so dang interesting. They sell a product that enables the home user to cast an AR-15 receiver out of high performance resin. In the process they made a really informative three part video on the casting process.

A lot of people are interested in the product, and having fun with it. In this two part video series, [Liberty Marksman] cast their receivers and test them to destruction. In one video they see how many rounds they can fire out of the gun before it breaks. When it breaks, they excitedly tear down the gun to see where it failed.

It’s quite a bit of fun to watch. Videos after the break.

Continue reading “DIY Cast AR-15 Receivers Are More Interesting Than Expected”