On-Demand Manufacturing Hack Chat

Join us on Wednesday, March 4 at noon Pacific for the On-Demand Manufacturing Hack Chat with Dan Emery!

The classical recipe for starting a manufacturing enterprise is pretty straightforward: get an idea, attract investors, hire works, buy machines, put it all in a factory, and profit. Things have been this way since the earliest days of the Industrial Revolution, and it’s a recipe that has largely given us the world we have today, for better and for worse.

One of the downsides of this model is the need for initial capital to buy the machines and build the factory. Not every idea will attract the kind of money needed to get off the ground, which means that a lot of good ideas never see the light of day. Luckily, though, we live in an age where manufacturing is no longer a monolithic process. You can literally design a product and have it tested, manufactured, and sold without ever taking one shipment of raw materials or buying a single machine other than the computer that makes this magic possible.

As co-founder of Ponoko, Dan Emery is in the thick of this manufacturing revolution. His company capitalizes on the need for laser cutting, whether it be for parts used in rapid prototyping or complete production runs of cut and engraved pieces. Their service is part of a wider ecosystem that covers almost every additive and subtractive manufacturing process, including 3D-printing, CNC machining, PCB manufacturing, and even final assembly and testing, providing new entrepreneur access to tools and processes that would have once required buckets of cash to acquire and put under one roof.

Join us as we sit down with Derek and discuss the current state of on-demand manufacturing and what the future holds for it. We’ll talk about Ponoko’s specific place in this ecosystem, and what role outsourced laser cutting could play in getting your widget to market. We’ll also take a look at how Ponoko got started and how it got where it is today, as well as anything else that comes up.

join-hack-chatOur Hack Chats are live community events in the Hackaday.io Hack Chat group messaging. This week we’ll be sitting down on Wednesday, March 4 at 12:00 PM Pacific time. If time zones have got you down, we have a handy time zone converter.

Click that speech bubble to the right, and you’ll be taken directly to the Hack Chat group on Hackaday.io. You don’t have to wait until Wednesday; join whenever you want and you can see what the community is talking about.

Show Us Your Human Interface; Win Laser Cutting Time

Our newest Hot List is Human Interfaces. This is anything you’ve designed into your project to interact with people. And we want to see it all! Do you have something bristling with buttons, boasting many LCD screens, hosting controls organized with the principles of Feng Shui, or intuitively voice activated? Show us the user interface you’re proud of and you could win one of thirty $100 gift cards for Ponoko laser cutting service.

We’re in the thick of judging the Wheels, Wings, and Propellers hot list from this week. We’ll be announcing the rankings in the coming days, but for now you need to get your project onto the Your Human Interface hot list. Here’s what you need to do before Thursday, 7/16/15:

Good luck, and per usually we’d like to encourage you to Vote this week. It’s a great way to explore the entries in this year’s 2015 Hackaday Prize, and you just might win $1000 from the Hackaday Store just for voting!

The 2015 Hackaday Prize is sponsored by:

Your Halloween Costume May Be Cool, But It’s Not Laser-Cut Cardboard Vintage Airplane Cool

While others are absorbed in baseball playoffs, [Aidan] has spent his recent Octobers planning incredible Halloween costumes for his son. We don’t know what he did last year, but there’s no way it’s better than this laser-cut cardboard airplane costume.

He had a few specs in mind and started with a model of a Grumman F4F-4 Wildcat from 3D Warehouse. Using SketchUp, he simplified the model and removed the landing gear and the propeller. [Aidan] created a simpler model on top of that, and set to work changing the proportions to make it adorable and toddler-sized.

To build around his son’s proportions, he inserted a 10-inch diameter scaled tube vertically into the model and squished down the fuselage in SketchUp. The plan was to have it laser-cut by Ponoko, which meant turning the design into flat pieces for them to cut. He ended up with 58 parts, many of them mirror images due to the symmetry of his design.

When the box from Ponoko arrived, [Aidan] was giddy. He was astonished at the quality of the pieces and found the plane very satisfying to build. But, he didn’t stop there. Using LayOut, he created a custom instrument cluster with reflections and shadows. The plane also has a Wii steering wheel, a motorized propeller, and of course, decals.

A Laser Cut Word Clock

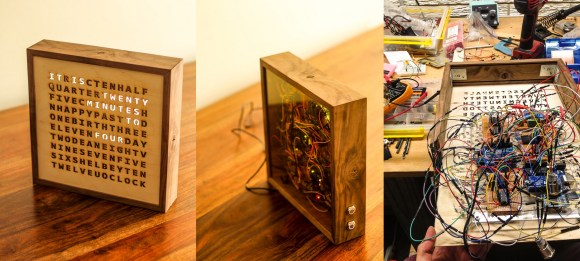
DIY laser cut word clock.

What is a word clock? A word clock is a clock that displays the time typographically that is also an interactive piece of art. Rather than buy one for $1500, [Buckeyeguy89] decided to build one as a present for his older brother. A very nice present indeed!

There are many different things that come into play when designing a word clock. The front panel is made from a laser cut piece of birch using the service from Ponoko. Additionally, white translucent pieces of acrylic were needed to keep each word’s light from bleeding into the neighboring letters. The hardware uses two Arduinos to control the LEDs and a DS3231 RTC for keeping accurate time. The results are very impressive, but it would sure make assembly easier if a custom PCB was used in the final version. For a one-off project, this makes a great birthday present.

The craftsmanship of this word clock is great, making it well suited for any home. What projects have you built that involve more than just electronics? Sometimes, quality aesthetics make all the difference.

“Counting Box” Also Saves Calculators From Small Children

[Nathan]’s son really loves numbers and counting, and one of his favorite things to do is add 1 to a calculator over and over again. Being the awesome dad that he is, [Nathan] built his son a counting box that has a 10-digit rotary switch and two arcade buttons to add and subtract.

One goal of the project was to have the counting box retain memory of the display while being powered off. The easiest way to do this is to write the display data to the ATmega’s EEPROM. This EEPROM is only rated for 100,000 write cycles (although in practice it’s much higher), so [Nathan] included a 24LC256 in a little spasm of over-engineering. All the electronics are laid out on perf board, and the case is constructed from bamboo that was laser cut by Ponoko. The quality of the case itself is fairly remarkable – we’re really impressed with the finish and the magnetic battery access door.

From experience, we know that playing with an HP-15C eventually leads to a broken calculator and having our Nintendo taken away. We’re really happy for [Nathan]’s son, and wish we had our own counting box at his age.

BAMF2011: Google’s SKPR Bot, Not For Arachnophobes

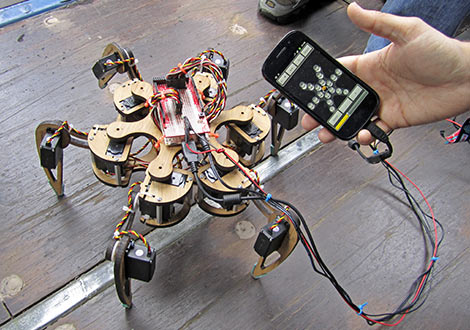
Google’s Maker Faire exhibit space is swarmed with robots…er, androids. Amidst some cool bipeds and Segway-balancers, our inner sci-fi nerd was most smitten with this hexapod design, which they’ve dubbed SKPR Bot. The “Skipper” is on hand to showcase the ease of various Google technologies: SketchUp, Android OS and the Android Open Accessory Development Kit. The whole project came together in less than six weeks.

18 servos are mounted to a framework designed in SketchUp and laser-cut by Ponoko. The low-level servo PWM control is handled by the Dev Kit (essentially a rebadged Arduino Mega, as we’ve seen), while an Android OS phone provides a slick GUI and handles all the inverse kinematics calculations required as the robot takes each step. The coolest bit is that it’s all up for grabs. At this moment you’ll have to scrounge around the ’net a bit to find the plans and code, but some time post-Faire they plan to bring everything together at the SKPR Bot site.

Nixie Tubes Live In A Cool Box

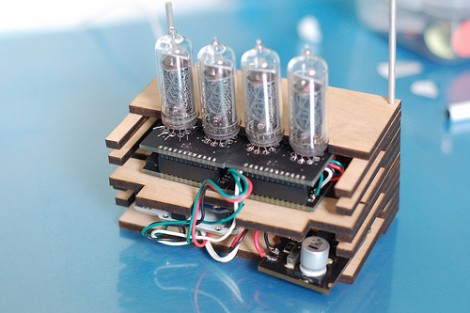
This set of four Nixie tubes display the number of people following bildr on Twitter. That’s neat; it uses an Arduino and some open source driver boards. But what caught out eye is the enclosure. The image above shows only half, but when assembled it’s a nice little cube that keeps the insides safe. This was laser cut using the Ponoko service and kicks off a design contest. Come up with the best idea for using 4 Nixies, their drivers, and $50 worth of Ponoko’s services and they’ll give you the materials to make it happen.