Giant DIY Mouse Sets The Ball Free

Make the move to a split keyboard and the first thing you’ll notice is that you have all this real estate between the two halves. (Well, as long as you’re doing it right). This is the perfect place to keep your cat, your coffee cup, or in [Jacek]’s case, your fantastic DIY trackball mouse.
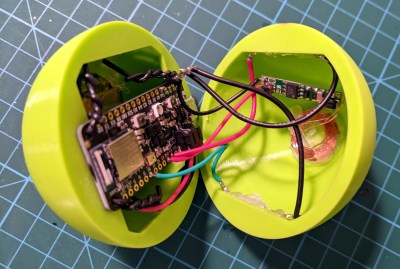
Don’t be fooled by the orange plastic base — all the electronics are rolled up inside that big sexy ball, which [Jacek] printed in two halves and glued together. Inside the ball there’s an Adafruit Feather nRF52840 Sense, which has an onboard accelerometer, gyroscope, and magnetometer. As you’ll see in the video after the break, the Feather takes readings from these and applies a sensor-fusing algorithm to determine the ball’s orientation in 3D space before sending its position to the computer. To send the click events, [Jacek] baked some mouse buttons into the keyboard’s firmware. Among the other Feather sensors is a PDM MEMS microphone, so detecting taps on the ball and translating them to clicks is not out of the question for a future version.

Here comes the really clever part: there are two reed switches inside the ball. One is used as a power switch, and the other is for setting the ‘up’ direction of the trackball. The ball charges wirelessly in a 3D printed base, which also has a small neodymium magnet for activating the reed switches. Check out the demo after the break, which shows [Jacek] putting the trackball through its paces on a mouse accuracy testing program.

If you prefer your DIY trackballs to be more standard looking, click on over to the Ploopy project.


Continue reading “Giant DIY Mouse Sets The Ball Free”

Custom Coil Lets Mouse Charge Without Wires

It’s 2021, shouldn’t all of our devices be able to pull the power they need from the ether? [Sasa Karanovic] certainly thinks so, which is why he recently took it upon himself to add wireless charging capabilities to his desktop computer peripherals. The Qi transmitter and receiver modules are relatively cheap and easy to come by, the trick is in getting them installed.

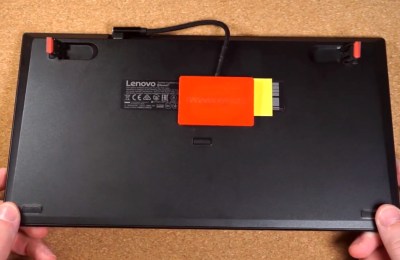
The keyboard gets non-invasive Qi charging.

For the keyboard, [Sasa] took the path of least resistance. The receiver coil lives inside a little 3D printed box attached to the back, and power is routed through a hacked up right-angle USB cable. It’s a simple addition that doesn’t make any permanent changes to the keyboard; perfect for those who don’t want to risk toasting their gear.

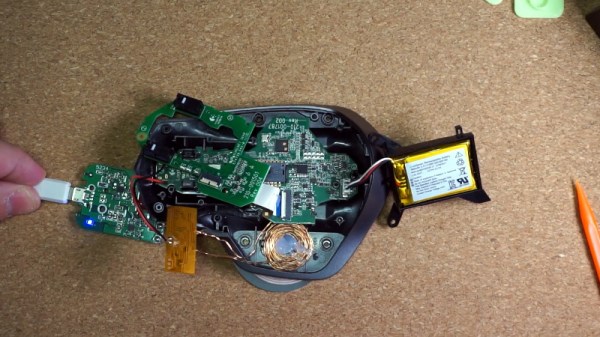
But that wasn’t really an option for the mouse. Obviously the Qi hardware would have to go on the inside, but at a glance it was clear there wasn’t enough room to mount the stock coil. So [Sasa] pulled the original coil apart and rewound it around a small 3D printed jig. This resulting coil was perfectly sized to fit inside the flat area on the left side of the mouse with no apparent degradation in charging ability. Wiring the module up to an unpopulated pad on the PCB allowed him to easily inject the 5 V output into the device’s existing charging circuitry.

We’ve seen plenty of aftermarket Qi charging coils take up permanent residence in various gadgets, but rewinding the coil is a neat trick that we’ve only seen pulled off a couple times in the past. Something to file away mentally should you ever want to wirelessly power up one of your projects.

Continue reading “Custom Coil Lets Mouse Charge Without Wires”

Supercap Drink Coasters Are The Life Of The Party

You’ve probably seen multicolored flashing LEDs embedded into clear plastic cups or coasters before, they’re quite commonly used in fancy restaurants that also feature animatronic characters and a gift shop on the way out. But have you ever wondered about the logistics of maintaining such devices? When the anthropomorphic rodent shuts down for the night, you’re going to want to clean all those blinking doodads; but any opening to connect a charger or insert a battery is just a leak waiting to happen.

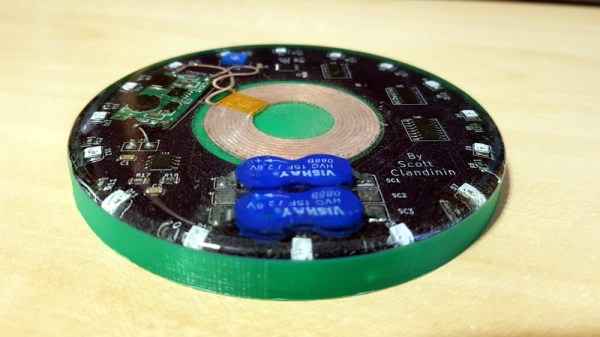
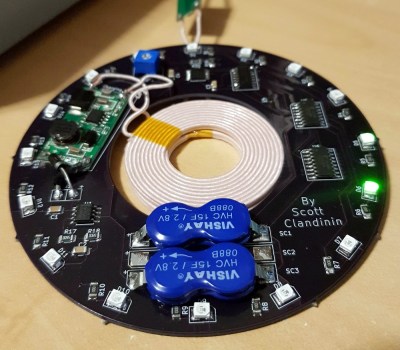
[Scott Clandinin] has come up with a solution to this problem that’s equal parts brilliant simplicity and unabashed overengineering. Using wireless charging and supercapacitors, he’s developing an LED coaster that can be hermetically sealed in clear resin.

With no plugs to connect or batteries to change, these coasters can be permanently encapsulated with no ill effects. Granted the supercapacitors will degrade with time and eventually won’t hold a charge for as long, but even the most conservative estimates would have these coasters still partying in a decade.

For his prototype version [Scott] has put together a simple charging base, but we imagine in a full deployment such devices could be charged with induction coils built into a bar or table. While the energy consumption could potentially be a showstopper, we’d love to see a future version that integrates a radio receiver. Then the coasters could double as pagers to let diners know their table is ready.

While this device is obviously much thicker than a traditional coaster, it looks fairly reasonable even at this early stage. We like the concentric design that puts the coil inside the PCB, and wonder if similar cutouts couldn’t be used to get the twin 15F supercapacitors and charging module hunkered down just a few millimeters more. The 2019 Hackaday Prize is all about evolving an idea into a design suitable for production, and those are the sort of incremental improvements that the judges will certainly be keeping an eye out for.

Curbing Internet Addiction In A Threatening Manner

Those who have children of their own might argue that the youth of today are getting far too much internet time. [Nick] decided to put an emergency stop to it and made this ingenious internet kill switch to threaten teenagers with. Rather unassuming on the outside, the big red button instantly kills all network traffic as soon as you push it down, doing its label justice. Reset the toggle button, and the connection is restored, simple as that.

In order to achieve this, [Nick] fit inside the enclosure a Raspberry Pi Zero W, along with a battery and a wireless charging circuit for portability and completely wireless operation. The button is wired into the Pi’s GPIO and triggers a command to the router via SSH over WiFi, where a script listening to the signal tells it to drop the network interfaces talking to the outside world. It’s simple, it’s clean, and you can carry it around with you as a warning for those who dare disobey you. We love it.

Another use for big red buttons we’ve seen in the past is an AC power timer, but you can do just about anything with them if you turn one into an USB device. Check this one in action after the break.

Continue reading “Curbing Internet Addiction In A Threatening Manner”

Hackaday Podcast 015: Going Low Frequency, Robotic Machines, Disk Usage For Budgets, And Cellphones Versus Weather

Hackaday Editors Mike Szczys and Elliot Williams discuss the highlights of the great hacks from the past week. On this episode we discuss wireless charging from scratch, Etch-A-Sketch selfies, the robot arm you really should build yourself, bicycle tires and steel nuts for anti-slip footwear, and bending the piezo-electric effect to act as a VLF antenna. Plus we delve into articles you can’t miss about 5G and robot firefighting.

Take a look at the links below if you want to follow along, and as always, tell us what you think about this episode in the comments!

Take a look at the links below if you want to follow along, and as always, tell us what you think about this episode in the comments!

Direct download (60 MB or so.)

Continue reading “Hackaday Podcast 015: Going Low Frequency, Robotic Machines, Disk Usage For Budgets, And Cellphones Versus Weather”

You Can Add Wireless Charging To IPhone… Kinda

We could watch cellphone teardown videos all day long. There’s something pleasing about seeing how everything is packed into such a small enclosure. From the connectors, to that insidious glue, to the minuscule screws, [Scotty Allen] has a real knack for giving us a great look at the teardown process. Take a look at his latest video which attempts to add wireless charging to an iPhone. I think there’s a lot to be said for superb lighting and a formidable camera, but part of this is framing the shots just right.

Now of course we’ve taken apart our fair share of phones and there’s always that queasy “I think I’m going to break something” feeling while doing it. It’s reassuring that [Scotty] isn’t able to do things perfectly either (although he has the benefit of walking the markets for quick replacement parts). This video is a pretty honest recounting of many things going wrong.

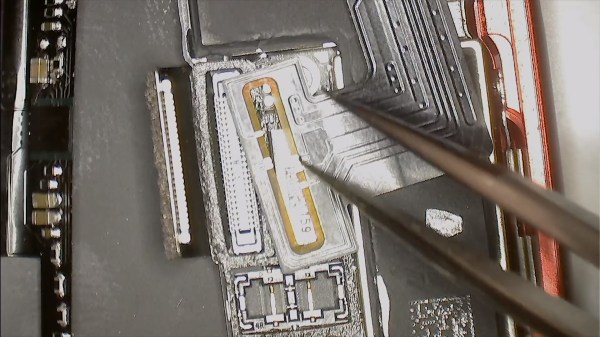
The iPhone 6 and 7 are not meant to have wireless charging, but [Scotty’s] working with a friend named [Yeke] who created an aftermarket kit for this. The flexible PCB needs to be folded just right, and adhesive foam added (along with a magical incantation) to make it work. That’s because the add-on is a no-solder job. Above you can see it cleverly encircles one of the mating connectors and relies on mechanical pressure to make contact with the legs of that connector. Neat!

In the second half of the video [Scotty] meets up with [Yeke] to discuss the design itself. We find it interesting that [Yeke] considers his work a DIY item. Perhaps it’s merely lost in translation, but perhaps [Yeke’s] proximity to multiple flexible PCB manufacturers makes him feel that this is more like playing around for fun than product design. Any way you look at it, the ability to design something that will fit inside that crazy-tight iPhone case is both impressive and mesmerizing. Having seen some of the inductive charging hacks over the years, this is by far the cleanest way to go about it.

We caught up with [Scotty] during last year’s Supercon. We may not be able to drop everything and move to Shenzhen, but hearing about the experience is just enough to keep us wanting to!

Continue reading “You Can Add Wireless Charging To IPhone… Kinda”

Wireless Charger Truck Mod Keeps Juice Flowing On The Move

Wireless charging is great tech, but its relative novelty means it may not be everywhere you want it. When one of those places is your vehicle, well, you make like [Braxen McConnell] and crack it open to install a wireless charger!

After dismantling the centre console, [McConnell] had to make a few cuts behind the scenes to make room for the wireless charger — as well as cutting down the charger itself. He also took apart the charger and flipped the board and charging coil around inside its case; the reason for this is the closer the coil is to the phone, the better. The charger will already be hidden behind the plastic of the centre console, so it’s no good to be fighting through the extra distance of the charger’s internals. The charger was mounted with double-sided tape, since it’s relatively light and won’t be knocked about.

[McConnell] tapped into the accessory circuit on his truck so it would only be drawing current when the truck is on — nobody likes coming back to a dead battery! Power comes from a cigarette outlet connected to a USB car charger, which then powers the wireless charger — it’s a little hacky, but it works! Once the wireless charger is plugged in and the centre console is reinstalled, [McConnell] was set! Check out the build video after the break.

Continue reading “Wireless Charger Truck Mod Keeps Juice Flowing On The Move”