Automated Chess Set Does It From Below

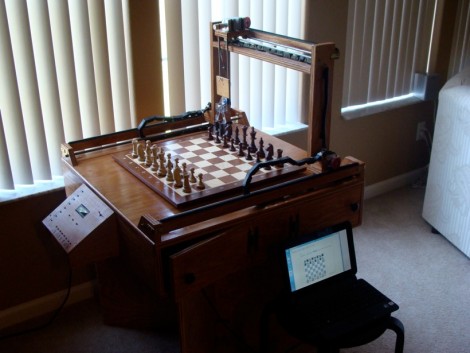
You can get class credit for the coolest things these days. Take for instance, this Automatic Chessboard that [Brian] and [James] built for the final project in one of their classes this spring. We just looked at a robotic chess setup on Monday that used a gripper mounted on a gantry to move the pieces. This one’s a lot more user-friendly and borders on magical. That’s because the moving parts are all located below the board and could be hidden from view if a proper case were built around the edges.

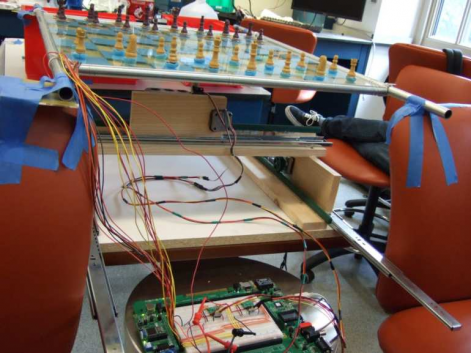
There are two main components to this build. The first is a grid of reed switches that detect the moves made by a human. This works because each piece the human player uses has a weak magnet glued to the bottom which is just strong enough to actuate the reed switch and let the computer sense what move was just made. On the robotic side of things this works like a plotter. Each of the computer’s pieces has a metallic disc glued to the base. What basically amounts to a plotter under the board uses rare-earth magnets to grab the computer’s piece and drag it to the next playing position.

The use of two separate magnetic systems provides some interesting design challenges. You can see the device in action in the video after the break, and a full writeup and source code package is available at the blog linked at the top of this feature. But for your convenience we’ve also mirrored the PDF whitepaper after the break which lays bare all of the juicy details.

Continue reading “Automated Chess Set Does It From Below”

Great Junk-yard Find Leads To A Reclaimed Control Panel Project

Having the “can you believe somebody threw this away?” mentality has gotten us into some trouble through the years, but look what [Joshua] found at the scrap yard! It’s a door from a power conversion station and it contains fourteen indicator lights and a lot of other doodads. But since this is just the door, he needed a way to monitor the controls and drive the indicators. At the heart of the hack he used to get this up and running is a PIC 18F2550. It has no trouble driving the indicators thanks to a pair of ULN2803 darlington arrays which switch the higher 24 volt levels.

His writeup doesn’t mention the method used, but the panel also has a couple of meters at the top. In the video after the break you can clearly see that he’s got them both working. We’d bet there’s a plan for each of the buttons as well, since this will be prominently featured in their alien-invasion themed Halloween display this year.

Continue reading “Great Junk-yard Find Leads To A Reclaimed Control Panel Project”

An Odd Little Box

Here’s an odd little box that might get those creative juices flowing for the upcoming Halloween season. [Jeremy’s] creepy glowing box has a pair of ping-pong ball eyes which diffuse the red light from a pair of LEDs. Both the lid and they eyes move, and the whole thing is set up for wireless control.

The majority of the parts came from a toy RC helicopter that [Jeremy] had sitting in his junk bin. After close inspection he found that the electronics included to motor drivers for the two rotors, as well as two servo motors which worked to steer the aircraft. One of those servos has been repurposed to aim the gaze of they eyes left and right, the other servo is used to lift and close the lid of the box. This leaves the two motor controllers, one of which switches the LEDs on and off. The other doesn’t really have a purpose yet. He tried adding one wheel to the box, but turning that on just makes the whole thing crash to the floor. Check out what he’s done so far in the clip after the fold.

Continue reading “An Odd Little Box”

Wireless Hackerspace Status Notifier

space_probe

Hackerspaces are always looking for novel ways to let their members know that they are open for business, and this notifier [Angus] from Make, Hack, Void recently put together is no exception.

While dumpster diving one day, he came across a fantastic-looking lab power supply from the ‘70s. He gutted it, saving the variable transformer for a future project, and started constructing his notifier. When someone enters the hackerspace, they simply set the dial on the “Space Probe” to the amount of time they expect to be there. The built-in Seeduino sends the data over Bluetooth to an OpenWRT-enabled router, which uses a couple of Lua scripts to notify members via email and Twitter.

Since almost all of the processing is done on the router side, it leaves the Arduino in the probe with little more to do than flash an LED and send ASCII status messages any time the knob is turned. [Angus] is well aware that this would probably make most people’s heads spin, but he hopes that other hackerspace members use that untapped potential to further enhance the notifier.

Stick around to see the Space Probe in action, and if you are interested in seeing what other hackerspaces use to keep their members in the know, check out this status switch from Hack42.

Continue reading “Wireless Hackerspace Status Notifier”

Building Your Own Real Time Clock

diy_rtc

Like many electronics hobbyists, [Pete] found that he had an overwhelming desire to build a clock for himself. He didn’t want to stick a discrete real time clock IC into a box and call it a day, so he opted to construct his own around a microcontroller instead.

After researching the specs on a few RTC ICs, he defined some accuracy requirements for his clock, and got to building. He started out using a 32,768 Hz watch crystal, but found that the accuracy was off by about 46 ppm after only 24 hours of use. That fell well beyond his self-imposed +/- 3 ppm tolerance goal, so he purchased an oscillator with about 500 times the resolution of his previous crystal.

After writing a handful of code to ensure that the clock remains stable, he calculated that his accuracy should be about 0.18 ppm – well within his acceptable tolerance range.

[Pete] says that this is just the first part of his clock construction, and that future revisions should include plenty of additional functionality, so keep an eye out for updates.

Wireless 4 Channel Temperature Monitor From Arduino Libraries

Say what you will about the Arduino platform but there certainly are a ton of libraries one can choose from. That is precisely what [Dan Julio] set out to do when building his slick looking 4 channel temperature monitor. The monitor consists of an Arduino RBBB, 2×16 character LCD and four DS18B20 1-wire digital thermometers. [Dan] also includes a bluesmirf to interface with an OS X monitoring program.  Using libraries for the Bluetooth, LCD, and temperature monitors the Arduino code is only about 200 lines, and pretty easy to follow. Check out more at [Dan]’s site.

If you’d like more temperature sensor projects check out this mug or this PIC based monitor or perhaps you’d like to keep it in the Atmel family.

Why Build A CNC Mill When You Can Have A Chess Robot Instead?

[Patrick McCabe] enjoys the challenge of playing chess against the computer but he wasn’t satisfied with the flat experience of on-screen gaming. No problem, he just built his own gantry-style chess robot that he can play against. Don’t be confused, he still doesn’t have to touch the pieces, but instead uses the dedicated control board seen on the left of the image above. The robotic arm that is mounted on a gantry takes care of moves for both players.

It’s a pretty normal CNC build, using four stepper motors to slide the moving bits along precision rod. An Arduino Mega drives the system, with a PC doing the heavy lifting using a program called My Robot Lab.

We certainly like it that [Patrick] spent a little bit of time making the cabinet and visible parts look nice. Chess is a civilized game and unfinished parts would be out-of-place. We didn’t see it in his writeup, but the one feature we’re really hoping he has implemented is the ability to have the robot automatically reset the board at the beginning of a game.

As you might have guess, you’ll find embedded video after the break.

Continue reading “Why Build A CNC Mill When You Can Have A Chess Robot Instead?”