7x7x7 LED Cube Driven By Arduino Mega

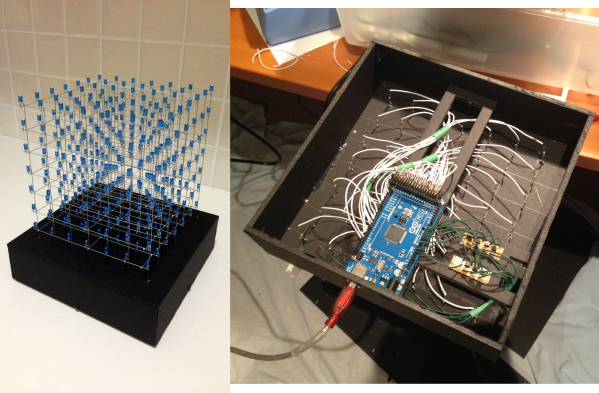
Sure, the physical build itself looks great, but it’s what [Michael] did with the firmware that impresses us the most. He’s using an Arduino Mega to drive the 7x7x7 cube and manages to squeeze out what he calls 142 frames per second with the setup. We’re not sure FPS is the right measurement, as we believe it’s the multiplexing rate that he’s trying to describle. It takes 144 uS to scan the entire matrix once. He performs the scan seven times per frame and the result is a flicker-free appearance, even to cameras.

You can see a video demonstration after the break. Since [Michael] emailed us directly with more details about the build we’ve pasted those below the fold as well.

If you’re looking for a more entry-level Arduino LED cube this 4x4x4 project is just the thing.

Continue reading “7x7x7 LED Cube Driven By Arduino Mega”

The Keypad Contest

Keypad

What can you do with ten buttons and ten lights? A lot.

[Andrew] and [Nathan] found a collection of Hale Research keypads being thrown out, and decided to host the Keypad Contest. The goal of the contest was to create something nifty using the ten buttons and ten lights on the keypad, and an ATtiny2313 that replaced the original 8051-compatible microcontroller in the device.

[Andrew] wanted to try making PCBs with his home-built CNC machine, so he milled out USBtinyISP programmers for the ATtiny2313. Then he gave out eleven development kits to a group, and explained how to develop on the hardware.

After a month of hacking, seven people completed projects. The winner was an internet radio controller, which had the keypad sending serial data to a TP-Link WR703N router. The router used a USB sound card and OpenWRT firmware to stream music. The runner up was a timing game called “Capture”.

The contest write up has details on all seven projects. [Andrew] and [Nathan] were successful in getting software engineers to try hardware with this contest, resulting in some neat hacks. After the break, check out a video demo of the internet radio controller.

Continue reading “The Keypad Contest”

Feedback For Automated Water And Food Pet Dispensers

pet-food-and-water-automation

[Enrico] figured out a way to fully automate his pet food and water. The system is in two parts, the water trough as seen on the left, and the food dispenser whose control hardware is shown on the right. The system is even hooked up to the network so that he can make sure it didn’t break down while he was away.

The water dispenser uses parts from a sprinkler system. Since it’s mounted outdoors it doesn’t matter if the water overflows a little bit. So [Enrico] set up the timer to run the water for three minutes every day. This acts as a backup system since the trough already has the ability to refill itself.

The food dispenser started as a commercial unit. To get feedback from the system he added a couple of magnets to the agitation motor and reads them with a hall effect sensor. In addition to an IP camera that monitors the area around the feeder (so [Enrico] can actually see his dog eating) there is a webcam which monitors the STM32 Discovery board which monitors the feeder. It tracks the number of times the dispenser has run.

HDD POV Clock Takes The Best From Those That Came Before It

hdd-pov-clock

The concept behind this clock has been seen before, but [Dieter] tried to combine the best aspects of several projects into his HDD POV clock (translated). The basic principle of the design is to cut a slot into the top platter of the hard drive. This will let the light from some LEDs shine through. By carefully synchronizing the LED with the spinning platter a set of differently colored hands can be shown to mark time. We’ve been looking at the project for several minutes now and we’re not quite sure if the lines marking the 5-minute segments on the clock are generated in the same way as the hands, or if they’re marks on a faceplate on top of the platters. Check out the clip after the break and let us know what you think.

Past HDD clock project include this one, or this other one. Some of the design improvements include a better motor driver (which [Dieter] pulled from an old VCR) and the inclusion of an RTC chip to keep accurate time without the need to be connected to a computer. We also think it’s a nice touch to sandwich the hardware between two picture frames for a nice finished look.

Continue reading “HDD POV Clock Takes The Best From Those That Came Before It”

3d Printed Hexapod Robot

3d-printed-hexapod

This hexapod was made almost entirely via 3d printing (translated). The parts that you need to supply include a few fasteners to make connections, twelve servo motors, and a method of driving them. As you can see in the video after the break, all those parts come together into a little robot that functions quite well. The only thing that we think is missing are some grippy feet to help prevent slipping.

[Hugo] calls the project Bleuette. It is completely open source, with the cad files and source code available on his Github repository. There is additional information in the wiki page of that repo. This gives us a good look at the electronic design. He’s controlling the legs with an Arduino, but it’s all dependent on his own shield which features a PIC 18F452 to take care of the signals used to drive all of the servo motors. The board also has some peripherals to monitor the current draw and regulate the incoming power.

Continue reading “3d Printed Hexapod Robot”

Modulator Box Connects IPod To Tesla Coil

tesla-coil-modulator

This pass through audio modulator lets you playback stereo audio on two Tesla coils. But don’t fret, you can just use mono files if you only have one coil on hand. On one side there are inputs that connect to the audio source. The other side drives the Tesla coil, switching it on and off based on the relationship between a reference voltage and the audio signal. As you can hear in the video after the break this sounds great as long as you have the right kind of source audio.

The song played in that clip is the Duke Nukem 3D theme. [Daniel] started with a MIDI file and removed the chimes and drums to make the playback a little cleaner. The demo uses just one coil because the other was destroyed during testing when feedback between the two became a problem.

For some reason this reminds us of that singing Tesla coil hat. If you’re already on our mailing list (sign up in the sidebar) you know we’re getting pretty close to unveiling our own awesome Tesla coil project. It doesn’t sing… yet.

Continue reading “Modulator Box Connects IPod To Tesla Coil”

Really, Really Geeky Wedding Invitations

invitation

Being real, ultimate geeks, [Bill] and [Mara] didn’t want to settle for plain, paper-based wedding invitations. No, they wanted something cooler, and came up with their own DIY electronic wedding invitations.

Since they would be making the invitations themselves, [Bill] and [Mara] needed a simple circuit that could be easily mass produced. They turned to the classic microcontroller-powered blinking LED circuit powered by an ATtiny13.

The first order of business was producing 50 printed circuit boards for each of the invitations. For this, [Bill] picked up an Xerox Phaser laser printer off of ebay and a few sheets of copper-clad kapton film. The etch resist was printed directly onto the kapton film and etched in a bath of ferric chloride, effectively making a flexible PCB.

These circuit boards were soldered up and laminated between the printed invitation and the card stock cutter with the help of a Silhouette Cameo paper cutter. After the cards were assembled, the battery was wired up and the cards shipped out.

The microcontroller inside the card was programmed to be asleep most of the time, waking up only every few seconds to check a light sensor to determine if the card was opened or not. If the microcontroller sensed the card was open, the lights began blinking, making it one of the most memorable wedding invitations [Bill] and [Mara]’s guests will ever receive.

You can check out a demo of the invitations after the break.

Continue reading “Really, Really Geeky Wedding Invitations”