GuruBrew’s 15 Minute Windows 8 Survival Guide

GuruBrew Windows 8 Survival Guide

One thing very common to all of us is our reliance on operating systems in our hobby life. If that OS is Windows then you could be in for quite a shakeup with Windows 8. Many readers are Linux or Apple users and couldn’t care less if Microsoft is releasing an entire paradigm shift in desktop navigation. However, you just might find yourself facing this new OS and you’ll look like you’re on training wheels if you don’t get acquainted now, and considering the number of computers being released with Windows 8 its inevitable that day will come soon.

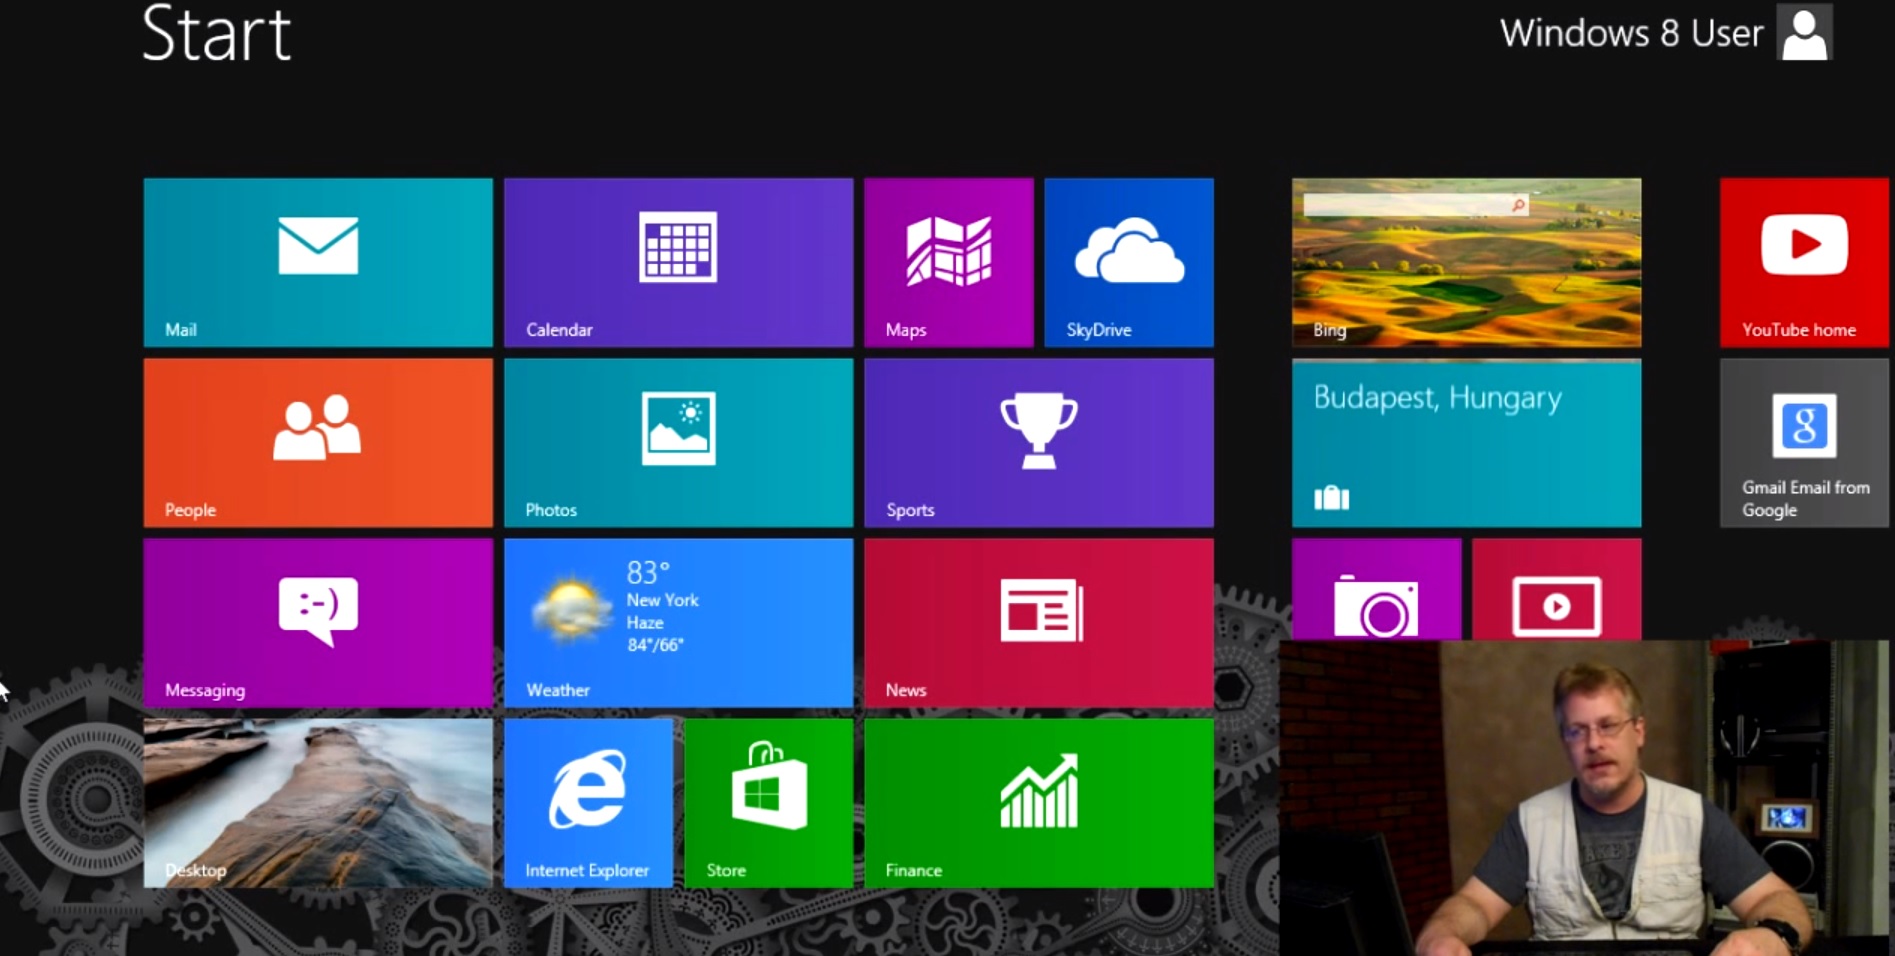
So if you haven’t been behind the wheel of Windows 8 then checkout [Steve’s] Windows 8 Survival Guide from the Guru Brew Tech Show. This is an excellent overview of the new touch screen navigation methods you’ll find in the Windows 8 desktop including hotspots, charms and tiles to name just a few. You’ll also learn tips to get around with a mouse and keyboard. It’s not a complete tutorial on using Windows 8 but you’ll at least know how to navigate, search for apps, work with multiple apps and find tools like task manager, control panel, file explorer as well as your familiar desktop.

Follow the break to watch the short survival guide video.

Continue reading “GuruBrew’s 15 Minute Windows 8 Survival Guide”

An Atmega328-based Radioteletype XY Scope Display

[Jack] tipped us about a Crossed Bananas Display (CBD) he just designed. A CBD is a tuning aid for frequency-shift keyed (FSK) modes and is basically an oscilloscope in X-Y mode. At one time, radioteletype operators used binary FSK to transmit text over radio waves. In this scheme, the “1” is called the mark frequency and the “0” is called the space frequency. If both frequencies were perfectly tuned (correct phase) the resulting display would look like the one shown above, explaining the origin of the “crossed banana” name.

The build is based on an ATmega328 and a 1.8″ ST7735R display which has a 128×160 resolution. The MC33204PG operational amplifier is used in conjunction with a potentiometer to scale the input in the microcontroller ADC’s range. Another potentiometer sets the refresh rate of the graph. The whole project is enclosed in a painted cast-aluminium bud box and all the sources for this project can be found here.

DIY Soda Can Battery

sodaCanBattery

It may not be particularly useful to create some makeshift batteries out of soda and soda cans, but it’s a good introduction to electrodes and electrolytes as well as a welcomed break from lemons and potatoes. The gang at [Go-Repairs] lopped off the can’s lid and temporarily set the soda aside, then took steel wool to the interior of the can to remove the protective plastic coating. The process can be accelerated by grabbing your drill and cramming the steel wool onto the end of a spade bit, although pressing too hard might rip through the can.

With the soda poured back in, you can eek out some voltage by clipping one lead to the can and another to a copper coin that’s dunked into the soda. Stringing along additional cans in series can scale up the juice, but you’ll need a whole six pack before you can get an LED working—and only just. The instructions suggest swapping out the soda for a different electrolyte: drain cleaner, which can pump out an impressive 12 volts from a six pack series. You’ll want to be careful, however, as it’s likely to eat through the can and is one lid away from being dangerous.

Stick around for a quick video after the break, and if you prefer the Instructables format, the [Go-Repairs] folks have kindly reproduced the instructions there.

Continue reading “DIY Soda Can Battery”

Using A Raspberry Pi To Give Your Car More Features

[Andrei] is cruising in style thanks to his Raspi-powered CarPC project, which is a steal at $200 considering all the functionality it provides. This is an update to the work we saw from him back in March. Rather than completely replace his car’s head unit, [Andrei] simply relocated it to the trunk, permanently set it to the “aux input” source, and connected the Raspberry Pi’s audio output. The Pi runs a Raspbian Wheezy distro with XBMC and is mounted in the storage area beneath the middle armrest. [Andrei] filled the hole left by the old stereo with a 7-inch touchscreen display, which connects to the Pi through both HDMI and USB. If you throw the car into reverse, the Pi automatically selects the touchscreen’s AV input to display the car’s backup camera, then flips back when put in drive.

The unit also provides navigation via the open-source Navit software using OpenStreetMap data. An ST22 SkyTraq GPS receiver grabs coordinates and feeds them into the Raspi, which updates the on-screen map once per second. You’ll want to watch the video after the break (Audio Warning: Tupac) to see for yourself just how well the CarPC came together,

Continue reading “Using A Raspberry Pi To Give Your Car More Features”

Smoothieboard, The Be-all, End-all CNC Controller

A while back we took a look at electronics boards for 3D printers, going over the cost and benefits of the most common electronics boards for printers, laser cutters, and mills. One of the most impressive boards was the Smoothieboard, but finding a supplier back then was a little difficult. Now, the Smoothieboard is up on Kickstarter, giving everyone the opportunity to get their hands on this very cool CNC control board.

While most RepRap and 3D printer controller boards use an ATMega or other 8-bit microcontroller, the Smoothie uses a 32-bit ARM chip in the form of an NXP LPC Cortex-M3 chip. Not only does this allow the Smoothie to do some very cool things with your machine – native arcs and circles, for example, but this better hardware also allows for Ethernet, drag-and-drop firmware, and exposing the USB port as both a serial port or mass storage device.

The Smoothie comes in three flavors, with either 3, 4, or 5 stepper motor drivers. These Allegro A4982 drivers are good enough for any 3D printer, laser cutter, or small mill, but the broken out pins allow for stepper drivers supplying more than 2A of current.

Everything on the Smoothieboard is modular, meaning this board is equally capable of powering a RepRap, mill, laser cutter, or plotter. There’s even a planned control panel called the Smoothiepanel, making this a great choice for your next CNC build.

Time-lapse Synthesizer Build Will Blow Your Mind

[themonkeybars] recently uploaded a time-lapse video of his DIY synthesizer build. First off the video itself is a pretty neat hack. An iPhone time-lapse app was used to capture one frame every 5 seconds. By the time the build was complete, approximately 46,000 frames had been snapped. This boiled down to over 43 minutes of youtube footage. [themonkeybars] didn’t work full time on the project, so the video covers about a year’s worth of work which we think makes it even cooler. The synth is also featured in much of the video’s soundtrack.

The synthesizer itself would be classified as an analog modular synth, a type we’ve seen before. Modular synthesizers are one of the earlier forms of electronic music. The synthesizer is composed of discrete modules such as oscillators, modulators, and filters. The modules may be housed in the same box, but they are not internally connected. All connections are made via front panel patch cables. This is where the term “Patch” came from. Continue reading “Time-lapse Synthesizer Build Will Blow Your Mind”

Game Controller Repurposed For Flea Market Find

powerPannerControlReplacement

A jarring pan with your tripod can ruin a shot in your film, and tilting up or down usually requires some loosening and tightening kung fu to keep gravity from taking over. The “Power Panner” is a remote-controlled device that fits between the tripod and the camera, handling pans and tilts with ease. When [NeXT] found one at the Capitol Flea Market for $5, he didn’t care about the missing remote. He bought the Panner, dragged it home, and hacked together his own remote with a Sega Master Pad.

After researching similar devices online, [NeXT] had determined the original remote’s pinout: essentially a D-pad with adjustable speed control. He decided to ignore the speed pins and to instead search for a suitable replacement controller. A Sega Master Pad offered the most straightforward solution, so [NeXT] went to work separating out the wires and soldering them to a DIN connector. He couldn’t find the right plug to fit the Panner’s DIN-7 jack, so he substituted a DIN-8 with the extra pin snapped off.

Rather than use the remaining two buttons for speed control, [NeXT] chose to feed them directly into his camera to drive the focus and shutter, but the Master Pad’s wiring posed a problem: the camera would have to share the Power Panner’s ground, and the Panner plugs into the wall via a 6V adapter. Fingers crossed, he decided to push ahead and was relieved that everything worked. We suspect the shared ground won’t be a problem as long as one device uses a floating power supply, which the Panner can provide either through the proper wall wart or by using its 4 AA battery option.

If you’re in the mood for more camera hacks, check out the sound-dampening and waterproofing build from last week.