The Tree Of 40 Fruit

[Sam Van Aken] is working on a long-term project which literally will bear fruit. Forty different kinds, in fact. The Tree of 40 Fruit is a single tree, carefully grafted to produce 40 different varieties of fruit. Growing up on a farm, [Sam] was always fascinated by the grafting process – how one living plant could be attached to another.

In 2008, [Sam] was working as a successful artist and professor in New York when he learned a 200-year-old state-run orchard was about to be demolished. The stone fruit orchard was not only a grove a trees, but a living history of man’s breeding of fruit. Many unique varieties of stone fruit – such as heirloom peaches, plums, cherries, and apricots –  only existed in this orchard.

[Sam] bought the orchard and began to document the characteristics of the trees. Color, bloom date, and harvest date were all noted in [Sam’s] books. He then had the idea for a single tree which would bear multiple types of fruit. By using grafting techniques such as chip grafting, [Sam] was able to join the varieties of stone fruit tree. The process was very slow going. Grafts performed one year must survive through the winter before they grow the following spring.

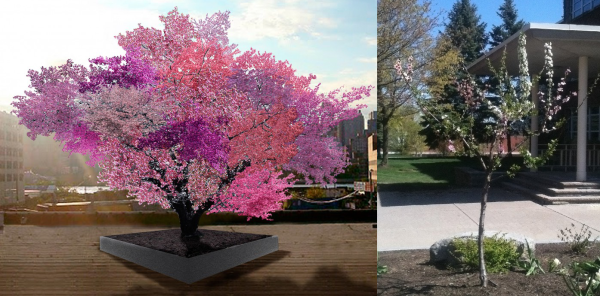
Throughout the process, [Sam] kept careful diagrams of each graft. He planned the tree out so the fruit harvest wouldn’t be boring. Anyone who has a fruit tree tends to give away lots of fruit – because after a couple of weeks, they’re sick of eating one crop themselves! With [Sam’s] tree, It’s possible to have a nectarine with breakfast, a plum with lunch, and snack on almonds before dinner,  all from the same tree. The real beauty is in the spring. [Sam’s] tree blossoms into an amazing array of pinks, purples and whites. A living sculpture created by an artist with a bit of help from Mother Nature.

Click past the break for [Sam’s] TED talk.

Continue reading “The Tree Of 40 Fruit”

Cloning Tektronix Application Modules

Tektronix’s MSO2000 line of oscilloscopes are great tools, and with the addition of a few ‘application modules’, can do some pretty interesting tasks: decoding serial protocols, embedded protocols like I2C and SPI, and automotive protocols like CAN and LIN. While testing out his MSO2012B, [jm] really liked the (limited time) demo of the I2C decoder, but figured it wasn’t worth the $500 price the application module sells for. No matter, because it’s just some data on a cheap 24c08 EEPROM, and with a little bit of PCB design <<removed because of DMCA takedown>>

The application module Tektronix are selling is simply just a small EEPROM loaded up with an <<removed because of DMCA takedown>>. By writing this value to a $0.25 EEPROM, [jm] can enable two applications. The only problem was getting his scope to read the EEPROM: a problem easily solved with a custom board.

The board [jm] designed <<removed because of DMCA takedown>>, with the only additional components needed being an EEPROM, a set of contacts for reading a SIM card, and a little bit of plastic glued onto the back of the board for proper spacing.

UPDATE: Learn about the DMCA Takedown Notice that prompted this post to be altered: http://hackaday.com/2014/08/05/hardware-security-and-a-dmca-takedown-notice/

A Better Google Glass For $60 (This One Folds)

glassFor [Tony]’s entry for The Hackaday Prize, he’s doing something we’ve all seen before – a head mounted display, connected to a Bluetooth module, displaying information from a smartphone. What we haven’t seen before is a cheap version of this tech, and a version of Google Glass that folds – you know, like every other pair of glasses on the planet – edges this project over from ‘interesting’ to ‘nearly practical’.

For the display, [Tony] is using a 0.96″ OLED connected to an Arduino Nano. This screen is directed into the wearer’s eye with a series of optics that, along with every other part of the frame, was 3D printed on a Solidoodle 2. The frame itself not only folds along the temples, but also along the bridge, making this HMD surprisingly compact when folded up.

Everything displayed on this head mounted display is controlled by  either an Android phone or a Bluetooth connection to a desktop. Using relatively simple display means [Tony] is limited to text and extremely simple graphics, but this is more than enough for some very interesting applications; reading SMS messages and checking email is easy, and doesn’t overpower the ‘duino.


SpaceWrencherThe project featured in this post is an entry in The Hackaday Prize. Build something awesome and win a trip to space or hundreds of other prizes.

The Smart Humidor

humidor

If you’re a cigar aficionado, you know storing cigars at the proper temperature and humidity is something you just need to do. Centuries of design have gone into the simple humidor, and now, I guess, it’s time to put some electronics alongside your cigars.

The design of [dzzie]’s smart humidor consists of an Arduino, WiFi shield, LCD + button shield, and most importantly, a DHT22 temperature and humidity sensor. In a bit of thoughtfulness, only the DHT22 is mounted inside the humidor; everything else is in an enclosure mounted outside the humidor, including a few buttons for clearing alerts and logging when water is added.

The smart humidor reads the DHT22 sensor every 20 minutes and uploads the data to a web server where useful graphs are rendered. The control box will send out an alert email to [dzzie] if the temperature or humidity is out of the desired range.

DIY Keyboard Backlighting Takes Forever, Worth It

LED Keyboard with Custom Lights

Want a back-lit keyboard? Make one yourself. Though you may not want to after seeing this build by [prodigydoo], who devoted 40 hours to upgrade his mechanical keyboard with a smattering of shiny.

No eye rolling just yet, though, because [prodigydoo’s] work is a monument to meticulous craftsmanship and dedication. So what if he accidentally dropped the keyboard’s PCB and cracked it? He patched that up with a few wires in true hacker-problem-solving fashion and no one will ever know.

With the electronics “safely” removed, [prodigydoo] set about desoldering every single key switch, then carefully detaching and disassembling the Cherry MX Blues. He then inserted an LED into each switch’s backplate, reassembled them, mounted the keys back on the board, then added some current-limiting resistors and heat shrink to the circuit. [prodigydoo] cut a few necessary holes for a power switch, state indicator LEDs (Caps Lock, etc.) and some under-the-board lighting, then rounded off the build by hooking up a power supply capable of running all the lights.

No microcontroller? No RGBLEDs? We like it anyway, and it seems [prodigydoo] is glad he kept it simple. Go check out the gallery for gritty details, an explanation of the circuit, and more pictures than your family vacation album.

The RC White House Robot

IMG_20140726_124812_164

This remote controlled, Arduino-based robot was created by a young student named [Quin] who likes to teach electronics classes at hackerspaces. It is an adaptation of this awesome, fast, fully autonomous mini Roomba that has since driven its way into the Presidential building during the 1st ever White House Maker Faire.

The quick, little device uses a robot chassis kit with an XBee wireless module so that the controller and the robot can be connected together. An NFC Shield was hacked and split in half so that the wires could be soldered in place.

[Quin]’s goal was to develop a fun game that records the number of times the robot drives over NFC tags laid across a flat surface. Points are shown in the form of blinking lights that illuminate when the device goes over the sensors, keeping track of the score.

The controller container was made with an open source 3D printer called a Bukobot. The enclosure holds an Arduino and another XBee shield along with a joystick and a neopixel ring, giving it a nice polished look complete with a circle of beautiful, flashing LED’s.

Continue reading “The RC White House Robot”

Hackaday Links: July 27, 2014

hackaday-links-chain

Taking apart printers to salvage their motors and rods is a common occurrence in hacker circles, but how about salvaging the electronics? A lot of printers come with WiFi modules, and these can be repurposed as USB WiFi dongles. Tools required? And old printer, 3.3 V regulator, and a USB cable. Couldn’t be simpler.

The Raspberry Pi has a connector for a webcam, and it’s a very good solution if you need a programmable IP webcam with GPIOs. How about four cameras?. This Indiegogo is for a four-port camera connector for the Raspi. Someone has a use for this, we’re sure.

The one flexible funding campaign that isn’t a scam. [Kyle] maintains most of the software defined radio stack for Arch Linux, and he’s looking for some funds to improve his work. Yes, it’s basically a ‘fund my life’ crowdfunding campaign, but you’re funding someone to work full-time on open source software.

Calibration tools for Delta 3D printers. It’s just a few tools that speed up calibration, made for MATLAB and Octave.

[Oona] is doing her usual, ‘lets look at everything radio’ thing again, and has a plan to map microwave relay links. If you’ve ever seen a dish or other highly directional antenna on top of a cell phone tower, you’ve seen this sort of thing before. [Oona] is planning on mapping them by flying a quadcopter around, extracting the video and GPS data, and figuring out where all the other microwave links are.

PowerPoint presentations for the Raspberry Pi and BeagleBone Black. Yes, PowerPoint presentations are the tool of the devil and the leading cause of death for astronauts*, but someone should find this useful.


* Yes, PowerPoint presentations are the leading cause of death for astronauts. The root cause of the Columbia disaster was organizational factors that neglected engineer’s requests to use DOD space assets to inspect the wing, after which they could have been rescued. These are organizational factors were, at least in part, caused by PowerPoint.

Challenger was the same story, and although PowerPoint didn’t exist in 1986, “bulletized thinking” in engineering reports was cited as a major factor in the disaster. If “bulletized thinking” doesn’t perfectly describe PowerPoint, I don’t know what does.

As far as PowerPoint being the leading cause of death for astronauts, 14 died on two shuttles, while a total of 30 astronauts died either in training or in flight.