Modded Microwave Sets Its Own Clock

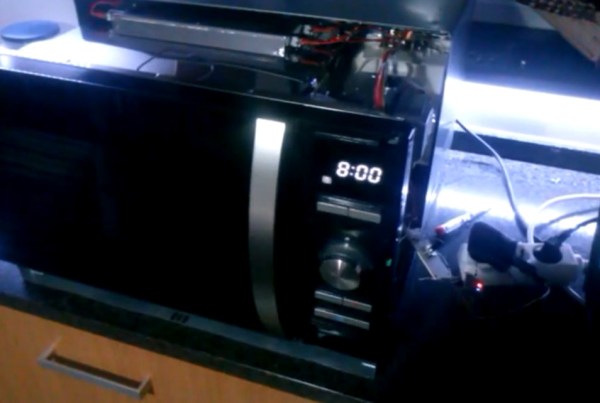
Of all the appliances in your house, perhaps the most annoying is a microwave with a flashing unset clock. Even though a lot of devices auto-set their time these days, most appliances need to have their time set after being unplugged or after a power outage. [Tiago] switches off power to some of his appliances while he’s at work to save a bit of power, and every time he plugs his microwave back in he has to manually reset the clock.

Thankfully [Tiago] wrote in with his solution to this problem: an add-on to his microwave that automatically sets the time over the network. [Tiago]’s project uses an ESP8266 running the Lua-based firmware we’ve featured before. The ESP module connects to [Tiago]’s WiFi network and pulls the current time off of his Linux server.

Next, [Tiago] ripped apart his microwave and tacked some wires on the “set time” button and on the two output pins of the microwave’s rotary encoder. He ran all three signals through optoisolators for safety, and then routed them to a few GPIO pins on his ESP module. When the microwave and the ESP module are powered up, [Tiago]’s Lua script pulls the time from his server, simulates a press of the “set time” button, and simulates the rotary encoder output to set the microwave’s time.

While [Tiago] didn’t post any detailed information on his build, it looks like a great idea that could easily be improved on (like adding NTP support). Check out the video after the break to see the setup in action.

Continue reading “Modded Microwave Sets Its Own Clock”

Camera Slider

Camera Slider Utilizes Skateboard Trucks

[Peter] wanted a camera slider and found some inspiration on the good ole ‘net. He then gathered some parts and came up with his own design. We’ve seen camera sliders made from roller blade wheels before but never one that uses skateboard trucks as the carriage! On each truck axle are 2 bearings spaced apart without the skate wheels. Each pair of bearings rides on one of two 48 inch long closet rods supported between two push-up stands. The top portion from an old camera tripod makes a handy mount that allows adjustment of the camera’s aim.

Some camera sliders are manual operated. This one, however, is lead screw driven with a goal of keeping the camera moving at a constant rate. A disassembled hand drill provides the motor, gearbox and speed control necessary to turn the lead screw. Although it works well at slow speeds, [Peter] admits that it becomes less usable as the speed increases. This is mainly due to the 5/16 inch threaded rod lead screw oscillating and whipping around after reaching a certain RPM. If you stick with a straight run, a belt-driven system might make those faster movements more smoothly.

Automatic garage door opener

Blink Thrice To Let Me In

Now here’s a really cool home hack. [Luis Rodrigues] has automated his garage door to open, simply by flashing his headlights at it.

But wait, doesn’t that mean anyone could break into his house? Nope. At first we thought he had just added some photo-sensors and a bit of computer logic in order to turn a pattern of lights into an output to open the garage, but no, it’s actually specific to his car only. Which is awesome because if anyone ever tried to copy him to break in, all they break into is a very confused state of mind.

You see how it actually works is the headlight output is connected to a control box under the hood of his car. A Moteino (RF Arduino variant) reads the input signal of the headlights flashing three times, and then communicates wirelessly to the garage door in order to open it.

But [Luis] also has a gate outside his property — so if you hold the lights on for a second, both the garage door and the external gate will open as well.

Continue reading “Blink Thrice To Let Me In”

Robo Foam Cutter Makes Short Work Of Your Foam Rolls

Tired of cutting your foam sheets down to size? [jgschmidt] certainly was, and after one-too-many hours cutting foam manually, he built himself a machine that cuts sheets automatically, and he guides you through the process step-by-step.

[jgschmidt’s] build is a clever assembly of stock parts acquired from ServoCity. That’s a nice touch, considering we don’t often see their components in quick hacks. With a stepper to feed more foam, and a stepper to drive the blade mechanism, the device can consistently cut foam from a roll to desired lengths.

The blade mechanism consists of two exacto blades fixed nose-to-nose such that the machine can cut on both forward and reverse sweeps. While we’ve certainly seen some stellar past foam cutter builds, we can’t resist drooling over the speedy throughput of [jgschmidt’s] machine as it cuts on both forward and back-strokes. Finally, when the blades dull, they can be swapped out for a few dime’s worth of new parts.

Many of the steps in [jgschmidt’s] build are laudably practical with a “get it done” attitude. From hot-glued wire insulation to the double-edged blade formed from exacto knives, we’re thrilled to see him take a few pieces off the shelf and few pieces off the web and build himself a new workshop tool. Perhaps the neatest feature of this hack is its ability to rapidly transform a raw material into numerous repeatable, useful forms for his customers.

via [Instructables]

Continue reading “Robo Foam Cutter Makes Short Work Of Your Foam Rolls”

Apple II Watch

Strapping An Apple II To Your Body

Now that the Apple wristwatch is on its way, some people are clamoring with excitement and anticipation. Rather than wait around for the commercial product, Instructables user [Aleator777] decided to build his own wearable Apple watch. His is a bit different though. Rather than look sleek with all kinds of modern features, he decided to build a watch based on the 37-year-old Apple II.

The most obvious thing you’ll notice about this creation is the case. It really does look like something that would have been created in the 70’s or 80’s. The rectangular shape combined with the faded beige plastic case really sells the vintage electronic look. It’s only missing wood paneling. The case also includes the old rainbow-colored Apple logo and a huge (by today’s standards) control knob on the side. The case was designed on a computer and 3D printed. The .stl files are available in the Instructable.

This watch runs on a Teensy 3.1, so it’s a bit faster than its 1977 counterpart. The screen is a 1.8″ TFT LCD display that appears to only be using the color green. This gives the vintage monochromatic look and really sells the 70’s vibe. There is also a SOMO II sound module and speaker to allow audio feedback. The watch does tell time but unfortunately does not run BASIC. The project is open source though, so if you’re up to the challenge then by all means add some more functionality.

As silly as this project is, it really helps to show how far technology has come since the Apple II. In 1977 a wristwatch like this one would have been the stuff of science fiction. In 2015 a single person can build this at their kitchen table using parts ordered from the Internet and a 3D printer. We can’t wait to see what kinds of things people will be making in another 35 years.

Continue reading “Strapping An Apple II To Your Body”

drawing of quadcopter in space

Ask Hackaday: Quadcopter In Near Space?

Your mission, should you choose to accept it, is to send a quadcopter to near space and return it safely to the Earth. Getting it there is not that difficult. In fact, you can get pretty much anything you want to near space with a high altitude weather balloon. Getting it back on the ground in one piece is a whole other ballgame.

Why does someone need to do this? Well, it appears the ESA’s StarTiger team is taking a card out of NASA’s book and wants to use a Sky Crane to soft land a rover on Mars. But instead of using rockets to hold the crane steady in the Martian sky, they want to use…you guessed it, a quadcopter. They’re calling it the Dropter.

quadcopter on mars

At first glance, there seems to be a lot wrong with this approach. The atmosphere on Mars is about 100 times less dense than the Earth’s atmosphere at sea level. How do props operate in these conditions? Testing would need to be done of course, and the Earth’s upper atmosphere is the perfect place to carry out such testing. At 100,000 feet, the density of the stratosphere is about the same as that of the Martian surface atmosphere. AND 100,000 feet is prime high altitude balloon territory.  Not to mention the gravity on Mars is about 38% of Earth’s gravity, meaning a 5.5 pound model on Earth could accurately represent a 15 pound model on Mars.

With all of these facts taken into consideration, one can conclude that realistic testing of a scale model Martian quadcopter is within the grasp of the hacker community. We’ve seen some work on high altitude drones before, but never a quadcopter.

Now it’s your turn to do something no one has ever done before. Think you got what it takes to pull such a project off? Let us know what your approach to the challenge would be in the comments.

Continue reading “Ask Hackaday: Quadcopter In Near Space?”

An Apple ][ Emulator On An Arduino Uno

April Fools’ Day may have passed, but we really had to check the calendar on this hack. [Damian Peckett] has implemented an Apple ][, its 6502 processor, and a cassette port, all on an Arduino Uno. If that wasn’t enough, he also uses a PS/2 keyboard for input and outputs analog VGA. [Damian] is doing all this with very few additional components. A couple of resistors, a capacitor and some very clever hacking were all [Damian] needed to convince an Arduino Uno that it was an Apple.

Making all this work boiled down to a case of resource management. The original Apple ][ had 4KB of RAM and 8KB of ROM. The ATmega328 has only 2KB of RAM, but 32KB of Flash. The only way to make this hack work would be to keep as much of the emulation and other routines in Flash, using as little RAM as possible.

The core of this hack starts with the MOS 6502, the processor used in the Apple. [Damian] wrote a simple assembler which translates the 6502 opcodes and address modes to instructions which can be executed by the Arduino’s ATmega328. To keep everything in ROM and make the emulator portable, [Damian] used two large switch statements. One for address modes, and a 352 line switch statement for the opcodes themselves.

A CPU alone is not an Apple though. [Damian] still needed input, output, and the ROM which made the Apple so special. Input was through a PS/2 keyboard. The PS/2 synchronous serial clock is easy to interface with an Arduino. Output was through a custom VGA implementation, which is a hack all its own. [Damian] used the lowly ATmega16u2 to generate the video timing. The 16u2 is normally used as the Arduino Uno’s USB interface. The only external hardware needed is a single 120 ohm resistor.

The original Apples had cassette and speaker interfaces. So does this emulated Apple. [Woz’s] original cassette and speaker interface accurate loops to generate and measure frequencies. One of the trade-offs [Damian] accepted in his 6502 was cycle accuracy, so he couldn’t use the original routines. Not a problem though, as he was able to write simple functions to replace these routines and drop them in place of the Apple’s own ROM calls.

The Apple ][ ROM itself is handled as one giant character array. This includes the system monitor, Mini-Assembler, Sweet-16, and [Woz’s] own Integer Basic. [Damian] caps off this incredible project by booting his new computer, loading a  Mandelbrot set program from cassette -or in this case an audio file stored on his cell phone, and running it. The well-known fractal is displayed in all its glory on a modern LCD monitor, driven by a microcontroller, emulating a computer from nearly 40 years ago.

Continue reading “An Apple ][ Emulator On An Arduino Uno”