Android-based TV sticks should be in more projects. They are readily available and inexpensive. They have a lot of horsepower for the price, and they can even boot a mainline Linux kernel, unlike some single-board computers we know. They’re smaller than the Pi Zero, so they’ll fit almost anywhere.
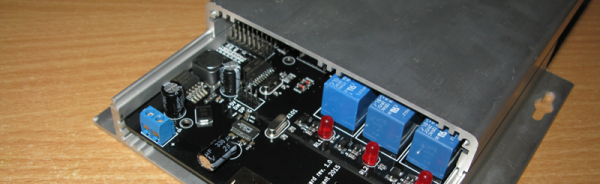
The one thing they don’t have, though, is I/O. Sure, it’s got a USB port, but that’s just about it. [Necromant] considered these problems and created a carrier board that fixes all that.
On-board 3A DC-DC. You can power the whole thing with anything from 7 to 24 volts DC
A 4-Port USB hub
An ATtiny 2313, connected to the hub via the V-USB stack
2 USB ports on the back, with power control via GPIO lines
One USB port on the front (with power always on)
3 relays
Fits a common anodized aluminum enclosure
The ATtiny code is on GitHub and allows for full I/O control, saving the state of the pins in EEPROM, and providing up to eight channels of servo control. The device connects through the USB port (consuming one port on the hub).
Repurposing consumer gear for embedded service is nothing new. We’ve seen it with phones. We’ve even seen remotes used as a mouse. But this is such a nice template for adding cheap and easy computing power to your projects that we’re surprised we don’t see it more often. Why aren’t you hacking a TV stick into your projects?
If you’ve read through the comments on Hackaday, you’ve doubtless felt the fires of one of our classic flame-wars. Any project done with a 32-bit chip could have been done on something smaller and cheaper, if only the developer weren’t so lazy. And any project that’s squeezes the last cycles of performance out of an 8-bit processor could have been done faster and more appropriately with a 32-bit chip.
Of course, the reality for any given project is between these two comic-book extremes. There’s a range of capabilities in both camps. (And of course, there are 16-bit chips…) The 32-bit chips tend to have richer peripherals and run at higher speeds — anything you can do with an 8-bitter can be done with its fancier cousin. Conversely, comparatively few microcontroller applications outgrow even the cheapest 8-bitters out there. So, which to choose, and when?
Eight Bits are Great Bits
The case that [Mike] makes for an 8-bit microcontroller is that it’s masterable because it’s a limited playground. It’s a lot easier to get through the whole toolchain because it’s a lot shorter. In terms of debugging, there’s (often) a lot less that can go wrong, letting you learn the easy debugging lessons first before moving on to the truly devilish. You can understand the hardware peripherals because they’re limited.
And then there’s the datasheets. The datasheet for a chip like the Atmel ATMega168 is not something you’d want to print out, at around 660 pages long. But it’s complete. [Mike] contrasts with the STM32F405 which has a datasheet that’s only 200 pages long, but that’s just going over the functions in principle. To actually get down to the registers, you need to look at the programming manual, which is 1,731 pages long. (And that doesn’t even cover the various support libraries that you might want to use, which add even more to the documentation burden.) The point is, simpler is simpler. And if you’re getting started, simpler is better.
Kids, and Hackaday editors, love robots! The Open Roberta project (OR) takes advantage of this to teach kids about programming. And while the main focus is building a robot programming language that works for teaching grade-school and high-school kids, it’s also a part of a large open source robotics ecosystem that brings a lot more to the table than you might think. We talked with some folks at Google, one of the projects’ sponsors, about where the project is and where it’s going.
Building a robot can be very simple — assembling pre-configured parts or building something small, quick, and cute — or it can be an endeavour that takes years of sweat and tears. Either way, the skills involved in building the ‘bot aren’t necessarily the same as those it takes to program the firmware that drives it, and then eventually the higher-level software that makes it functional and easy to drive.
OR, as an educational project, makes it very, very easy for kids to start off programming robots, but it’s expandable as the user gets more experienced. And since everything is open source, it’s part of a whole ecosystem that makes it even more valuable. We think it’s worth a look (along with something significantly more complex like ROS) if you’re playing around with robotics.
System Architecture
Open Roberta is the user-facing middleware in a chain of software and firmware bits that make a robot work in a classroom environment. For the students, everything runs inside a browser. OR provides a webserver, robot programming interface and language, and then converts the output of the students’ programs to something that can be used with the robots’ firmware. The robots that are used in classrooms are mostly based on the Lego Mindstorms EV3 platform because it’s easy to put something together in short order. (But if you don’t have an EV3, don’t despair and read on!)
The emphasis is on ease of entry for the students and the teachers supervising the class. Everything runs in a browser, so there’s nothing to install on the client side. The students connect to a server that directs the robots, communicating with the robots’ own operating system, and uploading the students’ programs.
The Peachy Printer, originally a crowdfunding campaign for a $100 stereolithography 3D printer, is now dead in the water.[Rylan Grayston], the creator of the Peachy Printer, announced that [David Boe] — investor, 50% owner of Peachy Printer, and business partner — had stolen over $300,000 in Kickstarter campaign funds. According to [Rylan], this money was used to build a house.
An example print from the Peachy Printer Kickstarter campaign
When the Peachy Printer was announced on Kickstarter, it was, by any measure, a game changing product. Unlike other stereolithographic printers like the Form 1 and DLP projector kit printers, the Peachy was cheap. It was also absurdly clever. Instead of using a stepper motor to raise a print out of a vat of resin, the Peachy Printer floated the resin on a vat of salt water. By slowly dripping salt water into this vat, the level of the resin rose up, allowing the galvanometers and laser diode to print the next layer of a 3D object. In our first coverage of the Peachy Printer, everyone was agog at how simple this printer was. It wasn’t a high-resolution printer, but it was a 3D resin printer that only cost $100. Even today, nearly three years after the launch of the Kickstarter campaign, there’s nothing like it on the market.
For the last two years, [Rylan] appeared to have the Peachy Printer in a pseudo-stealth mode. Whispers of the Peachy Printer circled around 3D printer forums, with very little information coming from [Rylan]. For the last year, the Peachy Printer appeared to be just another failed crowdfunded 3D printer. Either [Rylan] didn’t have the engineering chops to take a novel device to market, there were problems with suppliers, or [Rylan] just couldn’t get the product out the door.
In the update published to the Kickstarter campaign, the reason for the failure of Peachy Printer to deliver becomes apparent. The Kickstarter campaign was set up to deliver the funds received – $587,435.73 – directly into [David Boe]’s account. Thirty days after the funds were received, [David] had spent over $165,000. In just over three months, all the Kickstarter funds, save for $200,000 transferred into the Peachy Printer corporate account, were spent by [David].
With no funds to complete the development of the Peachy Printer, [Rylan] looked into alternative means of keeping the company afloat until Kickstarter rewards had shipped. Peachy Printer received two government grants totalling $90,000 and $135,000. In March of 2015, one of [Rylan]’s family members loaned $50,000 to Peachy Printer. A plan to finance the delivery of Kickstarter rewards with new sales – a plan that is usually looked down upon by Kickstarter backers – was impossible, as cost and time required of certifying the laser in the Peachy Printer would have put the company in the red.
Right now, [Rylan] and the Peachy Printer are pursuing repayment from [David Boe], on the basis that Kickstarter reward money is still tied up in the construction of a house. Once the house is complete, the bank will disburse funds from the construction mortgage, and funds can then be transferred from [David] to Peachy Printer.
In all, the Peachy Printer is a mess, and has been since the Kickstarter funds were disbursed to [David]. There is – potentially – a way out of this situation that gets Peachy Printers into the hands of all the Kickstarter backers if the mortgage construction funds come through and production resumes, but that’s a lot of ‘ifs’. Failed Kickstarter projects for 3D printers are nothing new, but [Rylan]’s experience with the Peachy Printer is by far the most well-documented failure of a crowdfunding project we’ve ever seen.
It is often a surprise to see how other people react to mains electricity when they encounter it in a piece of equipment. As engineers who have dealt with it both personally and professionally for many years it is easy to forget that not everyone has had that experience. On one hand we wince at those who dive in with no fear of the consequences, on the other we are constantly surprised at the number of people who treat any item with more than a few volts in it as though it was contaminated with radioactive anthrax and are scared to even think about opening it up.
We recently had a chat among the Hackaday writers about how we could approach this subject. The easy way out is to be all Elf-and-Safety and join the radioactive anthrax crowd. But the conclusion we came to was that this site is a resource for hackers and makers. Some of you are going to lift the lid on boxes containing significant voltages no matter what, so we thought we’d help you do it safely rather than just listen for the distant screams.
So here follows the first in a series on how to approach electronic devices containing high voltages, and live to tell the tale. By “high voltages” we mean anything up to mains voltages, and those directly derived from them such as the few hundred volts rectified DC you’ll find in a switch-mode PSU. For multi-kilovolt EHT you’ll have to wait for another article, because that is an entire subject in itself. We’ll mention these higher voltages in passing, but their detail is best left for a Hackaday colleague with more pertinent experience.
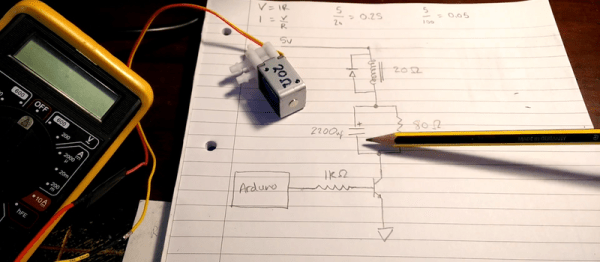
No circuit is so trivial that it’s not worth thinking hard about. [Charles Wilkinson] wanted to drive a solenoid air valve that will stay open for long periods of time. This means reducing the holding current to prevent wasting so much power. He stumbled on this article that covers one approach in a ridiculous amount of depth.
[Charles] made two videos about it, one where he debugs the circuit and learns things live on camera, and another where he sums it all up. We’ll be walking you through the long one, but feel free to skip around.
Those tiny black rectangles of epoxy aren’t black boxes anymore. Decapsulating ICs is becoming somewhat common, and if you’re reverse engineering a chip-on-board epoxy blob, or just figuring out if the chip you bought is the chip you wanted, you’ll need to drop some acid. Usually this means finding someone with the knowhow to decap a chip, or having enough confidence in yourself to mess around with fuming nitric acid. Now Dangerous Prototypes has a better solution – Dirty Decapsulation. Send your chip to Dangerous Prototypes, and they’ll melt away the epoxy and take a few pictures of the die hidden inside your chip.
Dirty Decapsulation is Dangerous Prototype’s addition to their array of hacker services including cheap, crappy PCBs and SLA printing service. Dirty Decapsulation follows in the tradition of these other services; it’s not the best you can possibly get, but you’re not paying thousands of dollars for the job.
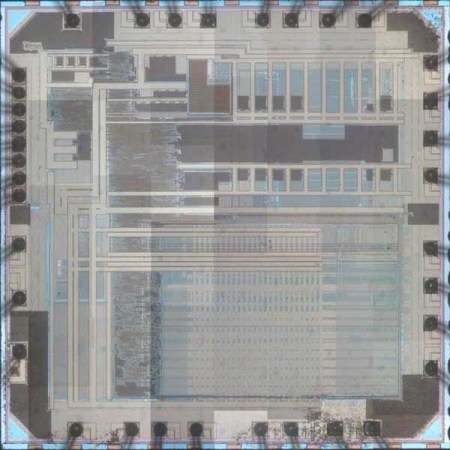
Right now, Dirty Decapsulation will take a chip, strip off the epoxy, and take a few pictures. These pictures are stitched together, producing a medium quality image of the die. No, you can’t see individual gates, and you can’t see different layers of metal and silicon. If you want that, you’ll need some nitric or a few thousand dollars. Dirty Decapsulation is just to verify the chip’s identity and give a rough idea of the layout of the die.


 Building a robot can be very simple — assembling pre-configured parts or building something small, quick, and cute — or it can be an endeavour that takes years of sweat and tears. Either way, the skills involved in building the ‘bot aren’t necessarily the same as those it takes to program the firmware that drives it, and then eventually the higher-level software that makes it functional and easy to drive.
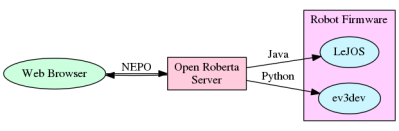 Open Roberta is the user-facing middleware in a chain of software and firmware bits that make a robot work in a classroom environment. For the students, everything runs inside a browser. OR provides a webserver, robot programming interface and language, and then converts the output of the students’ programs to something that can be used with the robots’ firmware. The robots that are used in classrooms are mostly based on the Lego Mindstorms EV3 platform because it’s easy to put something together in short order. (But if you don’t have an EV3, don’t despair and read on!)


 Dirty Decapsulation is Dangerous Prototype’s addition to their array of hacker services including


