Building A Swarm Of Autonomous Ocean Boats

There’s a gritty feel to the Hackerboat project. It doesn’t have slick and polished marketing, people lined up with bags of money to get in on the ground floor, or a flashy name (which I’ll get to in a bit). What it does have is a dedicated team of hackers who are building prototypes to solve some really big challenges. Operating on the ocean is tough on equipment, especially so with electronics. Time and tenacity has carried this team and their project far.

Continue reading “Building A Swarm Of Autonomous Ocean Boats”

Ask Hackaday: Whatever Happened To LED Light Sensors?

If you’re a long-time Hackaday reader like we are, you’ll certainly remember a rash of projects from around ten years ago that all (mis-)used an LED as a light sensor. The idea wasn’t new, but somehow it made the rounds and insinuated itself into our collective minds. Around the same time, a cryptographic cipher with an exceptionally small memory footprint was also showing up in hacker projects: TEA (Tiny Encryption Algorithm).

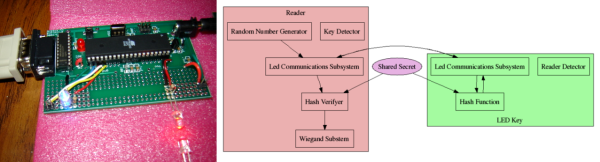
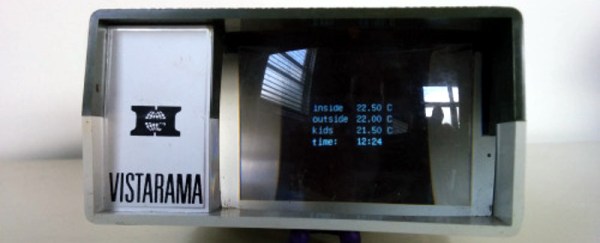
This old project by [Marcin Bojanczyk], [Chris Danis], and [Brian Rogan] combines both the LED-as-light-sensor meme and TEA to make a door-entry keyfob that works over visible light. And they do so using almost nothing — a few LEDs and just over 2Kb of code. It’s pretty sweet.

Which brings us to the question: where are they (LED-sensors and TEA) now?

ledtouch_photo
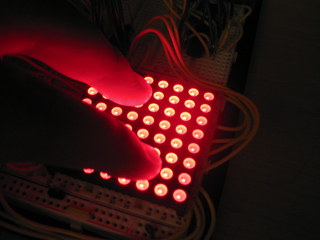
LED-as-light-sensor was just cool. We certainly loved the idea back in 2006. But [Forrest Mims] had been using the phenomenon for decades back then. It certainly makes sense when you’re trying to squeeze as much as possible out of as little as possible, or when budget is a main concern and you just can’t afford an extra photodiode.

But our own experience with LEDs as light sensors is that the results are extremely variable across different LEDs. Code that works with water-clear red LEDs might not work with the ones that come in red-tinted plastic, for instance. Is that why they went extinct?
4746123271_7888160588
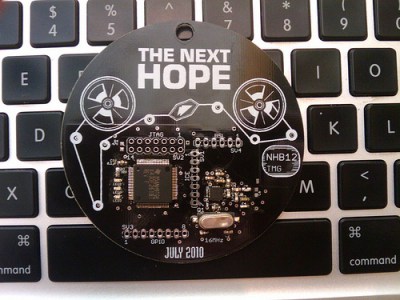
Similarly, the TEA family of ciphers showed up in a bunch of projects around this time, from the badge for the HOPE conference in 2010 to a widely used RFM12B radio library. There are a couple of attacks on XXTEA, but they only affect reduced-round versions of the cipher, and rely on a tremendous amount of intercepted data — more than we’d see in a home-automation network over years.

Over the last five years or so, there’s been a lot more Internet of Things, which means using standard Internet-style encryption methods (AES and so on) that are widespread on non-memory-constrained computers. Is that what happened to XXTEA?

Anyway, we got tipped off to a project that combined a few of our favorite (old) ideas in one, so we thought that we’d share. Thanks [Blue Smoke] for the walk down memory lane. Any of you out there keeping the flame(s) alive? Have you used sensing LEDs or XXTEA? Are those projects still going, or do you have any future projects planned with these tricks still up your sleeve? Let us know in the comments below.

Mouse Brains Plus Line Laser Equals Rangefinder

[Neumi] wrote in with a sweet robotics hack. It’s a 2D laser distance sensor (YouTube) made with a cheap line laser and an optical mouse’s flow-sensor chip used as a low-resolution camera. In one sense, it’s a standard laser-distance-sensor project. But it is clever for a whole bunch of reasons.

adns-3080-for-2d-depth-sensing-with-arduino-uzoetsntwv8mp4-shot0010_thumbnail

For one, using a mouse sensor as a low-res camera is awesome. It’s designed to read from a standard red LED, so the sensitivity is in just the right ballpark for use with a line laser. It returns a 30×30 pixel greyscale image, which is just about the right amount of data for a low-end microcontroller to handle and keep up with the framerate without resorting to coding tricks.

It’s also no coincidence that these sensors are available with lenses built in, for relatively cheap, on eBay. Apparently the quadcopter gurus use them as if they were mice to visually track their quad’s motion. Hacker spillover!

Detecting the laser line as it reflects off of whatever objects are lying on [Neumi]’s floor could also possibly prove difficult, and might produce false readings in the presence of background illumination. So [Neumi] takes two readings with the camera — one with the laser on and one with it off — and differences them. Done fast enough, this should reduce any non-laser sources down to the sensor’s noise floor. Finally, there’s some thresholding and averaging going on behind the scenes that help make everything work out right. The code is up on GitHub.

Not a bad build for a 2D laser distance system on a budget. If you want to shell out a bit more money, and are into a seriously involved build, this is probably the slickest we’ve seen in a long time. And if you’re thinking that you’ve heard of [Neumi] before, you’re right: we featured this 405mm laser PCB exposer / burner CNC machine just a few months ago.

Continue reading “Mouse Brains Plus Line Laser Equals Rangefinder”

Fail Of The Week: Where’s Me Jumper?

Just in case you imagine that those of us who write for Hackaday are among the elite of engineering talent who never put a foot wrong and whose benches see a succession of perfectly executed builds and amazing hacks, let me disabuse you of that notion with an ignominious failure of my own.

I was building an electronic kit, a few weeks ago. It’s a modular design with multiple cards on a backplane, though since in due course you’ll see a review of it here I’ll save you its details until that moment. In my several decades of electronic endeavours I have built many kits, so this one as a through-hole design on the standard 0.1″ pitch should have presented me with no issues at all. Sadly though it didn’t work out that way.

Things started to go wrong towards the end of the build, I noticed that the temperature regulator on my soldering iron had failed at some point during its construction. Most of it had thus been soldered at a worryingly high temperature, so I was faced with a lot of solder joints to go over and rework in case any of them had been rendered dry by the excessive heat.

In due course when I powered my completed kit up, nothing worked. It must have been the extra heat, I thought, so out came the desolder braid and yet again I reworked the whole kit. Still no joy. Firing up my oscilloscope I could see things happening on its clock and data lines so there was hope, but this wasn’t a kit that was responding to therapy. A long conversation with the (very patient) kit manufacturer left me having followed up a selection of avenues, all to no avail. By this time a couple of weeks of on-and-off diagnostics had come and gone, and I was getting desperate. Somehow I’d cooked this thing with my faulty iron, and there was no way to find the culprit.

Continue reading “Fail Of The Week: Where’s Me Jumper?”

Master’s UAV Project Takes Flight

Pushing the maker envelope all the way to the Master level, [Przemyslaw Brudny], [Marek Ulita], and [Maciej Olejnik] from the Politechnika Wroclawska in Poland packed a UAV full of custom sensor boards for their thesis project.

The Skywalker X-8 FPV drone underwent extensive modifications to accommodate the embedded systems as well as upgrading the chassis with carbon glass to withstand the high load and speeds they would need to perform their tests. The ailerons were customized for finer control of the drone. But for our money, it’s all the board design that supports those sensors which is really fun to delve into.

Continue reading “Master’s UAV Project Takes Flight”

A Slide Viewer Makes An Excellent Case For An OLED Project

Sometimes when browsing the websites of our global hackspace community you notice a project that’s attractive not necessarily because of what it does or its technology but because of its presentation. So it is with the subject of this article, [Kris] needed a house temperature monitor and found a 1960s slide viewer made an excellent choice for its housing.

The monitor itself is a fairly straightforward Arduino build using a couple of DS18B20 1-wire temperature sensors and a real-time-clock module and displaying their readings on a small OLED screen. Its code can be found on this mailing list thread if you are interested. The display presented a problem as it needed to be reasonably large, yet fairly dim so it could be read at night without being bright enough to interrupt sleep.

A variety of projection techniques were tried, involving lenses from a projection clock, a magnifying glass, and a Google Cardboard clone. Sadly none of these lenses had the required focal length. Eventually the slide viewer was chosen because it was pointed out that the OLED screen was about the same size as a photographic slide.

Slide viewers are part of the familiar ephemera of the analog era that most people over 60 may still have taking up drawer space somewhere but may well be completely alien to anyone under about 30. They were a magnification system packaged up into a console usually styled to look something like a small portable TV of the day, and different models had built-in battery lights, or collected ambient light with a mirror. The screen was usually a large rectangular lens about 100mm(4″) diagonal.

[Kris]’s Vistarama slide viewer came via eBay. It’s not the smallest of viewers, other models folded their light paths with mirrors, however the extra space meant that the Arduino fit easily. The OLED was placed where the slide would go, and its display appeared at just the right magnification and brightness. Job done, and looking rather stylish!

We’ve not featured a slide viewer before here at Hackaday, though we did recently feature a similar hack on an Ikea toy projector. We have however featured more than one digital conversion on a classic slide projector using LCD screens in place of the slide.

Via Robots and Dinosaurs makerspace, Sydney.

Hackaday Prize Entry: Electronic, Visual Harmonicas

[sholnkin] is tasked with teaching a kindergarten class how to play a musical instrument. No, not those cheap plastic recorders. [shlonkin] is teaching kindergarteners how to play the only instrument that both blows and sucks: the harmonica.

Unlike a classroom of kids with plastic recorders, where the fingering is either right or it isn’t, [shlonkin] needs to teach kids to put their mouth over the right hole, and suck or blow to produce a note. The classroom has a poster laying out the notes on the harmonica, but they needed something better. [shlonkin] envisioned a large illuminated sign that lit up in different colors, and could play the displayed notes with a speaker.

The high-level design for this project includes a Teensy 3.2 with the Audio Adapter breakout driving a small audio amp. The Teensy also controls a bunch of LEDs mounted inside a wooden case. The layout of these LEDs went surprisingly well, and it’s rare to find a backlit panel that is lit this evenly.

As a classroom musical teaching aid, this type of device has been around for decades – deep in the recesses of band rooms in schools across the world, you can find old Wurlitzer pianos with devices that aren’t much different from this simple device. It’s a pedagogical method that worked back then, and should work now.

The HackadayPrize2016 is Sponsored by: