Nixie Tubes Adorn Steampunk Solar Power Meter

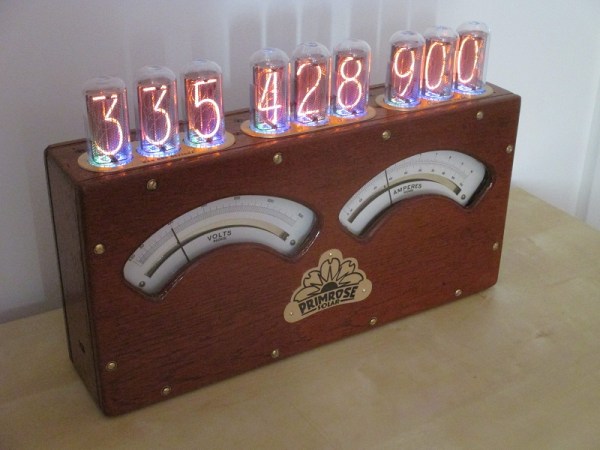
The appeal of adding Nixie tube displays to a project seems to know no end. First it was Nixie clocks, now it’s Nixie power meters, with the latest addition being this Nixie-Steampunk hybrid solar power monitor.

We’re suckers for a project with a vintage look, and this one pushes all the buttons. Built on commission for a solar power company CEO’s office, [Paul Parry]’s build is based on a Depression-era Metropolitan-Vickers combined voltmeter and ammeter. The huge meters with mirrored scales and the rich wood of the case – our guess is that it’s mahogany – made a great starting point, and after some careful hole drilling, nine IN-18 Nixies were sprouting from the case. A strip of RGB LEDs below decks added the requisite backlighting of the envelopes, and a Raspberry Pi was enlisted to interpret data from the company’s solar farm and drive the tubes and the meters. The project was capped off with a new finish on the case and a couple of fancy brass plaques.

[Paul] sent us the tip for his build after seeing the last power meter we covered, and we have to say they’re both great looking and functional projects. Keep the Nixie projects coming!

Putting A Trackball Inside A Controller

Gaming on a PC is obviously superior and you would be a fool to argue otherwise. The keyboard and mouse is the obviously superior input device, but there are times when you just want to play games on a couch. [Gabriel] has an interesting solution to this input problem in the second version of his KeyBall Controller. It’s a controller, but it leverages the superior layout and precision of the keyboard and mouse combo, without making any compromises.

[Gabriel]’s KeyBall Controller began its life as several generic console controllers. The main body of is mostly a clone of the original Xbox S controller. Inside, there are parts from a clone SNES controller, a PSX controller, a generic USB trackball, and an iPazzPort USB handheld keyboard.

The construction of the KeyBall follows in the tradition of the best case modders we’ve ever seen: cutting plastic, gluing plastic, applying epoxy putty, and lots of sanding. The electronics for the controller also follow in the most hallowed traditions of case modders: perfboard, hot glue, and many fine strands of wire. Inside the controller is a USB hub to connect all the different USB devices.

It’s a great device that finally solves the problem of putting a traditional keyboard and mouse layout in the palms of your hands.

YAPZH! (Yet Another Pi Zero Hub)

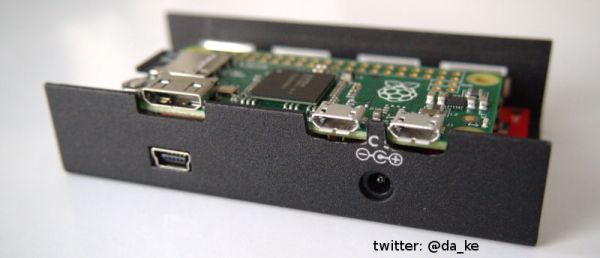
You’d think just about all the permutations of adding a hub to the Raspberry Pi Zero were done. But you’d be wrong. [Daniel’s] approach is to put the Zero inside the existing case for the hub. The LogiLink hub used is in a nice metal case with mounting flanges on the side. It looks robust and not much like a typical consumer hub. This hack would serve well where the Zero and hub might take a few wacks.

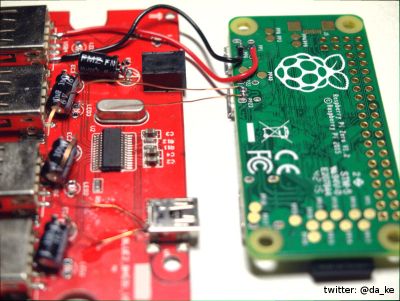
Wiring between Zero and Hub

It took some fiddling with the hub components but he made it work. The easy part was wiring the the power and USB test points on the Zero to the hub.

More challenging were the mechanical aspects to physically fit the Zero into the case. Four LEDs were removed since their only purpose was indicating if a cables were plugged into the hub. There are four electrolytic capacitors standing upright that occupied the space needed by the Pi. [Daniel] repositioned them to lie horizontally to provide room for the Zero.

With the Zero able to fit inside the case the next steps are to create mounting holes in the USB board and cut holes in the case to access the HDMI and USB ports and the SD card holder. Some finicky work with a Dremel provided the holes and the cutouts. Fortunately, the mounting holes on the Zero aligned with some open spaces on the USB board. If they don’t, some glue and standoffs might be sufficient.

The only aspect [Daniel] left for you to hack is access to the GPIO port. That would require another cutout to bring out a ribbon cable for controlling your world. After such a nicely detailed writeup with a plethora of pictures, he had to leave something for other hackers to do.

PIC32 Smart Watch For Less Than A Benjamin

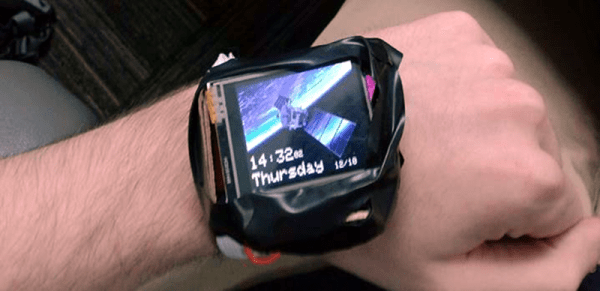
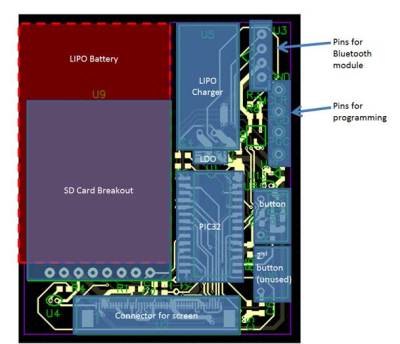
[Matthew Filipek] likes smart watches, but wanted to build one for under $100, so he did. The watch has a 1.7 inch LCD touchscreen, a rechargeable LiPo battery, an SD card, and Bluetooth. The watch is a little large since [Matthew] had only a month to complete the project that drove him to use some pre-made modules image004and meant one shot at getting his custom PCB right.
The watch sports three applications: a settings app, a simple game, and a sketch program (you can see a demo in the video below). Power management is a primary goal, of course, although the clock rate is held high enough to make the game playable. To simplify the software, [Matthew] uses protothreads–a lightweight thread abstraction for embedded systems.

We’ve seen several DIY smartwatches in the past including one entry for the Hackaday Prize. It is hard to roll your own watch that has the same small size and style as a commercial offering. However, there is something to be said for having a homebrew watch for boosting your hacker cred.

Continue reading “PIC32 Smart Watch For Less Than A Benjamin”

WingBoard: Wakeboarding Behind An Airplane

[Aaron Wypyszynski] or [Wyp] for short had a dream as a youngster about jumping out of a plane and “carving through the sky” (paraphrasing the video embedded after the break), so when he grew up [Wyp] went ahead and pursued that dream.

What that boyhood dream produced is [Wyp] offering to pull you through the sky on what looks like a proper model of a blunt nosed paper airplane glider. Seems to be a bit like wakeboarding for skydivers, cause that needed to be a thing.

Continue reading “WingBoard: Wakeboarding Behind An Airplane”

Wink Hub Connects To SmartThings

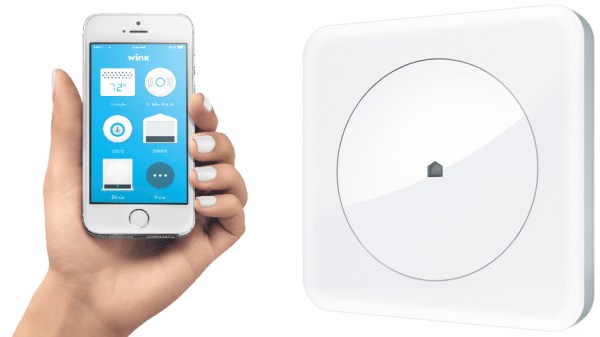
As home automation grows more and more popular by the day, the free market is taking notice and working to supply the demand. The Wink Hub is a part of this current trend. It’s a device that allows many of your wireless devices to talk to one another. Things like lights, thermostats, door locks, garage doors…and many other devices can all connect to the hub. Typically, you use a program on your phone or tablet to control these devices. But because this is a closed source gadget, it can’t connect to everything, until now. A hacker was not only able to root the device, but he also gained the ability to connect to devices it was never designed to connect to.

[Michael] was able to get root and take control of some of the devices used with one of Wink’s main competitors – SmartThings. The process is not for the faint of heart and requires at least a yellow belt in Linux-Fu. [Michael] points out that you should use a Wink Hub that you don’t care about as the possibility of bricking it is there if something goes wrong.

We’ve seen a few instances of rooting the Wink and are happy to see these hacks maturing. It’s a shame the thing is locked down since the multiple radios make the hardware capable of being a great cross-platform hub. For legacy and better user experience, cross-platform operation is paramount. The industry isn’t moving in that direction… Phillips recently removed support for devices outside the Hue family. But the community wants this functionality and their push back led to a hasty reversal of Phillips’ changes. Hackers like [Michael] are showing what your home could be like if connected devices were free to interact with one another.

Drive A Sony Camera With An ESP8266

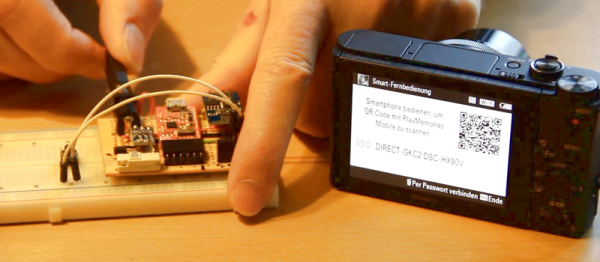
Nearly everything has WiFi these days. [glaskugelsehen]’s Sony camera uses the wireless network to transfer photos to the computer, naturally, and it also has a remote-control application that’ll run on Android smartphones. [glaskugelsehen] doesn’t have an Android — but he does have shows us an ESP8266 that he turned into a WiFi-powered remote for the camera (Google translate into English).

Sony actually made [glaskugelsehen]’s work easy here. They have a publicly available API for the camera’s controls, and it’s all run by JSON sent over HTML HTTP POST. Which is to say, that it’s a piece of cake to script as long as you can send HTMLHTTP directives.

[glaskugelsehen]’s code, written in the Arduino environment for the ESP, first finds the camera’s WiFi network and authenticates to it. Then it sets the camera into remote-control mode, and takes over from there. So far, he’s only implemented taking still photos, but from the API it looks like you can also stop and start video recordings and more.

And yeah. We just wrote up another project doing virtually the same thing with a GoPro. [glaskugelsehen] read that too, and mentions it in his blog. We love it when people take inspiration from each other!