The Perils Of Return Path Gaps

The radio frequency world is full of mysteries, some of which seem to take a lifetime to master. And even then, it seems like there’s always something more to learn, and some new subtlety that can turn a good design on paper into a nightmare of unwanted interference and unexpected consequences in the real world.

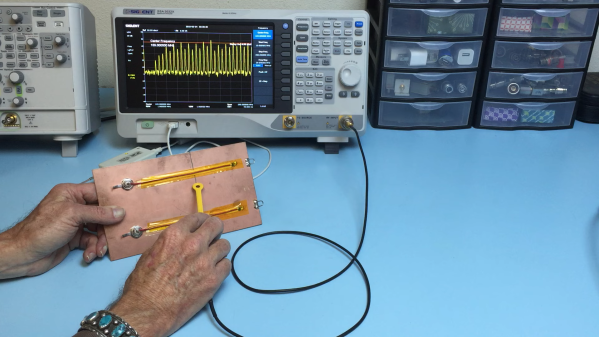
As [Ken Wyatt] aptly demonstrates in the video below, where you put gaps in return paths on a PCB is one way to really screw things up. His demo system is simple: a pair of insulated wires running from the center pins on BNC jacks and running along the surface of a piece of copper-clad board to simulate a PCB trace. The end of each wire is connected to the board’s ground plane through a 50 ohm resistor, with one wire running over a narrow slot cut into the board. A harmonics-rich signal is fed into each trace while an H-field EMC probe connected to a spectrum analyzer is run along the length of the trace.

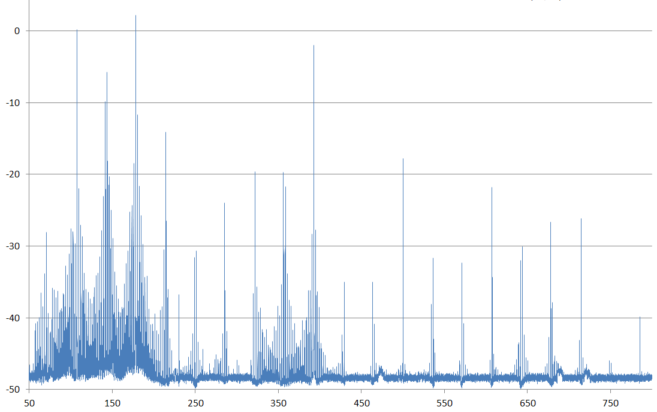
With the trace running over the solid ground plane, the harmonics are plentiful, as expected, but they fall off very quickly away from the trace. But over on the trace with the gapped return trace it’s a far different story. The harmonics are still there, but they’re about 5 dBmV higher in the vicinity of the gap. [Ken] also uses the probe to show just how far from the signal trace the return path extends to get around the gap. And even worse, the gap makes it so that harmonics are detectable on the unpowered trace. He also uses a current probe to show how common-mode current will radiate from a long conductor attached to the backplane, and that it’s about 20 dB higher with the gapped trace.

Hats off to [Ken] for this simple explanation and vivid reminder to watch return paths on clock traces and other high-frequency signals. Need an EMC probe to check your work? A bit of rigid coax and an SDR are all you needContinue reading “The Perils Of Return Path Gaps”

GPU Turned Into Radio Transmitter To Defeat Air-Gapped PC

Another week, another exploit against an air-gapped computer. And this time, the attack is particularly clever and pernicious: turning a GPU into a radio transmitter.

The first part of [Mikhail Davidov] and [Baron Oldenburg]’s article is a review of some of the basics of exploring the RF emissions of computers using software-defined radio (SDR) dongles. Most readers can safely skip ahead a bit to section 9, which gets into the process they used to sniff for potentially compromising RF leaks from an air-gapped test computer. After finding a few weak signals in the gigahertz range and dismissing them as attack vectors due to their limited penetration potential, they settled in on the GPU card, a Radeon Pro WX3100, and specifically on the power management features of its ATI chipset.

With a GPU benchmarking program running, they switched the graphics card shader clock between its two lowest power settings, which produced a strong signal on the SDR waterfall at 428 MHz. They were able to receive this signal up to 50 feet (15 meters) away, perhaps to the annoyance of nearby hams as this is plunk in the middle of the 70-cm band. This is theoretically enough to exfiltrate data, but at a painfully low bitrate. So they improved the exploit by forcing the CPU driver to vary the shader clock frequency in one megahertz steps, allowing them to implement higher throughput encoding schemes. You can hear the change in signal caused by different graphics being displayed in the video below; one doesn’t need much imagination to see how malware could leverage this to exfiltrate pretty much anything on the computer.

It’s a fascinating hack, and hats off to [Davidov] and [Oldenburg] for revealing this weakness. We’ll have to throw this on the pile with all the other side-channel attacks [Samy Kamkar] covered in his 2019 Supercon talk.

Continue reading “GPU Turned Into Radio Transmitter To Defeat Air-Gapped PC”

Fail Of The Week: Ambitious Vector Network Analyzer Fails To Deliver

If you’re going to fail, you might as well fail ambitiously. A complex project with a lot of subsystems has a greater chance of at least partial success, as well as providing valuable lessons in what not to do next time. At least that’s the lemonade [Josh Johnson] made from his lemon of a low-cost vector network analyzer.

For the uninitiated, a VNA is a versatile test instrument for RF work that allows you to measure both the amplitude and the phase of a signal, and it can be used for everything from antenna and filter design to characterizing transmission lines. [Josh] decided to port a lot of functionality for his low-cost VNA to a host computer and concentrate on the various RF stages of the design. Unfortunately, [Josh] found the performance of the completed VNA to be wanting, especially in the phase measurement department. He has a complete analysis of the failure modes in his thesis, but the short story is poor filtering of harmonics from the local oscillator, unexpected behavior by the AD8302 chip at the heart of his design, and calibration issues. Confounding these issues was the time constraint; [Josh] might well have gotten the issues sorted out had the clock not run out on the school year.

After reading through [Josh]’s description of his project, which was a final-year project and part of his thesis, we feel like his rating of the build as a failure is a bit harsh. Ambitious, perhaps, but with a spate of low-cost VNAs coming on the market, we can see where he got the inspiration. We understand [Josh]’s disappointment, but there were a lot of wins here, from the excellent build quality to the top-notch documentation.

Fail Of The Week: How Not To Design An RF Signal Generator

We usually reserve the honor of Fail of the Week for one of us – someone laboring at the bench who just couldn’t get it together, or perhaps someone who came perilously close to winning a Darwin Award. We generally don’t highlight commercial products in FotW, but in the case of this substandard RF signal generator, we’ll make an exception.

We suppose the fail-badge could be pinned on [electronupdate] for this one in a way; after all, he did shell out $200 for the RF Explorer signal generator, which touts coverage from 24 MHz to 6 GHz. But in true lemons-to-lemonade fashion, the video below he provides us with a thorough analysis of the unit’s performance and a teardown of the unit.

The first step is a look at the signal with a spectrum analyzer, which was not encouraging. Were the unit generating a pure sine wave as it should, we wouldn’t see the forest of spikes indicating harmonics across the band. The oscilloscope isn’t much better; the waveform is closer to a square wave than a sine. Under the hood, he found a PIC microcontroller and a MAX2870 frequency synthesizer, but a conspicuous absence of any RF filtering components, which explains how the output got so crusty. Granted, $200 is not a lot to spend compared to what a lab-grade signal generator with such a wide frequency range would cost. And sure, external filters could help. But for $200, it seems reasonable to expect at least some filtering.

We applaud [electronupdate] for taking one for the team here and providing some valuable tips on RF design dos and don’ts. We’re used to seeing him do teardowns of components, like this peek inside surface-mount inductors, but we like thoughtful reviews like this too.

Continue reading “Fail Of The Week: How Not To Design An RF Signal Generator”

Filter Your Pi And Be A Responsible Pirate

At this point it’s pretty well-known that you can tack a long wire to the Raspberry Pi’s GPIO, install some software, and you’ve got yourself the worlds easiest pirate FM radio station. We say that it’s a “pirate” station because, despite being ridiculously easy to do, broadcasting on these frequencies without a license is illegal. Even if you had a license, the Raspberry Pi with a dangling bit of wire will be spewing out all kinds of unintentional noise, making it a no-go for any legitimate purposes.

Unfiltered output of Pi broadcasting on 107.3 MHz

In an effort to address that issue, [Naich] has written up a couple posts on his blog which not only discuss why the Pi is such a poor transmitter, but shows how you can build a filter to help improve the situation. You’ll still be a lawless pirate if you’re transmitting on FM stations with your Pi, but you won’t be a filthy lawless pirate.

In the first post, [Naich] shows us exactly what’s coming out of the wire antenna when the Pi is broadcasting some tunes on the default 107.3 MHz, and it ain’t pretty. The Pi is blasting out signals up and down the spectrum from 50 MHz to 800 MHz, and incredibly, these harmonics are in some cases stronger than the intentional broadcast. Definitely not an ideal transmitter.

[Naich] then goes on to show how you can build a DIY filter “hat” for the Pi that not only cuts down a lot of the undesirable chatter, but even boosts the intended signal a bit. The design is surprisingly simple, only costs a few bucks in components, and conveniently is powered directly from the Pi’s GPIO. It even gives you a proper antenna jack instead of a bare wire wound around a header pin.

We’ve seen plenty of projects utilizing the Raspberry Pi FM transmission hack, and while this mod still doesn’t make it perfect, it’s always nice to see an awesome hack made even better.

Cleaning Up A Low-Cost Buck-Boost Supply

Cheap DC-DC converters have been a boon on the hobbyist bench for a while now, but they can wreak havoc with sensitive circuits if you’re not careful. The problem: noise generated by the switch-mode supply buried within them. Is there anything you can do about the noise?

As it turns out, yes there is, and [Shahriar] at The Signal Path walks us through a basic circuit to reduce noise from DC-DC converters. The module under the knife is a popular buck-boost converter with a wide input range, 0-32 VDC output at up to 5 amps, and a fancy controller with an LCD display. But putting the stock $32 supply on a scope reveals tons of harmonics across a 1 MHz band and overall ripple of about 66 mV. But a simple voltage follower built from a power op-amp and a Zener diode does a great job of reducing the spikes and halving the ripple. The circuit is just a prototype and is meant more as a proof of principle and launching point for further development, and as such it’s far from perfect. The main downside is the four-volt offset from the input voltage; there’s also a broad smear of noise at the high end of the spectrum that persists even with the circuit in place. Centered around 900 MHz as it is, we suspect a cell signal of some sort is getting in. 900 kHz.

If you haven’t checked out the videos at The Signal Path, you really should. [Shahriar] really has a knack for explaining advanced topics in RF engineering, and has a bench to die for. We’ve covered quite a few of his projects before, from salvaging a $2700 spectrum analyzer to multiplexing fiber optic transmissions.

Continue reading “Cleaning Up A Low-Cost Buck-Boost Supply”

Measuring Spurious Emissions Of Cheap Handheld Transceivers

If you buy an amateur transceiver cheap enough to make a reasonable grab bag gift or stocking stuffer, you get what you pay for. And if this extensive analysis of cheap radios is any indication, you get a little more than you pay for in the spurious emissions department.

Amateur radio in the United States is regulated by the FCC’s Part 97 rules with special attention given to transmitter technical specifications in Subpart D. Spurious emissions need to be well below the mean power of the fundamental frequency of the transmitter, and [Megas3300] suspected that the readily available Baofeng UV-5RA dual-band transceiver was a little off spec. He put the $20 radio through a battery of tests using equipment that easily cost two orders of magnitude more than the test subject. Power output was verified with a wattmeter, proper attenuators were selected, and the output signal scanned with a spectrum analyzer. Careful measurements showed that some or all of the Baofeng’s harmonics were well above the FCC limits. [Megas3300] tested a few other radios that turned out to be mostly compliant, but however it all turned out, the test procedure is well documented and informative, and well worth a look.

The intended market for these radios is more the unlicensed crowd than the compliant ham, so it’s not surprising that they’d be out of spec. A ham might want to bring these rigs back into compliance with a low pass filter, for which purpose the RF Biscuit might prove useful.

[via r/AmateurRadio]