Hackaday Prize Entry: A 3D Printer Management System

Since the first desktop 3D printers, people have been trying to figure out a way to manage desktop 3D printers and turn them into tiny little automated factories. One of the first efforts was a conveyor belt build plate that was successfully used by MakerBot until it wasn’t anymore. Octoprint has been a boon for anyone who wants to manage a few printers, but that’s only half the solution.

For his Hackaday Prize entry, [Mike] has come up with a solution that turns a desktop 3D printer into a completely automated factory. Not only does this project take care of removing the part from the bed when the print is done, it also manages a web-based print queue. It is the simplest way to manage a printer we’ve ever seen, and it’s a great entry for the Hackaday Prize.

First up, the software stack. [Mike] has developed a web-based queue and slicing software that ingests 3D models and spits out Gcode to a printer. This, really, is nothing new. Octoprint does it, Astroprint does it, and even a few 3D printers have this capability. This is only one part of the project though, although it is geared more as a maker space management software than simply a dedicated 3D printer controller.

You can’t have an automated mini factory without an automated build plate, though, and here [Mike] has come up with something really great. His solution for dispensing prints after they’re completed is brilliant in its simplicity. All you need to do is drop the floor out from underneath the print. [Mike]’s solution is a trap door print bed. At the beginning of the print, an inkjet printer spits out a piece of paper, with a few lines of text, onto the print bed. When the print is finished, a stepper motor unwinds a cable, and a trap door opens up underneath the print. The part drops into a bin, the door closes, and the next print is loaded up in the queue. It’s brilliantly simple.

You can check out [Mike]’s demo of this system after the break. It’s awesome and so sublimely simple we’re shocked no one has thought of this before.

Continue reading “Hackaday Prize Entry: A 3D Printer Management System”

12-Foot Guitar Takes The Stage

Musical festivals are fun and exciting. They are an opportunity for people to perform and show-off their art. The Boulevardia event held this June in Kansas City was one such event, where one of the interactive exhibits was a 12-foot guitar that could be played. [Chris Riebschlager] shares his experience making this instrument which was intended to welcome the visitors at the event.

The heart of this beautiful installation is a Bare Conductive board which is used to detect a touch on the strings. This information is sent over serial communication to a Raspberry Pi which then selects corresponding WAV files to be played. Additional arcade buttons enable the selection of playable chords from A through G, both major and minor and also give the option to put the guitar in either clean or dirty mode.

The simplicity of construction is amazing. The capacitive touch board is programmed using the Arduino IDE and the code is available as a Gist. The Raspberry Pi runs a Python script which makes the system behave like an actual guitar i.e. touching and holding the strings silences it while releasing the strings produces the relevant sound. The notes being played were exported guitar notes from Garage Band for better consistency.

The physical construction is composed of MDF and steel with the body and neck of the guitar milled on a CNC machine. Paint, finishing and custom decals give the finished project a rocking appearance. Check out the videos below for the fabrication process along with photos of the finished design.

This project is a great example of art enabled by technology and if you love guitars, then go ahead and check out Brian May’s Handmade Guitar. Continue reading “12-Foot Guitar Takes The Stage”

Fail Of The Week: Tracking Meteors With Weather Radio

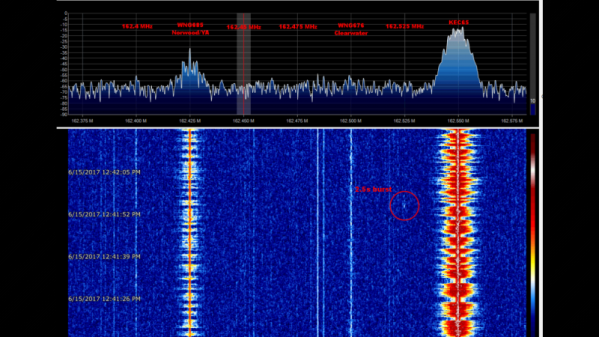
It’s not hard to detect meteors: go outside on a clear night in a dark place and you’re bound to see one eventually. But visible light detection is limiting, and knowing that meteors leave a trail of ions means radio detection is possible. That’s what’s behind this attempt to map meteor trails using broadcast signals, which so far hasn’t yielded great results.

Passing jet’s Doppler signature

The fact that meteor trails reflect radio signals is well-known; hams use “meteor bounce” to make long-distance contacts all the time. And using commercial FM broadcast signals to map meteor activity isn’t new, either — we’ve covered the “forward scattering” technique before. The technique requires tuning into a frequency used by a distant station but not a local one and waiting for a passing meteor to bounce the distant signal back to your SDR dongle. Capturing the waterfall display for later analysis should show characteristic patterns and give you an idea of where and when the meteor passed.

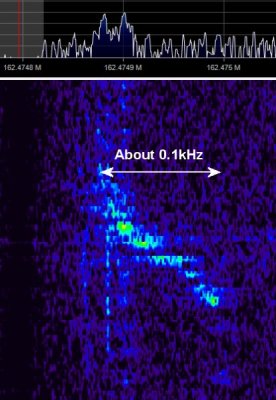
[Dave Venne] is an amateur astronomer who turns his eyes and ears to the heavens just to see what he can find. [Dave]’s problem is that the commercial FM band in the Minneapolis area that he calls home is crowded, to say the least. He hit upon the idea of using the National Weather Service weather radio broadcasts at around 160 MHz as a substitute. Sadly, all he managed to capture were passing airplanes with their characteristic Doppler shift; pretty cool in its own right, but not the desired result.

The comments in the RTL-SDR.com post on [Dave]’s attempt had a few ideas on where this went wrong and how to improve it, including the intriguing idea of using 60-meter ham band propagation beacons. Now it’s Hackaday’s turn: any ideas on how to fix [Dave]’s problem? Sound off in the comments below.

Fake Your ID Photos – The 3D Way

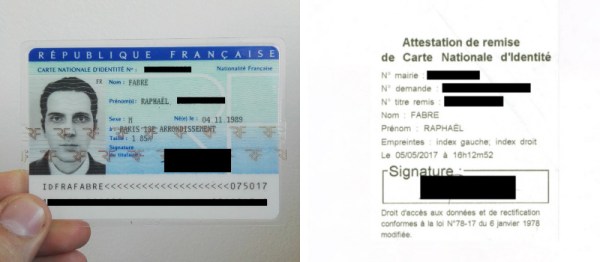
Photographs for identification purposes have strict requirements. Lighting, expression, and framing are all controlled to enable authorities to quickly and effectively use them to identify individuals reliably. But what if you created an entirely fake photograph from scratch? That’s exactly what [Raphael Fabre] set out to do.

With today’s 3D modelling tools, human faces can be created in extreme detail. Using these, [Raphael] set out to create a 3D model of himself, which was then used to render images simulating a passport photograph. Not content to end the project there, [Raphael] put his digital doppelgänger to the test – applying for a French identification card. He succeeded.

While the technology to create and render high-quality human faces has existed for a while, it’s impressive that [Raphael]’s work passed for genuine human. Obviously there’s something to be said for the likelihood of an overworked civil servant catching this sort of ruse, but the simple fact is, the images made it through the process, and [Raphael] has his ID. Theoretically, this leaves open the possibility of creating entirely fictitious characters and registering them as real citizens with the state, for all manner of nefarious purposes. If you do this, particularly on a grand scale, be sure to submit it to the tip line.

We’ve seen other concerning ID hacks before, such as this attempt at hacking RFIDs in Passport Cards.

Spice Up Your Shop With A VW Pickup Wall Decoration

Seeing a half car is always a disconcerting experience. Especially when that half car is about 14 feet up in the air. [PanasonicModelRC6015] — We’ll call him [RC6015] for short — has gone and mounted 1/2 (actually more like 1/4) of a VW Rabbit Caddy pickup MK1 up on his shop wall.

The caddy started life as a regular 1983 VW pickup. Unfortunately, the years had not been kind to it. The body panels were in good shape, but there were serious rust problems in the floors, strut towers, rockers, and control arm mounts. According to [RC6015], this is beyond “weld on few replacement panels”, though he’s been heavily questioned on it in his Reddit thread.

Cutting the truck down was easy – a reciprocating saw did most of the work. The VW has a unibody design, so there was still some frame there to hold things together. A 2×12 board then was then bolted from the front of the truck to the rear. This made everything stable and provided a solid mounting point. A second 2×12 was lag bolted to several studs on the wall. Then it was just a matter of lifting the truck into position and bolting the two boards together. We’re guessing the [RC6015]’s wall has solid wood studs. Don’t try hanging a 500 lb truck from the wall if you’ve only got thin metal studs behind your sheetrock.

Just in case you’re wondering, the Panasonic Model RC-6015 is a vintage flip display alarm clock, the same one Marty used in Back to the Future.

If a truck on the wall is a bit much for your shop, check out this wall mounted weather display.

Heathkit’s New RF Meter: Who Is It For?

Electronic hackers and ham radio operators of a certain age have a soft spot for the Heathkit brand. Maybe that’s why we had a rush of nostalgia when we saw the Heathkit site had a new product. You may recall that Heathkit had gone the way of the dodo until a few years ago when the brand started to resurface. Their latest kit is a precision RF meter which is available on preorder.

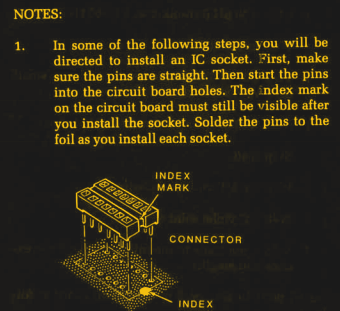
Before there were websites and hacker spaces and all the modern push to “do it yourself,” Heathkit was teaching people electronics through kit building. Sure, they were known for ham radio and test equipment, but many people built stereos (hi-fi), TVs, radio control gear, computers, and even robots. All with manuals that are hard to imagine if you haven’t seen one. They were world-class.

Continue reading “Heathkit’s New RF Meter: Who Is It For?”

EV3DEV Lego Linux Updated

The ev3dev Linux distribution got an update this month. The distribution targets the Lego EV3 which is a CPU Lego provides to drive their Mindstorm robots. The new release includes the most recent kernel and updates from Debian 8.8. It also contains tools needed for some Wi-Fi dongles and other updates.

If you haven’t seen ev3dev before, it is quite simply Linux that boots on the EV3 hardware using an SD card. You don’t have to reflash the computer and if you want to return to stock, just take out the SD card. You can also use ev3dev on a Raspberry Pi or BeagleBone, if you like. There’s a driver framework included for handling sensors, motors, and other items using the file system.

Continue reading “EV3DEV Lego Linux Updated”