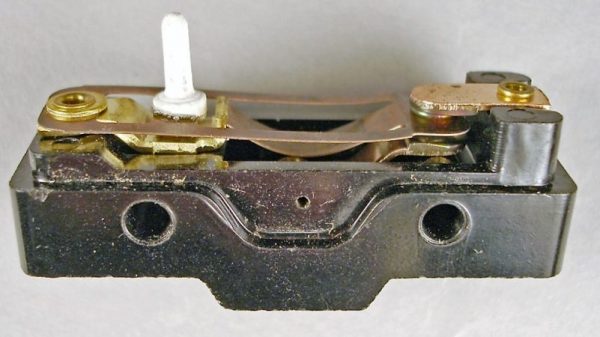
You find them everywhere from 3D printers to jet airliners. They’re the little switches that detect paper jams in your printer, or the big armored switches that sense when the elevator car is on the right floor. They’re microswitches, or more properly miniature snap-action switches, and they’re so common you may never have wondered what’s going on inside them. But the story behind how these switches were invented and the principle of physics at work in the guts of these tiny and useful switches are both pretty interesting.
Year: 2017
A Touchscreen From 1982, That Could Kill With A Single Finger Press
Over the pond here in the UK we used to have a TV show called Tomorrow’s World, It was on once a week showing all the tech we would have been using in 10 years time (or so they said). In 1982 they ran with a story about a touch screen computer. Perhaps not what you would recognize today as a touchscreen but given the date and limited technology someone had come up with a novel idea for a touchscreen that worked sort of.
It was a normal CRT screen but around the edges where photodiodes pointing inwards as if to make an invisible infrared touch interface just half an inch in front of the screen. Quite impressive technology giving the times. As they go through the video showing us how it works a more sinister use of this new-fangled touch screen computer rears its ugly head, They turned it into a pretty cool remote-controlled gun turret complete with a motorized horizontal and vertical axis upon which an air pistol was placed along with a camera. You could see an image back from the camera on the screen, move the gun around to aim the weapon, then with a single finger press on the screen, your target has been hit.
Continue reading “A Touchscreen From 1982, That Could Kill With A Single Finger Press”
Victorians And Fiber, Louisville’s Quest For Fast Internet
It was a dark and stormy afternoon, the kind you get on the east side of the country. I was drinking a coffee, sitting in a camping chair in front of my door, and watching like a hawk for the treacherous cable man to show up. This day there would be no escape. There would be no gently rapping the door with a supple sheepskin leather glove before scurrying away for another union mandated coffee break. I was waiting, I was kind of grumpy, and by God today would be the day. Today would be the day that after hours on hold, after three missed appointments, after they lost my records twice; I would get an answer on whether or not they could actually service internet to my apartment. If I was lucky, and the answer was yes, then approximately two to three thousand years later they would run a cable from the telephone pole to my house and I could stop commandeering WiFi from the pizza shop across from me.
It’s important to note that I was in the middle of the city. I wasn’t out in the boonies. Every house on the block but mine had cable. While this is dumb, it begins to make more sense when you dive into the history. Louisville, Kentucky is a strange place. It used to be the gateway to the west. Ships would crawl up its river until they reached the falls. Then porters would charge an exorbitant fee to carry all those goods down to the bottom of the falls where they would be loaded on a ship and be sent ever westward. Resulting in every rich merchant, captain, and manufacturer in the region having a nice house there. Ever wonder why the Derby is in Louisville and the Queen comes to visit sometimes? It probably has something to do with it having the highest concentration of Victorian buildings and mansions outside of New York City.
Continue reading “Victorians And Fiber, Louisville’s Quest For Fast Internet”
Broken Yoga Becomes Firewall
It seems the older I get, the density of broken and/or old laptops on my garage grows. That’s one of the reasons it’s interesting to know which projects are being made to bring back to life these things. [zigzagjoe] sent us an interesting project he made out of a Lenovo Yoga 2 motherboard: a pfsense router/firewall.
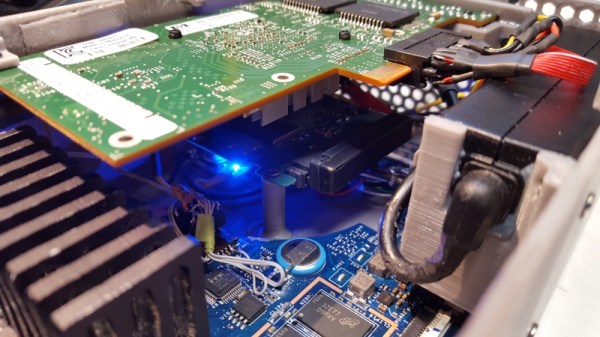
The laptop was damaged, but the main board was functioning just fine. What started as adding an old Pentium heatsink to it and see how good it would work, escalated to a fully working, WiFi, 4 port gigabyte NIC, 3D printed case firewall. The board had PCI-E via an M.2 A/E key slot for the WiFi module but [zigzagjoe] need a normal PCI-E slot to connect the quad-port NIC. He decided to hand solder the M.2 A/E (WiFi card) to have a PCI-E 1x breakout since his searches for an adapter came out empty or too expensive. For storage, he chose 16GB SanDisk U100 Server half-slim SSD for its power efficiency. Once again, the SSD cable had to be hacked as the laptop originally used a super-slim HDD with a non-standard connector. The enclosure was then designed and 3D printed.
But [zigzagjoe] went further to optimize his brand new router/firewall. On the project documentation, we can see a lot of different modifications went into building it, such as bios modification for new WiFi modules to work, an Attiny85 fan driver for extra cooling, a 45W PSU inside the case and other interesting hacks.
This is not your typical laptop to firewall hack, that’s for sure.
A Tool For KiCad Board Renderings
If you’re producing documentation for a PCB project, you might as well make the board renders look good. But then, that’s a lot of work and you’re not an artist. Enter [Jan]’s new tool that takes KiCad board files, replaces each footprint with (custom) graphics, and provides a nice SVG representation, ready for labelling. If you like the output of a Fritzing layout, but have higher expectations of the PCB tool, this is just the ticket.
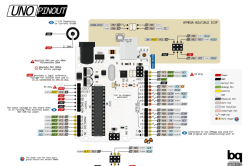
 We all love [pighixx]’s pinout diagrams. Here’s his take on the Arduino Uno, for instance. It turns out that he does these largely by hand. That’s art for ya.
Sparkfun has taken a stab at replicating the graphical style for the pin labels, but then they toss in a photo of the real item. [Jan]’s graphic PCB generator fills in the last step toward almost putting [pighixx] out of a job. Get the code for yourself on GitHub.
Mangling Images With Audio Effects
Ever wonder what those snapshots you took of your trip to Paris would look like if you ran them through a Proco RAT or a Boss Overdrive? How about a BF-3 flanger? [Robert Foss] wrote in with this nifty little script (GitHub) that processes images as if they were audio files so that you can try it out without investing in a rack of analog pedals. Test your audio/visual DSP intuition and see if you can name the images without looking at the effects.
If you know your Linux command-line utilities, there’s really not much to it — scroll down to the very bottom of the script to see how it’s done. ffmpeg converts the images to YUV format, which works much better than RGB for audio processing, and then sox adds the audio effects. Another trip through ffmpeg gets you back to an image or video.
OK, it’s cheating because it’s applying the audio effects inside the computer, but nothing’s stopping you from actually taking the audio out and running it through that dusty Small Stone. Of course, once you’ve got audio outside of the computer, the world is your oyster. Relive the glorious 70’s when video artists made works using souped-up audio synthesizers. If you haven’t seen the Sandin Image Processor or the Scanimate in action, you’ve got some YouTubing to do.
Pi Time – A Fabric RGB Arduino Clock
Pi Time is a psychedelic clock made out of fabric and Neopixels, controlled by an Arduino UNO. The clock started out as a quilted Pi symbol. [Chris and Jessica] wanted to make something more around the Pi and added some RGB lights. At the same time, they wanted to make something useful, that’s when they decided to make a clock using Neopixels.
Neopixels, or WS2812Bs, are addressable RGB LEDs , which can be controlled individually by a microcontroller, in this case, an Arduino. The fabric was quilted with a spiral of numbers (3.1415926535…) and the actual reading of the time is not how you are used to. To read the clock you have to recall the visible color spectrum or the rainbow colors, from red to violet. The rainbow starts at the beginning of the symbol Pi in the center, so the hours will be either red, yellow, or orange, depending on how many digits are needed to tell the time. For example, when it is 5:09, the 5 is red, and the 9 is yellow. When it’s 5:10, the 5 is orange, the first minute (1) is teal, and the second (0) is violet. The pi symbol flashes every other second.
There are simpler and more complicated ways to perform the simple task of figuring out what time it is…
We are not sure if the digits are lighted up according to their first appearance in the Pi sequence or are just random as the video only shows the trippy LEDs, but the effect is pretty nice:


