The ‘All-Seeing Pi’ Aids Low-Vision Adventurer

Adventure travel can be pretty grueling, what with the exotic locations and potential for disaster that the typical tourist destinations don’t offer. One might find oneself dangling over a cliff for that near-death-experience selfie or ziplining through a rainforest canopy. All this is significantly complicated by being blind, of course, so a tool like this Raspberry Pi low-vision system would be a welcome addition to the nearly-blind adventurer’s well-worn rucksack.

[Dan] has had vision problems since childhood, but one look at his YouTube channel shows that he doesn’t let that slow him down. When [Dan] met [Ben] in Scotland, [Ben] noticed that he was using his smartphone as a vision aid, looking at the display up close and zooming in to get as much detail as possible from his remaining vision. [Ben] thought he could help, so he whipped up a heads-up display from a Raspberry Pi and a Pi Camera. Mounted to a 3D-printed frame holding a 5″ HDMI display and worn from a GoPro head mount, the camera provides enough detail to help [Dan] navigate, as seen in the video below.

The rig is a bit unwieldy right now, but as proof of concept (and proof of friendship), it’s a solid start. We think a slimmer profile design might help, in which case [Ben] might want to look into this Google Glass-like display for a multimeter for inspiration on version 2.0.

Continue reading “The ‘All-Seeing Pi’ Aids Low-Vision Adventurer”

Stop Printing Air With A Filament Sensor

If you have had a 3D printer for awhile, you know the heartbreak of coming in to check on an 8-hour print only to find that in hour 7 you ran out of filament (or the filament broke) and your printer has been dutifully moving around for no reason. [Chuck Hellebuyck] knows and he decided to make a filament sensor he found on Thingiverse.

Finding a part on Thingiverse and printing it probably doesn’t warrant much attention. But if you watch the video, below, it is a good example of how things from Thingiverse don’t always meet your needs. The microswitch [Chuck] had was bigger than the design used. So he loaded the STL file into TinkerCAD and fixed it. He shows you exactly how he did it. That’s a useful skill because you never know when you’ll need to modify some part you’ve found on the Internet.

Continue reading “Stop Printing Air With A Filament Sensor”

Unlocking 12V Quick Charge On A USB Power Bank

[Robert Nixdorf] frequently needs to use this high-end audio recorder, but it sucks dry a set of eight AA batteries in just a few hours. Obviously a longer lasting solution was required, and he started scouring the web looking for an answer. He bought a Quick Charge power bank and then hacked a Digispark to negotiate with the power bank to provide 12V output to Quick Charge his audio recorder.

Qualcomm’s Quick Charge system is designed to provide increased output voltages to reduce charging time in QC compatible devices such as mobile phones powered by their Snapdragon range of SoC’s. Depending on how the end-point negotiates with the charger, either 5V, 9V or 12V outputs are supported.

You can dig into the details in Qualcomm’s Quick Charge Patent [PDF] which shows how the system works. Quite simply, the voltage provided by the charger depends on the signals set on the D+ and D- data pins during the initial handshaking phase. [Robert] found it easy to get his QC charger to provide the required voltage by using a 3V3 voltage regulator and a resistive divider. But a more permanent solution would be needed if he wanted to use it on the field.

His parts bin revealed a Digispark board and he set about hacking it. He isolated the VUSB from the rest of his board since it would get pulled up to 12V when in use. And then replaced the existing 5V regulator with a 3V3 one. This required several bodges which he has documented on his blog. Some simple code flashed on the ATtiny85 handles all of the handshaking and sets up 12V output to run his audio recorder. A single charge on the power bank now lasts him almost 12 hours, so he’s pretty satisfied with the hack.

Quick Charge is currently at version 4 and supports USB-C and USB-PD hardware such as cables and connectors. But it seems using USB-C hardware outside of the current USB-C specifications is deprecated, with reports suggesting Google is asking OEM’s not to use Quick Charge but stick to USB-PD. Let’s hope this gets settled one way or another soon.

Thanks, [Frank] for the tip.

Reading The Unreadable SROM: Inside The PSoC4

Wow. [Dmitry Grinberg] just broke into the SROM on Cypress’ PSoC 4 chips. The supervisory read-only memory (SROM) in question is a region of proprietary code that runs when the chip starts up, and in privileged mode. It’s exactly the kind of black box that’s a little bit creepy and a horribly useful target for hackers if the black box can be broken open. What’s inside? In the manual it says “The user has no access to read or modify the SROM code.” Nobody outside of Cypress knows. Until now.

This matters because the PSoC 4000 chips are among the cheapest ARM Cortex-M0 parts out there. Consequently they’re inside countless consumer devices. Among [Dmitry]’s other tricks, he’s figured out how to write into the SROM, which opens the door for creating an undetectable rootkit on the chip that runs out of each reset. That’s the scary part.

The cool parts are scattered throughout [Dmitry]’s long and detailed writeup. He also found that the chips that have 8 K of flash actually have 16 K, and access to the rest of the memory is enabled by setting a single bit. This works because flash is written using routines that live in SROM, rather than the usual hardware-level write-to-register-and-wait procedure that we’re accustomed to with other micros. Of course, because it’s all done in software, you can brick the flash too by writing the wrong checksums. [Dmitry] did that twice. Good thing the chips are inexpensive.

The nitty-gritty on the ROP (return oriented programming) tricks that [Dmitry] had to pull, and a good look into the design of the system itself, are all up on [Dmitry]’s blog. We can’t wait to see what other buried treasure he’s going to find as he continues to play around with these chips. And in case you’re wondering what type of mad genius it takes to pull this off, consider that [Dmitry] runs Linux on AVRs, fools nRF24 chips into transmitting Bluetooth LE beacons, and re-writes his own airplane’s GPS.

[Main image is a PSoC4200 dev kit, and [Dmitry] has only been working with the 4000 and 4100 series. Just so you know.]

WiFi Power Bar!

Ever wanted to access a file or run some program on your computer while away from home, but the darned thing is turned off? Finding themselves occasionally working away from home and not wanting to leave their computer on for extended periods, [robotmaker]’s solution was to hack into existence a WiFi-controlled power bar!

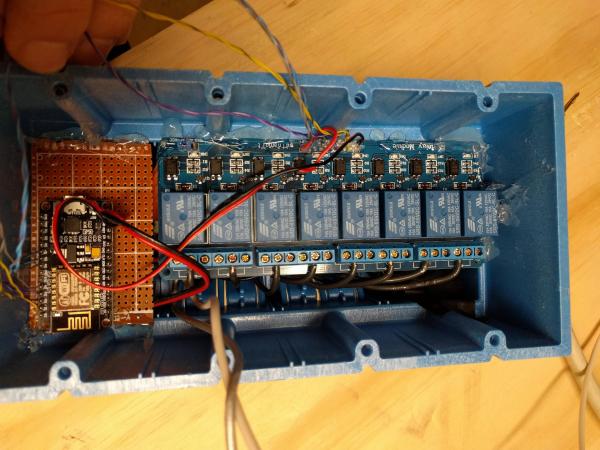
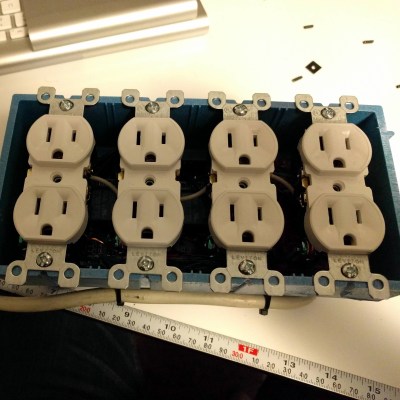
esp8266-powerbar-thumbInside the junction box, an eight-channel relay is connected to an ESP8266 module. The module uses MQTT to communicate with Home Assistant and is powered by a partially dismembered USB AC adapter — wrapped in kapon tape for safe-keeping. The entire bar is wired through a 10A fuse, while also using a fire resistant 4-gang electrical box. Once the outlets were wired in, closing it up finished up the power bar.

[robotmaker] controls the outlets via a cheap smartphone — running HADashboard — mounted to a wall with a 3D printed support. Don’t worry — they’ve set up the system to wait for the PCs to power down before cutting power, and the are also configured to boot up when the relay turns on.

The best part — the power bar only cost $25.

[via /r/homeautomation]

This Art Project’s Video Is Not A Time-Lapse

polarization-no-1-very-small

Artist Pe Lang uses linear polarization filters to create an unusual effect in his piece polarization | nº 1. The piece consists of a large number of discs made from polarizing film that partially overlap each other at the edges. Motors turn these discs slowly, and in the process the overlapping portions go from clear to opaque black and back again.

The disc rotation speed may be low but the individual transitions occur quite abruptly. Seeing a large number of the individual discs transitioning in a chaotic pattern — but at a steady rate — is a strange visual effect. About 30 seconds into the video there is a close up, and you can see for yourself that the motors and discs are all moving at a constant rate. Even so, it’s hard to shake the feeling of that one is watching a time-lapse. See for yourself in the video, embedded below.

Continue reading “This Art Project’s Video Is Not A Time-Lapse”

Antenna Analyzer Is A Lab In A Box

There was a time when the measure of a transmitting radio antenna was having it light an incandescent bulb. A step up was a classic SWR/Power meter that showed you forward and reflected power. Over the years, a few other instruments have tried to provide a deeper look into antenna performance. However, the modern champion is the antenna analyzer which is a way of measuring vector impedance.

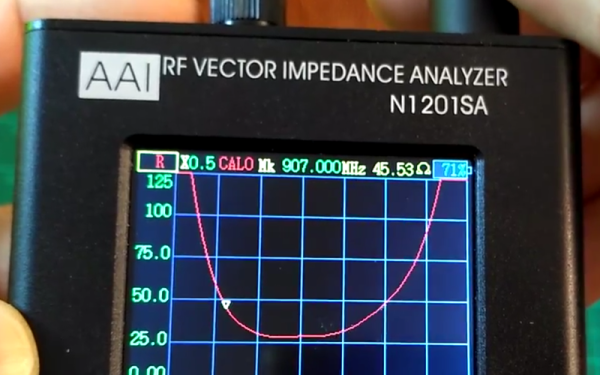
[Captain Science] did a review of an inexpensive N1201SA analyzer. This device is well under $200 from the usual Chinese sellers. The only thing a bit odd is the frequency range which is 140 MHz to 2700 MHz. For some extra money (about $80 or $100 more) you can drop the low-end frequency to just under 35 MHz.

Continue reading “Antenna Analyzer Is A Lab In A Box”