See If Someone Has Been In Your Drawers With This Simple Alarm

There’s a spy movie – probably from the [James Bond] franchise – in which our hero is staying in a fancy hotel. It’s crawling with enemies, naturally, and eager to see if one has been snooping in his room while he’s out for martinis, he sticks a hair across the gap in the door. When he comes back and finds the hair missing, he knows the game is afoot.

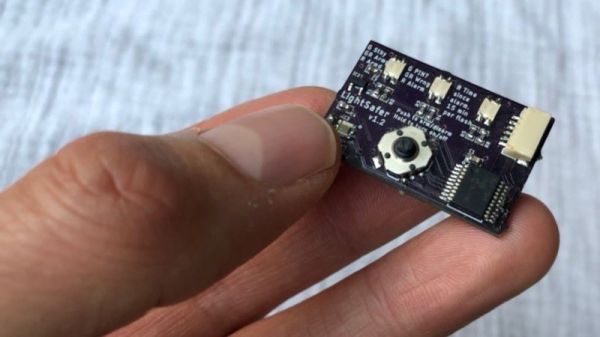
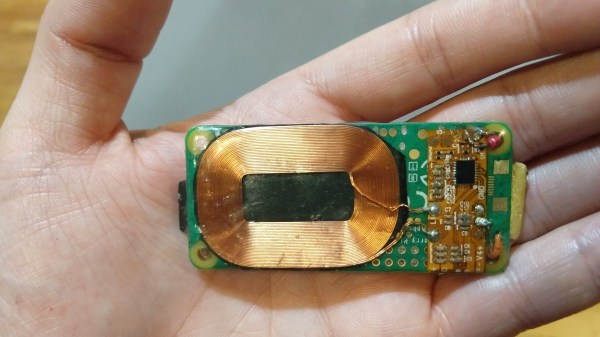
This hotel safe intrusion detector is what [Q] might have thought up for such a job if he’d had access to PIC microcontrollers and SMD LEDs. [Andy]’s “LightSafer” is a silent alarm for hotel safes, drawers, closets, or even the refrigerator – anywhere where the transition from dark to light indicates an unwanted visit. It’s tiny – only 33 x 21 mm – and is powered by a CR2032 coin cell. A Broadcom APDS-9300 light sensor watches for openings while the PIC monitors a joystick control for the correct PIN entry. There’s no audible alarm; rather, an LED blinks to indicate an unauthorized intrusion and blinks once for every 15 minutes since the event.

LightSafer is simple but effective, with a clever UI that keeps the current draw low and the battery life long. [Andy] used a similar technique for this low-draw cat tracking collar that we featured a while back.

Measuring Particulate Pollution With The ESP32

Air pollution isn’t just about the unsightly haze in major cities. It can also pose a major health risk, particularly to those with vulnerable respiratory systems. A major part of hazardous pollution is particulate matter, tiny solid particles suspended in the air. Particulate pollution levels are of great interest to health authorities worldwide, and [niriho] decided to build a monitoring rig of their own.

Particulate matter is measured by an SDS011 particulate matter sensor. This device contains a laser, and detects light scattered by airborne particles in order to determine the level of particulate pollution in PM2.5 and PM10 ranges. The build makes use of an ESP32 as the brains of the operation, chosen for its onboard networking hardware. This makes remotely monitoring the system easy. Data is then uploaded to a Cacti instance, which handles logging and graphing of the data.

For those concerned about air quality, or those who are distrustful of official government numbers, this build is a great way to get a clear read on pollution in the local area. You might even consider becoming a part of a wider monitoring network!

A Handy Way To Cheaply Print A Robotic Arm

There’s something fascinating about humanoid robotic hands, if only because of how they are such close approximations of our own hands. One could almost picture them with tendons and skin covering them. Sadly, making your own is quite prohibitive because in addition to being complex bits of machinery, making one of these marvels of engineering is usually rather expensive.

[Gray Eldritch]’s Humanoid Robot Arm project seeks to fix both points, by providing a ready to print project. All it takes is about a kilogram of PLA filament, some TPU filament, five MG996r servos (or equivalent), an SG90 servo or similar, an Arduino Uno board and a few other bits and pieces. This should result in a robotic arm with hand as covered in the video of the Mark 3 version that is embedded after the break.

Continue reading “A Handy Way To Cheaply Print A Robotic Arm”

Hands-On: CCCamp2019 Badge Is A Sensor Playground Not To Be Mistaken For A Watch

Last weekend 5,000 people congregated in a field north of Berlin to camp in a meticulously-organized, hot and dusty wonderland. The optional, yet official, badge for the 2019 Chaos Communication Camp was a bit tardy to proliferate through the masses as the badge team continued assembly while the camp raged around them. But as each badge came to life, the blinkies that blossomed each dusk became even more joyful as thousands strapped on their card10s.

Yet you shouldn’t be fooled, that’s no watch… in fact the timekeeping is a tacked-on afterthought. Sure you wear it on your wrist, but two electrocardiogram (ECG) sensors for monitoring heart health are your first hint at the snoring dragon packed inside this mild-mannered form-factor. The chips in question are the MAX30001 and the MAX86150 (whose primary role is as a pulse sensor but also does ECG). We have high-res ADCs just waiting to be misused and the developers ran with that, reserving some of the extra pins on the USB-C connector for external devices.

There was a 10€ kit on offer that let you solder up some electrode pads (those white circles with gel and a snap for a solid interface with your body’s electrical signals) to a sacrificial USB-C cable. Remember, all an ECG is doing is measuring electrical impulses, and you can choose how to react to them. During the workshop, one of the badge devs placed the pads on his temples and used the card10 badge to sense left/right eye movement. Wicked! But there are a lot more sensors waiting for you on these two little PCBs.

Continue reading “Hands-On: CCCamp2019 Badge Is A Sensor Playground Not To Be Mistaken For A Watch”

Impractical Clock Uses Tuning Fork

Clock projects are so common that they are almost a cliche. After all, microcontrollers have some clock source and are good at counting, so it stands to reason that a clock is an obvious project. [WilkoL’s] clock though has a most unusual clock source: a 440 Hz tuning fork.

A cheap plastic dome really shows off the fork and contributes to this good-looking build. An ATTiny13 divides the input frequency down, handles the display, and obeys the adjustment buttons. It does require a little metalworking, as the tuning fork needed filing and threading, although we bet you could figure out other ways to mount it.

Continue reading “Impractical Clock Uses Tuning Fork”

Pegleg: Raspberry Pi Implanted Below The Skin (Not Coming To A Store Near You)

Earlier this month, a group of biohackers installed two Rasberry Pis in their legs. While that sounds like the bleeding edge, those computers were already v2 of a project called PegLeg. I was fortunate enough to see both versions in the flesh, so to speak. The first version was scarily large — a mainboard donated by a wifi router roughly the size of an Altoids tin. It’s a reminder that the line between technology’s cutting edge and bleeding edge is moving ever onward and this one was firmly on the bleeding edge.

How does that line end up moving? Sometimes it’s just a matter of what intelligent people can accomplish in a long week. Back in May, during a three-day biohacker convention called Grindfest, someone said something along the lines of, “Wouldn’t it be cool if…” Anyone who has spent an hour in a maker space or hacker convention knows how those conversations go. Rather than ending with a laugh, things progressed at a fever pitch.

The router shed all non-vital components. USB ports: ground off. Plastic case: recycled. Battery: repurposed. Amazon’s fastest delivery brought a Qi wireless coil to power the implant from outside the body and the smallest USB stick with 64 GB on the silicon. The only recipient of PegLeg version 1.0 was [Lepht Anonym], who uses the pronoun ‘it’. [Lepht] has a well-earned reputation among biohackers who focus on technological implants who often use the term “grinder,” not to be confused with the dating app or power tool.

Continue reading “Pegleg: Raspberry Pi Implanted Below The Skin (Not Coming To A Store Near You)”

Giant LED Display Is 1200 Balls To The Wall

When you’re going to build something big, it’s often a good idea to start small and work out the bugs first. That’s what [bitluni] did with his massive 1200-pixel LED video wall, which he unveiled at Maker Faire Hanover recently.

We covered his prototype a while back, a mere 300 ping pong ball ensconced-LEDs on a large panel. You may recall his travails with the build, including the questionable choice of sheet steel for the panel and the arm-busting effort needed to drill 300 holes with a hand drill. Not wanting to repeat those mistakes, [bitluni] used the custom hole punch he built rather than a drill, and went with aluminum sheet for the four panels needed. It was still a lot of work, and he had to rig up some help to make the tool more comfortable to use, but in the end the punched holes appear much neater than their drilled counterparts.

[bitluni] mastered enough TIG welding to make nice aluminum frames for the panels, making them lightweight and easy to transport. 1200 ping pong balls, a gunked-up soldering iron, and a package of hot glue sticks later, the wall was ready for electronics. It took a 70-amp power supply and an ESP32 to run everything, but that’s enough horsepower to make some impressive graphics and even stream live video – choppy and low-res, but still usable.

We love the look this wall and we appreciate the effort that went into it. And it’s always good to see just how much fun [bitluni] has with his builds – it’s infectious.

Continue reading “Giant LED Display Is 1200 Balls To The Wall”