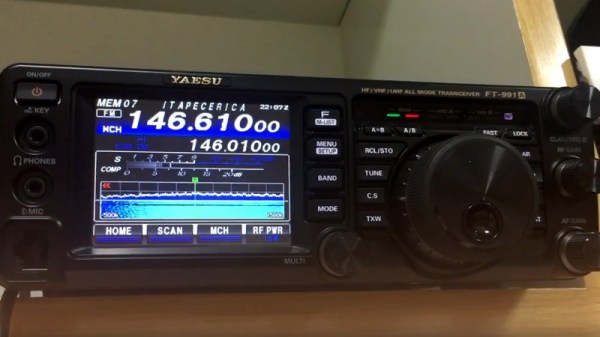
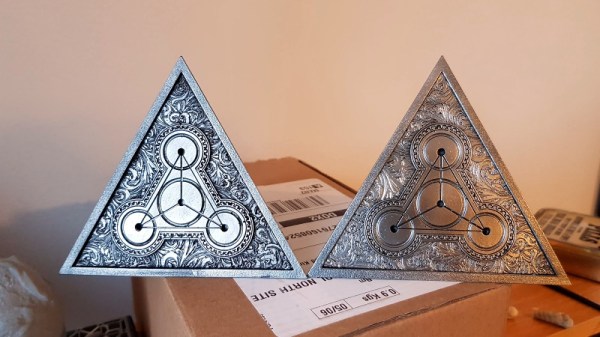
Null Shard Build Blurs Line Between Game And Reality With Laser Cutting, Mold Making, 3D Printing

InĀ The Room Three, players are tasked with collecting mysterious objects known as “Null Shards”. But it seems one player, who goes by the name [Juiceman], took this challenge a bit literally. Starting with promotional art released for the game, he embarked on an epic journey to create a replica “Null Shard” that ended up looking so good that one of them is currently residing in a place of honor at the headquarters of developer Fireproof Games.

The developers had previously released image files to create a papercraft version of the Null Shard on their website, so [Juiceman] based his initial CAD work on these designs. But it turned out the surface texture was a little too complex to laser etch into acrylic without making a soupy mess. He simplified it a bit, while trying to retain the overall effect. From the superb laser-etched acrylic master he made a silicone mold started casting the eight triangular panels needed for two copies of the Shard.

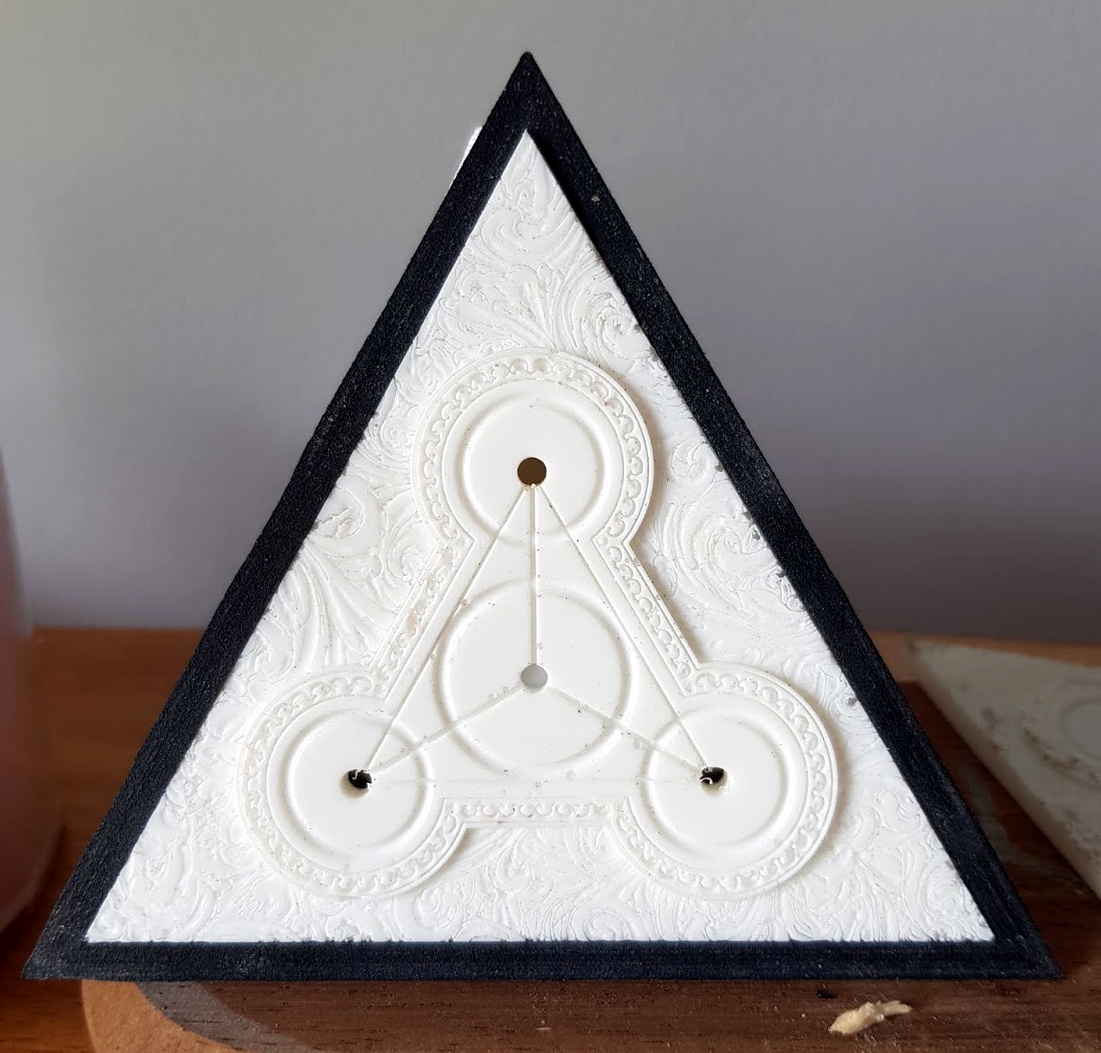
To hold it all together [Juiceman] create a “skeleton” pyramid by first experimenting with designs on a traditional plastic FDM printer. After a few tries he had a workable design and switched over to a laser sintering machine, giving the final frame a gorgeous texture. With the cast panels installed and a few coats of paint, he had his Null Shards.

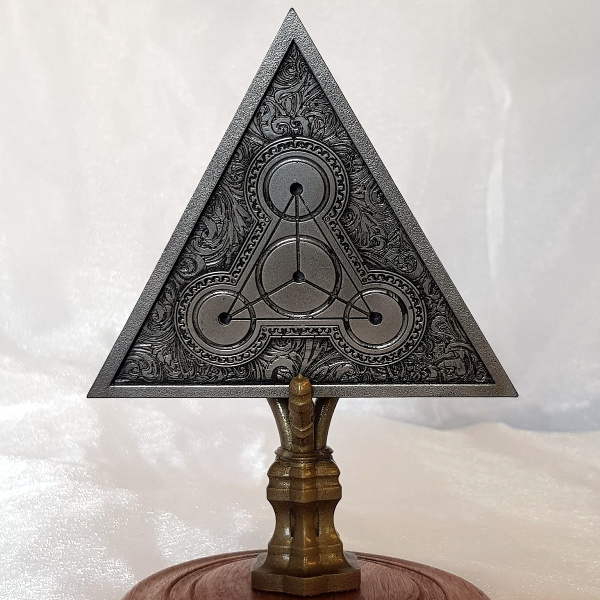
The final step was to turn down a piece of ash to make a nice base, and 3D print the feet and “claw” mount for the Shard using the same laser sintering process. The finished product looks fantastic, and apparently lives on a shelf next to a similarly constructed replica of the “Lament Configuration” puzzle cube from the Hellraiser films. [Juiceman] says the two replicas are the first entries into his “Geometries of Hell” collection, which incidentally, we’ve decided will officially be the name of our first metal album. All we need to do now is learn how to play instruments.

We’ve previously looked at how 3D printing and a dash of dedication can create some incredible prop builds, and once upon a time, we even ran a Sci-Fi Contest that challenged our readers to bring their favorite movie and game objects into the real world. Builds like this are a perfect example of what happens when a dedicated hacker or maker gets inspired by a piece of entertainment that really resonates with them.

[Thanks to Lauren for the tip]

Ham Radio Gets Embedded RTL-SDR

We usually think of the RTL-SDR as a low-cost alternative to a “real” radio, but this incredible project spearheaded by [Rodrigo Freire] shows that the two classes of devices don’t have to be mutually exclusive. After nearly 6 months of work, he’s developed and documented a method to integrate a RTL-SDR Blog V3 receiver directly into the Yaesu FT-991 transceiver.

The professional results of the hack are made possible by the fact that the FT-991 already had USB capability to begin with. More specifically, it had an internal USB hub that allowed multiple internal devices to appear to the computer as a sort of composite device.

Unfortunately, the internal USB hub only supported two devices, so the first order of business for [Rodrigo] was swapping out the original USB2512BI hub IC with a USB2514BI that offered four ports. With the swap complete, he was able to hang the RTL-SDR device right on the new chip’s pins.

Of course, that was only half of the battle. He had a nicely integrated RTL-SDR from an external standpoint, but to actually be useful, the SDR would need to tap into the radio’s signal. To do this, [Rodrigo] designed a custom PCB that pulls the IF signal from the radio, feed it into an amplifier, and ultimately pass it to the SDR. The board uses onboard switches, controlled by the GPIO ports on the RTL-SDR Blog V3, for enabling the tap and preamplifier.

In the video after the break, you can see [Rodrigo] demonstrate his modified FT-991. This actually isn’t the first time somebody has tapped into their Yaesu with a software defined radio, though this is surely the cleanest install we’ve ever seen.

Continue reading “Ham Radio Gets Embedded RTL-SDR”

RuneScape GBA Controller Is A Nostalgic Mash-Up

For gamers, the early 2000s certainly stand out as a memorable era. The dawn of the 21st century ushered in the sixth generation of home video game consoles, with Sony, Nintendo, and Microsoft all releasing their systems within a few years of each other. Nintendo also released their Game Boy Advance at around the same time, representing a minor revolution for mobile gaming. On the PC front, a free-to-play MMORPG calledĀ RuneScape was redefining people’s expectations of browser-based software.

Now, thanks to modern technology and the expert guidance of [TiKevin83], these varied bits of video game history can be used in conjunction for maximum rose-tinting effect. Using homebrew software on the GameCube and a healthy collection of wires and adapters, the GBA can be used as a controller for your adventures through the realm of Gielinor. After nearly two decades, the dreams of gamers everywhere have come true.

Well, that might be a stretch. In fact, we’d wager that nobody in human history has ever looked at the GBA and thought it would be a particularly good controller for an MMORPG. Watching the video after the break, it’s not hard to see why. Using the handheld system’s digital pad to control the mouse in RuneScape looks to be precisely as clunky as you’d imagine. But of course, that’s hardly the point.

So how is it accomplished? A homebrew tool for the GameCube’s “Game Boy Player” accessory allows the GBA, when connected to the console via the appropriate adapter cable, to mimic a standard controller. Once the GBA is running in this mode, it can then be connected to the computer using a Wii U to USB adapter. Finally, the program JoyToKey is used to map the GBA’s buttons to mouse and keyboard input for “Old School” RuneScape.

If you’d like to do something similar but aren’t quite committed enough to collect up all the Nintendo-branded ephemera this method requires, you may be interested in this DIY adapter that allows the venerable GBA to be used as a standard Bluetooth controller.

Continue reading “RuneScape GBA Controller Is A Nostalgic Mash-Up”

Aussies Find The True Meaning Of Drone Flight

Ah, stereotypes. Once they’ve solidified it’s surprisingly hard to shake them. When non-Australians think of a generic Aussie then, the chances are that a Crocodile Dundee type of character will spring to mind — a ‘Strine-speaking outdoorsman with a beer in hand. This group of Aussies aren’t helping the case, with a video posted by Australian drone retailer UAVme and featured by ABC News where a large multirotor lifts a guy in a lawn chair, beer in hand, over a lake to do some fishing.

Antics aside, having enough capacity to lift a person is pretty impressive. The drone in question appears to be a large hexacopter frame with rotors both below and above the boom, achieving an unusual dodecacopter configuration.

Of course we’re entertained by the sight, who wouldn’t envy them a spin under a drone in the relative safety of an environment where an unscheduled landing merely means getting wet? It seems Austrailia’s Civil Aviation Safety Authority isn’t quite so happy though, as ABC reports the usual chorus of condemnation. Entertainingly though it’s unclear whether or not our plucky adventurer — named as [Sam Foreman] — has in fact broken any laws given that he’s not flown in restricted airspace, over people or habitation, or above the legal altitude.

This isn’t the first such story we’ve brought you from Down Under, back in 2016 an Aussie landed in hot water for picking up a Bunnings sausage in a bun with his drone.

Continue reading “Aussies Find The True Meaning Of Drone Flight”

The Numberwang Badge Brought Cheer To CCCamp 2019

While wandering through CCCamp last weekend, in between episodes of forcing Marmite on the unwary, I ran into the well-known Hackaday.io user [Prof. Fartsparkle]. In a last-minute sprint leading up to the con he built himself the Numberwang badge to join in the colorful after-dark festivities with beautiful board artwork and remarkably enjoyable backlit LED display.

The Numberwang badge itself is a clone of the Adafruit Itsy Bitsy sporting an ATSAMD21G18 CPU and running CircuitPython. It has an LED strip on the reverse shining through the bare FR4 as a diffuser, and the Numberwang effect of selecting random numbers is achieved by a host of random touchable numbers sprinkled across its front. For something he freely admits was a last minute project, we think he’s done a pretty good job!

For those mystified by Numberwang, it is a fictional gameshow from a BBC TV comedy programme that involves contestants answering the quizmaster with random numbers. It joins a rich tradition of such hilarious nonsense, and has as a result become cult television.

If you’re really getting into Numberwang, don’t forget that it’s inspired a programming language.

Continue reading “The Numberwang Badge Brought Cheer To CCCamp 2019”

DIY 40FPS 16bpp Platformer On A Cortex M0+

Sure, you can play a bunch of retro games on a Raspberry Pi, but if you’re really hardcore, you build your own retro console and write your own games for it. [Nicola Wrachien]’s entry into this year’s Hackaday prize is his DIY Cortex M0+ game console and the platform game he wrote to test the hardware.

The board that [Nicola] is using is the uChip, a small DIP board based around a ATSAMD21 (the same chip that runs the Arduino Zero). That, along with a 160×128 TFT LCD screen, makes up the bulk of the hardware. A carrier board holds both of these as well as several buttons and an OpAmp.

The ATSAMD21 chip has decent hardware DMA that [Nicola] is using to get the frame rate needed. Since the DMA hardware and the CPU can work at the same time, while the DMA is handling one chunk of graphics, the CPU is working on the next chunk. Using this system, [Nicola] is able to get a better framerate than originally designed. Take a look at [Nicola]’s webpage for more details on the algorithm used.

In order to create a level in the platformer that [Nicola] made to show off the console, [Nicola] created a full blown level editor in Java. Using the editor, you can place the tiles and sprites and set their behaviours. The map can then be exported in an optimized format for loading on to the hardware and into the game.

A video showing off the game is after the break. There’s no shortage of great DIY consoles on the site — check out this impressive vector console, or if RetroPie is more your thing, take a look at this DIY Zelda-playing device.

Continue reading “DIY 40FPS 16bpp Platformer On A Cortex M0+”

Process Characterization On The Cheap With A Custom Test Rig

Testing is a key part of any product development cycle. Done right, it turns up unknown bugs and problems, and allows for them to be fixed prior to shipment. However, it can be a costly and time-consuming process. The [Bay Libre] team needed to do some work on power management, but the hardware required was just a little on the expensive side. What else does a hacker do, but build their own?

Enter the Thermo-Regulated Power Measurement Platform. It’s a device designed to control the die temperature of a chip during process characterization. This is where a chip, in this case the iMX8MQ, is run at a variety of temperatures, voltages, and frequencies to determine its performance under various conditions. This data guides the parameters used to run the chip in actual use, to best manage its power consumption and thermal performance.

The rig consists of a Peltier element with controller, a heatsink, and a fan. This is lashed up to a series of Python scripts that both control the chip temperature and run through the various testing regimes. Thanks to this automation, what would normally be a day’s work for an engineer can now be completed in just two hours.

Through a few smart component choices, the team accomplished the job at around one-tenth of the cost of commercial grade hardware. Granted, the average hacker probably won’t find themselves doing process characterization for cutting-edge silicon on a regular basis. Still, this project shows the value in building custom hardware to ease the testing process.

Testing is key to success in production. Custom jigs can make for light work when large orders come in, and we’ve run a primer on various testing techniques, too.