Strings of LEDs are a staple of the type of project we see here at Hackaday, with addressable devices such as the WS2812 in particular having changed beyond recognition what is possible on a reasonable budget. They’ve appeared in all kinds of projects, but are perhaps most memorable when used in imaging projects such as screen-like arrays or persistence-of-vision systems. There’s another addressable LED product that we haven’t seen here, which is quite a surprise considering that it can be found with relative ease in junk piles and has been on the market for decades. We’re talking about the LED printer, and the addressable LED product in question is a very high density array of LEDs the width of a page, designed to place an image of the page to be printed on the toner transfer drum.
Today’s tale of being in the right place at the right time comes from [fabe1999], who was doing an intern gig at the airport when the controller on their split-flap display bought a one-way ticket going south. They were just going to throw away thousands of these letters and replace them with monitors, but the intern intervened.
[fabe1999] grabbed an armload, took them home, and set about making them flap again, one letter at a time. An ATtiny worked okay, but it wasn’t really fast enough to flip them at their full clacking potential, so [fabe1999] switched to an ESP8266. So now there is one ESP for each of the 20 characters, and another that runs a web server where text can be directly entered for immediate display.
Each letter uses two sensors to flap to the right letter. The first one acts as a start sensor, detecting the blackness of a blank character. Another sensor counts the letters and makes the ESP stop the motor on the right one. So far, [fabe1999] hasn’t figured out how to recognize when a blank character can stay blank, so they flap all the way around back to blank for now. It certainly adds to the rich, flappy sound, but that can’t be good for the long-term life of the letters. Your flight is now departing for Post Break Island, where the letters are spending part of their retirement showing song titles from Spotify.
For decades, astronauts have been forced to endure space-friendly MREs and dehydrated foodstuffs, though we understand both the quality and the options have increased with time. But if we’re serious about long-term space travel, colonizing Mars, or actually having a restaurant at the end of the universe, the ability to bake and cook from raw ingredients will become necessary. This zero-gravity culinary adventure might as well start with a delicious experiment, and what better than chocolate chip cookies for the maiden voyage?
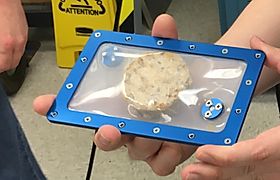
That little filtered vent lets steam out and keeps crumbs in. Image via Zero-G Kitchen
The vessel in question is the Zero-G Oven, built in a collaboration between Zero-G Kitchen and Nanoracks, a Texas-based company that provides commercial access to space. In November 2019, Nanoracks sent the Zero-G oven aloft, where it waited a few weeks for the bake-off to kick off. Five pre-formed cookie dough patties had arrived a few weeks earlier, each one sealed inside its own silicone baking pouch.
The Zero-G Oven is essentially a rack-mounted cylindrical toaster oven. It maxes out at 325 °F (163 °C), which is enough heat for Earth cookies if you can wait fifteen minutes or so. But due to factors we haven’t figured out yet, the ISS cookies took far longer to bake.
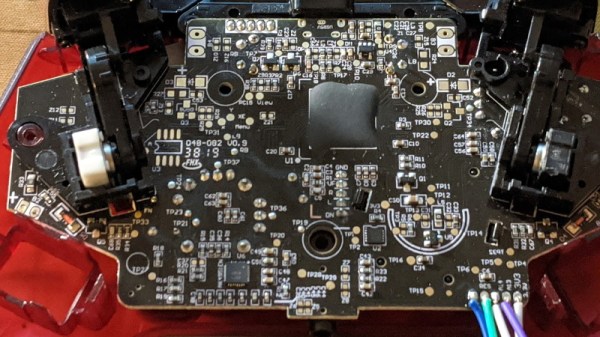
It’s amazing to see how much technology is packed into even the “simple” devices that we take for granted in modern life. Case in point, the third party Xbox controller that [wrongbaud] recently decided to tear into. Not knowing what to expect when he cracked open its crimson red case, inside he found an ARM Cortex microcontroller and a perfect excuse to play around with Serial Wire Debug (SWD).
Though even figuring out that much took a bit of work. As is depressingly common, all the interesting components on the controller’s PCB were locked away behind a black epoxy blob. He had no idea what chip was powering the controller, much less that debugging protocols it might support. But after poking around the board with his multimeter, he eventually found a few test points sitting at 3.3 V which he thought was likely some kind of a programming header. After observing that pulling the line labelled “RES” low reset the controller, he was fairly sure he’d stumbled upon a functional JTAG or SWD connection.
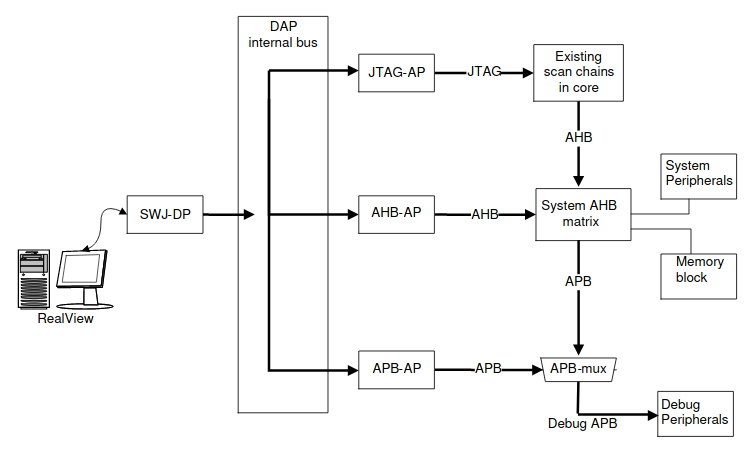
The Serial Wire Debug architecture.
As [wrongbaud] explains in his detailed blog post, SWD is something of a JTAG successor that’s commonly used by ARM hardware. Using just two wires (data and clock), SWD provides hardware debugging capabilities on pin constrained platforms. It allows you to step through instructions, read and write to memory, even dump the firmware and flash something new.
For the rest of the post, [wrongbaud] walks the reader through working with an SWD target. From compiling the latest version of OpenOCD and wiring an FTDI adapter to the port, all the way to navigating through the firmware and unlocking the chip so you can upload your own code.
To prove he’s completely conquered the microcontroller, he ends the post by modifying the USB descriptor strings in the firmware to change what it says when the controller is plugged into the computer. From here, it won’t take much more to get some controller macros like rapid fire implemented; a topic we imagine he’ll be covering in the future.
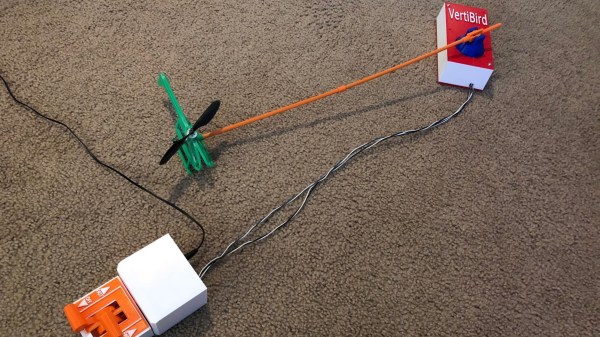
For many of us who grew up in the 1970s, “VertiBird”, the fly-it-yourself indoor helicopter, was a toy that was begged for often enough that it eventually appeared under the Christmas tree. And more than a few of the fascinating but delicate toys were defunct by Christmas afternoon, victims of the fatal combination of exuberant play and price-point engineering. But now a DIY version of the classic toy flies again, this time with a more robust design.
To be fair to the designers at Mattel, the toy company that marketed VertiBird, the toy was pretty amazing. The plastic helicopter was powered by a motor located in the central base, which rotated a drive rod that ran through a stiff tether. Small springs in the base and at the copter acted as universal joints to transmit power to the rotor. These springs were the weak point in the design, especially the one in the base, often snapping in two.
[Luke J. Barker]’s redesign puts a tiny gear motor in the aircraft rather than in the base, something that wouldn’t have been feasible in the original. To address the problem of getting electrical power from the base to the aircraft, [Luke] eschewed an expensive slip ring and instead used a standard 3.5-mm audio jack and plug. The plug serves as an axle for the main gear in the base that powers the copter’s rotation; sadly, this version doesn’t tilt the aircraft mechanically to control backward and forward flight like the original. A pair of pots with 3D-printed levers control throttle and flight direction through an Arduino; see it in action in the video below.
These pages abound with rotorcraft builds, both helicopters and multirotor. We appreciate all manner of flying machines, but this one really takes us back.
Ask anyone who’s ever tuned into Fireplace TV on a cold winter’s night — even though you can’t feel the heat or roast a marshmallow with it, fake fire is almost as soothing as the real thing. And if you have kids or pets, it’s a whole lot safer. But why go to the expense of buying a lighted insert when you could just make your own?
You don’t even need to get fancy with a microcontroller and RGB LEDs, either — just do what [Ham-made] did and dismantle some LED flame bulbs. They already have everything you need, and the flex PCB makes them easy to work with.
[Ham-made] adhered three bulbs’ worth to a piece of foam board with double-stick tape, soldered all the leads together, and wired in a toggle switch and a 2xAA battery pack. The bulbs each had a tilt switch so that the “flames” flow upward regardless of orientation, but [Ham-made] removed those to avoid flickering connectivity and fights with the toggle switch.
Once it was all wired up, [Ham-made] hot-glued some magnets to the foam board and attached it to the underside of the grate to keep it safe from the logs and the ash pit, while still allowing the glow to emanate from the right spot for realism. The only thing missing are the crackles and pops, and [Ham-made] is burning to hear your implementation ideas.
[Ham-made] wasn’t using his fireplace in the traditional way because the house is smallish and centrally heated. But if you rely on yours to keep you warm and cozy, why not make it voice-activated?
University of Toronto researchers have succeeded in converting used cooking oil — from McDonald’s, no less — into high-resolution 3D printing resin. Your first response might be: “Why?”, but thinking about it there are several advantages. For one thing, waste oil is a real problem for the food industry, and thus it can be acquired rather cheaply. An even bigger benefit is that the plastic that originates from this oil is biodegradable. Their 3d-printed butterfly, of course, is made from the recycled resin.
We aren’t chemists, but apparently 3D resin has a lot in common with cooking oil already. The team used a one-step chemical process to convert one liter of McDonald’s greasiest into a little more than 400 milliliters of resin.