Join Your Own Private LoRa Mesh Network

We are fortunate to live in an age surrounded by means of easy communication, and like never before we can have friends on the other side of the world as well as just down the road. But as many readers will know, this ease of communication comes at a price of sharing public and commercial infrastructure. To communicate with privacy and entirely off-grid remains an elusive prize, but it’s one pursued by Scott Powell with his LoRa QWERTY Messenger. This is a simple pager device that forms a LoRa mesh network with its peers, and passes encrypted messages to those in the same group.

At its heart is a LoRa ESP32 module with a small OLED display and a Blackberry QWERTY keyboard, and an SD card slot. The device’s identity is contained on an SD card, which gives ease of reconfiguration. It’s doubly useful, because it is also a complement to his already existing Ripple LoRa communication project, that uses a smartphone as the front end for a similar board.

We feel this type of secure distributed communication is an exciting application for LoRa, whether it be for kids playing at being spies or for more serious purposes. It’s certainly not the first such project we’ve featured.


Die Photos Reveal Logic From Commodore 128 PLA Chip

The 8721 PLA, or programmable logic array, was one of the chips that had to be invented to make the Commodore 128, the last of the 8-bit computers that formed the leading edge of the early PC revolution, a reality. [Johan Grip] got a hold of one of these chips and decided to reverse engineer it, to see what the C-128 designers had in mind back in mid-1980s.

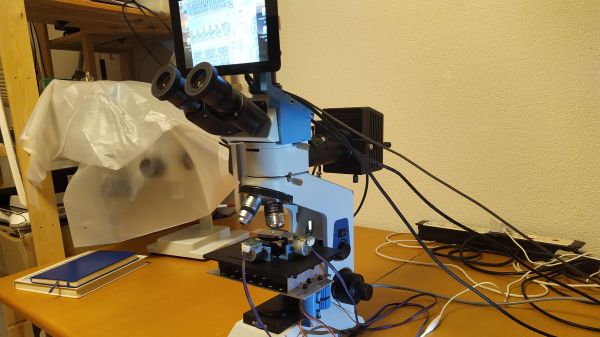
PLAs were the FPGAs of the day, with arrays of AND gates and OR gates that could be connected into complex logic circuits. [Johan]’s investigation started with liberating the 8721 die from its package, for which he used the quick and easy method favored by [CuriousMarc]. The next step was tooling up, as the microscope he was using proved insufficient to the task. Even with a better microscope in hand, [Johan] still found the need to tweak it, adding one of the new high-quality Raspberry Pi cameras and motorizing the stage with some stepper motors and a CNC controller board.

With optics sorted out, he was able to identify all the pads on the die and to find the main gate array areas. Zooming in a little further, he was able to see the connections between the matrices of the AND and OR gates, which makes decoding the logic a relative snap, although the presence of what appears to be an output block with latching functions confounds this somewhat.

The end result is a full Verilog HDL file that reflects the original 8721 logic, which we think is a pretty neat trick. And we’d love it if our own [Bil Herd] could chime in on this; after all, he literally designed the C-128.

Inside A $30,000 8 GHz Scope

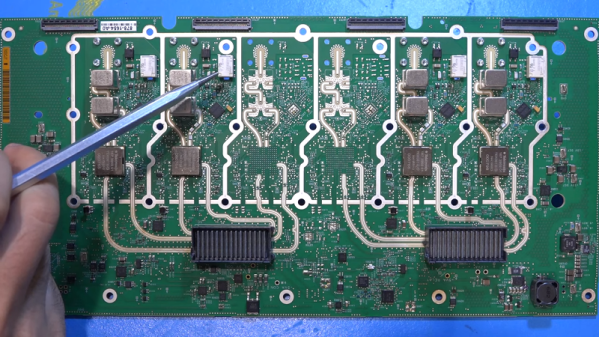
One of the best things about the Internet — especially the video part — is that you can get exposed to lots of things you might otherwise not be able to see. Take oscilloscopes, for example. If you were lucky, you might have one or two really nice instruments at work and you certainly weren’t going to be allowed to tear them open if they were working well. [The Signal Path], as a case in point, tears down a $30,000 MSO6 8 GHz oscilloscope.

Actually, the base price is not quite $30,000 but by the time you outfit one, you’ll probably break the $30K barrier. Compared to the scopes we usually get to use, these are very different. Sure, the screens are larger and denser, but looking at the circuit boards they look more like some sort of high-end computer than an oscilloscope. Of course, in a way, that’s exactly what it is.

Continue reading “Inside A $30,000 8 GHz Scope”

Do You Know Where Your Children Are? Check The Weasley Clock

What’s the coolest thing you could build for a Harry Potter fan, aside from a working magic wand or Quidditch broomstick? We would have to say a Weasley clock that shows the whereabouts of everyone in the family is pretty high on the list, especially if that fan is a wife and mother.

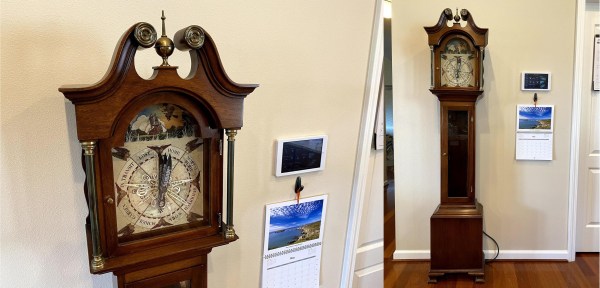
Here’s how it works: they’ve set up geofences to define the boundaries of home, each person’s school or workplace, and so on. The family’s locations are tracked through their phones’ GPS using Home Assistant, which is hosted on a Raspberry Pi. Whenever someone’s location changes, the Pi alerts the clock over MQTT, and it moves the 3D-printed hands with servos.

The clock has some interesting granularity to it as well. As someone gets closer to home, their pointer’s distance reflects that in its proximity to the Home slice. And Home itself is divided into the main house and the shop and reflected by the pointer’s position.

We particularly like the attention to detail here, like the art poster used for the clock’s face that includes all the Weasley’s whereabouts in the background. It’s built into a thrift store grandmother clock, which is smaller than a grandfather clock but no less majestic. In the future there are plans to implement the clock’s chimes to announce that someone is back home.

No matter what you’re into, the whereabouts clock idea can probably fit that universe. For instance, here’s one that uses LEGO mini-fig heads to locate roommates.

An Open-Source Microfluidic Pump For Your Science Needs

When it comes to research in fields such as chemistry or biology, historically these are things that have taken place in well-financed labs in commercial settings or academic institutions. However, with the wealth of technology available to the average person today, a movement has sprung up of those that run advanced experiments in the comfort of their own home laboratory. For those needing to work with very tiny amounts of liquid, [Josh’s] microfluidics pump may be just the ticket.

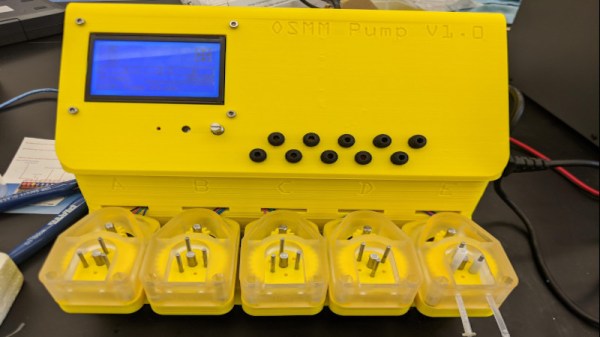
Consisting of a series of stepper-motor driven pumps, the hardware is inspired by modern 3D printer designs. The motors used are all common NEMA items, and the whole system is driven by the popular Marlin firmware. The reported performance is impressive, delivering up to 15 mL/min with accuracy to 0.1uL/min. That’s a truly tiny amount of fluid, and the device could prove highly useful to those exploring genetics or biology at home.

The great thing about this build is that it’s open source. [Josh] took the time to ensure that it was easily moddable to work with different tubing and materials, such that others could spin up a copy using whatever was readily available in their area. Performance will naturally vary, but if you’re experienced enough to build a microfluidic pump, you’re experienced enough to calibrate it, too. Design files are on Github for those keen to build their own.

We’ve seen other builds in this area before, too. We look forward to seeing some fun science done with [Josh]’s build, and look forward to seeing more DIY science gear in the future!

Breakaway Keyboard PCB Makes Customization A Snap

Once upon a time, keyboards were something that you took with you from computer to computer, because most of them were built quite nicely. After a few dark decades of membrane keyboards being the norm, the rise of the mechanical keyboard community has shined a light on what is possible with open source designs. Anyone can join in, because quality clackers now exist on every level, whether you want to design the perfect split ortho with OLEDs, rotary encoders, and rear view mirrors, or just want to fork over some money and get to punching switches.

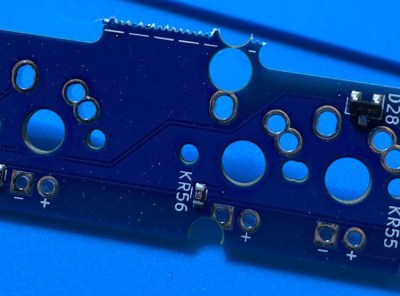
Break me off a piece of that candy bar keeb.

Building your own keyboard doesn’t have to be daunting. It can be as easy or as involved as you want. There’s still a fair amount of soldering simply because it’s a keyboard. But there are plenty of options if you don’t want to do a whole lot beyond soldering switches (or hot swap sockets!) and putting a case together.

Take for instance the JNAO (Just Need An Ortho) build that [Jared] just finished. It starts with a PCB and on-board controller, and the idea is to customize it from there. You’re left to 3D print, laser cut, or otherwise carve your own case and a plate to stabilize the key switches, and then get down to business deciding on switches and keycaps.

The interesting thing about the JNAO is the breakaway row of keys on the bottom. The standard grid is 12×5, but if you don’t need the dedicated number row along the top like [Jared], you’re not stuck with it. And you’re not stuck with the default layout, either. Flashing to a standard Planck layout didn’t go as easily as [Jared] might have liked, but we think he was wise to get the firmware squared away before ever turning on the soldering iron.

Don’t know what to do with such a small keyboard? They’re pretty much perfect for cyberdeck builds.

Smashing The Atom: A Brief History Of Particle Accelerators

When it comes to building particle accelerators the credo has always been “bigger, badder, better”. While the Large Hadron Collider (LHC) with its 27 km circumference and €7.5 billion budget is still the largest and most expensive scientific instrument ever built, it’s physics program is slowly coming to an end. In 2027, it will receive the last major upgrade, dubbed the High-Luminosity LHC, which is expected to complete operations in 2038. This may seem like a long time ahead but the scientific community is already thinking about what comes next.
Recently, CERN released an update of the future European strategy for particle physics which includes the feasibility study for a 100 km large Future Circular Collider (FCC). Let’s take a short break and look back into the history of “atom smashers” and the scientific progress they brought along. Continue reading “Smashing The Atom: A Brief History Of Particle Accelerators”