An Open Source Shipboard Computer System

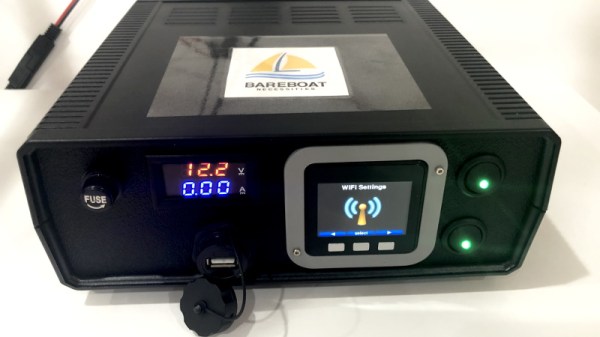
We’re not sure how many of you out there own a boat large enough to get its own integrated computer network, but it doesn’t really matter. Even if you can’t use this project personally, it’s impossible not to be impressed with the work [mgrouch] has put into the “Bareboat Necessities” project. From the construction of the hardware to the phenomenal documentation, there’s plenty that even landlubbers can learn from this project.

In its fully realized form, the onboard computer system includes several components that work together to provide a wealth of valuable information to the operator.

Inside the Boat Computer module

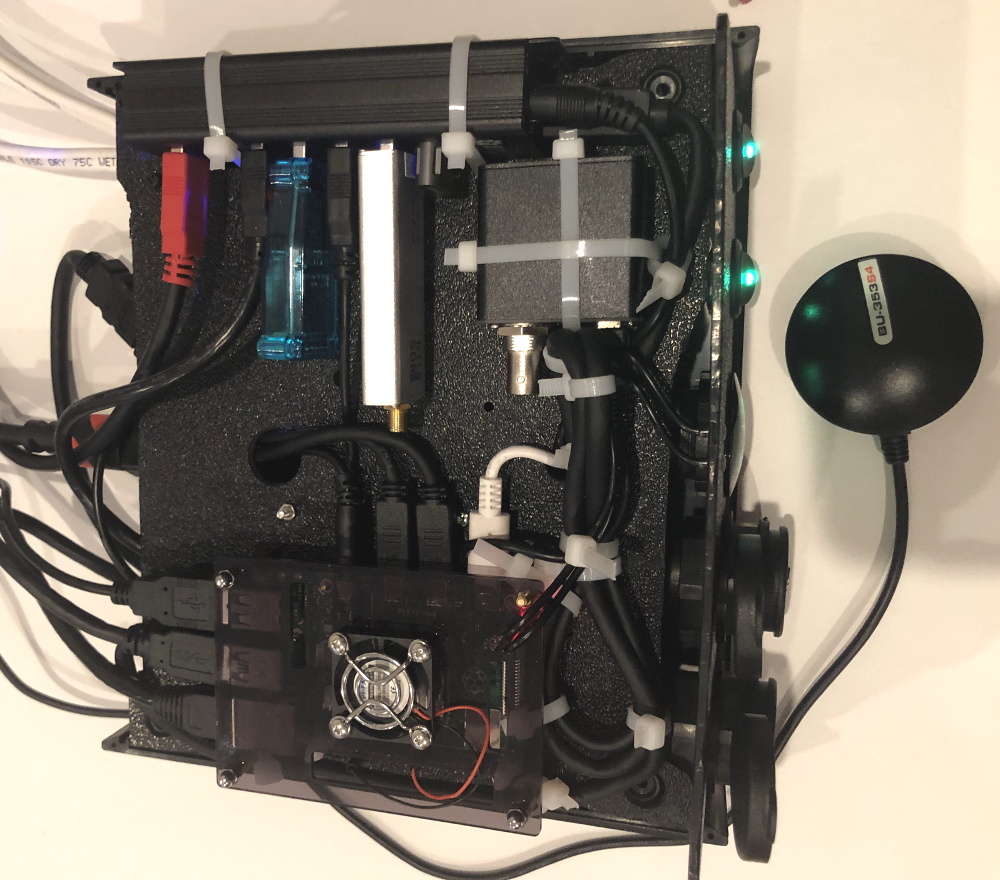
What [mgrouch] calls the “Boat Computer” contains a Raspberry Pi 4, a dAISy AIS receiver, an RTL-SDR, a GPS receiver, serial adapters, and the myriad of wires required to get them all talking to each other inside a weatherproof enclosure. As you might expect, this involves running all the connections through watertight panel mounts.

Combined with a suite of open source software tools, the “Boat Computer” is capable of interfacing with NMEA sensors and hardware, receive weather information directly from NOAA satellites, track ships, and of course plot your current position on a digital chart. The computer itself is designed to stay safely below deck, while the operator interacts with it through an Argonaut M7 waterproofed HDMI touch screen located in the cockpit.

For some people, that might be enough. But for those who want to do big, [mgrouch] further details the “Boat Gateway” device. This unit contains an LTE-equipped WiFi router running OpenWrt and all the external antennas required to turn the boat into a floating hotspot. Of course it also has RJ45 jacks to connect up to the other components of the onboard system, and it even includes an M5Stack Core with LAN module so it can display a select subset of sensor readings and navigational data.

If you’d like to do something similar on a slightly smaller scale, we’ve seen sailing computers that pushed all the data to a wearable display or even a repurposed eReader.

Poor Maintenance Could Have Led To Fatal B-17 Crash

In October the Nine-O-Nine, a fully restored Boeing B-17G bomber owned and operated by the Collings Foundation, crashed with thirteen people on board. After landing hard and skidding into the de-icing tanks at the Bradley International Airport, all but the tail and port wing of the 74 year old WWII aircraft was destroyed. Seven lives were lost in the accident, including that of Pilot Ernest “Mac” McCauley, who was regarded as one of the most experienced B-17 pilots in the world.

While the National Transportation Safety Board (NTSB) investigation is still ongoing and hasn’t made a final determination as to what ultimately brought down the Nine-O-Nine, enough serious maintenance issues were uncovered while examining the wreckage that the Federal Aviation Administration (FAA) has decided to rescind the Collings Foundation’s license to conduct any more paid flights on their remaining WWII aircraft. While many have spoken out in support of these “living history” flights, the FAA says they must be conducted in such a way that they don’t hinder the safety of other air traffic.

With the vast majority of the B-17’s airframe gone, the NTSB investigation has focused on the four 1,200 horsepower Wright R-1820 “Cyclone” engines recovered from the crash site. Investigators found that hastily attempted repairs to engine number 4, which is believed to have failed in-flight, were actually hindering normal operation:

Regarding engine 4, to prevent the magneto “P” leads from separating from the
magnetos, someone had attempted to rig the magneto leads in place with safety wire.

Inspection and testing of engine 4 left magneto revealed the movement of the safety-wired lead caused grounding to the case, which rendered the magneto lead inoperative.

Further, all of the spark plugs in the number 3 and 4 engines were found to be fouled and had electrode gaps that were out of tolerance. From an examination of the aircraft’s maintenance records, it was also learned that an arcing and burned wire had been replaced without any investigative steps taken to find what caused the failure to begin with.

With basic maintenance tasks either not being performed or at least done incorrectly, the FAA has called into question the culture of safety at the Collings Foundation. The paper is careful not to directly accuse the Foundation or any of its staff with outright negligence, but the implication seems clear.

The loss of Nine-O-Nine hit especially close to home for Hackaday. Just a month prior to the crash we had the opportunity to tour the aircraft, and came away with a newfound respect for not only those who designed and built the iconic bomber but the brave young men who flew it. Losing such a rare and historically significant aircraft and its crew was already a tragedy, but to find that negligence may be to blame is truly inexcusable.

A 1950s Ampex Tape Recorder Microphone Preamplifier Restoration

So often when we read of a modification on a classic piece of tube electronics we prepare to wince, as such work often results in senseless butchery of a well-preserved survivor. With [Frank Olson]’s work on a 1958 Ampex 601 tape recorder though we were pleasantly surprised, because while he makes a modification to allow its use as a stand-alone microphone preamplifier he also performs an extremely sympathetic upgrade to modern components and retains it in substantially the form it left the Ampex factory.

The video below the break is a satisfying wallow in pre-PCB-era construction for any of the generation who cut their teeth on tube, chassis, and tag strip electronics. We can almost smell the phenolic as he carefully removes time-expired capacitors and fits modern replacements complete with period features such as sheathing over their leads. The larger multiway can electrolytics are left in the chassis, with their modern miniaturised equivalents nestling underneath them out of sight. We all know that electronic components have become a lot smaller over the decades, but it’s still a bit of a shock to see just how tiny even a high voltage electrolytic has become.

The Ampex would have been a very high quality tape recorder when new, and while this one has a problem with its mechanism it’s that quality that makes it easier for him to do this work in 2020. There’s every chance that this one could be returned to service as a tape recorder if someone was of a mind to fix it, and meanwhile it will give Frank excellent service as a high quality pre-amp. This is how resto-mods should be done!

Ampex are very much still in existence making digital storage products, but back in the 1950s they were at the forefront of analogue magnetic tape technology. We’ve written in the past about how Bing Crosby had a hand in the development of high quality tape recorders, and also about Ampex’s part in the gestation of the video recorder.

Continue reading “A 1950s Ampex Tape Recorder Microphone Preamplifier Restoration”

COVID-19 Statistics: Reading The Tea Leaves

If you’ve been tracking the spread of the COVID-19 pandemic around the world, as we have, you’ve doubtless seen a lot of statistics. The raw numbers look shocking, and in many cases they are, but as always it’s crucially important to ask yourself what the numbers mean.

For instance, our own Tom Nardi put together a counter that displays the total number of COVID-19 cases in the US. It’s a cool project that puts together some web-scraping, a nice OLED screen, and a 3D-printed network display. When this is all over, it can be easily re-trained to show some other statistic of interest, and it’s a great introduction to a number of web APIs. However, it’s looking at the wrong number.

Let me explain. Diseases spread exponentially: the more people who have it, the more people are spreading it. And exponential curves all look the same when you plot out their instantaneous values — the raw number of COVID-19 cases. Instead, what distinguishes one exponential from another is the growth parameter, and this is related to the number of new cases per day, or more correctly, to the day-to-day change in new cases.

If left unchecked, and especially in the early stages of spread, the number of new cases grows every day. But as control efforts, mainly social distancing, take effect, the rate at which the number of new cases can slow, or even go negative. That’s the plan, anyway.

As is very well explained by this video from 3 Blue, 1 Brown, if this were a naturally spreading epidemic, the point at which the new cases just starts to decline marks the halfway point in the course of the disease. Here, we’re hoping that particularly strict quarantining procedures will cut this run even shorter, but if you’re interested in how the disease is spreading, the point when daily new infections turns around is what you’re looking for.

Why not put the daily difference in new cases on your desktop, then? These numbers are noisy, and the difference jumps all around. To be serious, you would probably want to put a moving average on the new cases figure, and look at that difference. Or simply show the new cases instead and look for it to drop for a few days in a row.

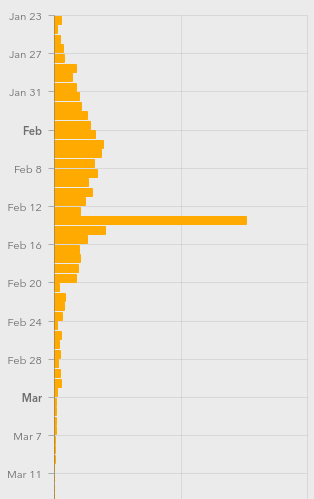
Still, this won’t be a perfect measure. For starters, COVID-19 seems to incubate for roughly a week without symptoms. This means that whatever numbers we have, they’re probably a week behind the actual situation. We won’t see the effects of social distancing for at least a week, and maybe more.

Further complicating things is the availability of tests, human factors like weekends when more people get tested but fewer government reporting offices are open, timezones, etc. (What happened on Feb. 13?)

I’m not going to go so far as to say that the COVID-19 stats that we see are useless — actually far from it. But if you’re going to armchair quarterback this pandemic, do it right. Plot out the daily new cases, maybe apply a little smoothing, at least in your head, and realize that whatever you’re seeing now probably represents what happened last week.

When you finally see the turning point, you may celebrate a little, because that means the halfway point was a week ago. We’ve seen it happen in China around Feb 2, and I’m looking forward to it happening here. I hope it happens wherever you are, and soon.

We will get through this. Stay safe, all. And keep yourself uninfected to keep others uninfected.

This article is part of the Hackaday.com newsletter, delivered every seven days for each of the last 212 weeks or so. It also includes our favorite articles from the last seven days that you can see on the web version of the newsletter.

Want this type of article to hit your inbox every Friday morning? You should sign up!

BCD To I2C: Turning A Nixie Counter Into Whatever You Want It To Be

Whenever a project calls for displaying numbers, a 7-segment display is the classic and straightforward choice. However, if you’re more into a rustic, retro, almost mystical, and steampunky look and feel, it’s hard to beat the warm, orange glow of a Nixie tube. Once doomed as obsolete technology of yesteryear, they have since reclaimed their significance in the hobbyist space, and have become such a frequent and deliberate design choice, that it’s easy to forget that older devices actually used them out of necessity for lack of alternatives. Exhibit A: the impulse counter [soldeerridder] found in the attic that he turned into a general-purpose, I2C controlled display.

Instead of just salvaging the Nixie tubes, [soldeerridder] kept and re-used the original device, with the goal to embed an Intel Edison module and connect it via I2C. Naturally, as the counter is a standalone device containing mainly just a handful of SN74141 drivers and SN7490 BCD counters, there was no I2C connectivity available out of the box. At the same time, the Edison would anyway replace the 7490s functionality, so the solution is simple yet genius: remove the BCD counter ICs and design a custom PCB containing a PCF8574 GPIO expander as drop-in replacement for them, hence allowing to send arbitrary values to the driver ICs via I2C, while keeping everything else in its original shape.

Containing six Nixie tubes, the obvious choice is of course to use it as a clock, but [soldeerridder] wanted more than that. Okay, it does display the time, along with the date, but also some sensor values and even the likes on his project blog. If you want to experiment with Nixie tubes yourself, but lack a matching device, Arduino has you obviously covered. Although, you might as well go the other direction then.

Continue reading “BCD To I2C: Turning A Nixie Counter Into Whatever You Want It To Be”

A Soldering LightSaber For The Speedy Worker

We all have our preferences when it comes to soldering irons, and for [Marius Taciuc] the strongest of them all is for a quick heat-up. It has to be at full temperature in the time it takes him to get to work, or it simply won’t cut the mustard. His solution is a temperature controlled iron, but one with no ordinary temperature control. Instead of a normal feedback loop it uses a machine learning algorithm to find the quickest warm-up.

The elements he’s using have a thermocouple in series with the element itself, meaning that to measure the temperature the power must be cut to the element. This duty cycle can not be cut too short or the measurements become noisy, so under a traditional temperature control regimen there is a limit on how quickly it can be heated up. His approach is to turn it on full-time for a period without stopping to measure the temperature, only measuring after it has had a chance to heat up. The algorithm constantly learns how long to switch it on to achieve what temperature, and is able to interpolate to arrive at the desired reading. It’s a clever way to make existing hardware perform new tricks, and we like that.

He’s appeared on these pages quite a few times over the years, but perhaps you’d like to see the first version of the same hardware. Meanwhile watch the quick heat up in action with a fuller explanation in the video below.

Continue reading “A Soldering LightSaber For The Speedy Worker”

Trimmed PCB Makes The Ultimate Portable N64

One of the most impressive innovations we’ve seen in the world of custom handhelds is the use of “trimmed” PCBs. These are motherboards of popular video game consoles such as the Nintendo Wii and Sega Dreamcast that have literally been cut down to a smaller size. As you can imagine, finding the precise shape that can be cut out before the system stops functioning requires extensive research and testing. But if you can pull it off, some truly incredible builds are possible.

Take for example this absolutely incredible clamshell N64 built by [GMan]. After cutting the motherboard down to palm-sized dimensions, he’s been able to create a handheld system that’s only a bit larger than the console’s original cartridges.

Incidentally those original cartridges are still supported, and fit into a slot in the rear of the system Game Boy style. It’s still a bit too chunky for tossing in your pocket, but we doubt you could build a portable N64 any smaller without resorting to emulation.

In the video after the break, [Gman] explains that the real breakthrough for trimmed N64s came when it was found that the system’s Peripheral Interface (PIF) chip could be successfully relocated. As this chip was on the outer edge of the PCB, being able to move it meant the board could get cut down smaller than ever before.

But there’s more than just a hacked N64 motherboard living inside the 3D printed enclosure. [Gman] also designed a custom PCB that’s handling USB-C power delivery, charging the handheld’s 4250 mAh battery, and providing digital audio over I2S. It’s a fantastically professional setup, and you’d be forgiven for thinking the board was part of the original console.

Considering how well designed and built this N64 SP is, it probably will come as no surprise to find this isn’t the first time [Gman] has put something like this together. He used many of the same tricks to build his equally impressive portable Dreamcast last year.

Continue reading “Trimmed PCB Makes The Ultimate Portable N64”