Teaching A Machine To Be Worse At A Video Game Than You Are

Is it really cheating if the aimbot you’ve built plays the game worse than you do?

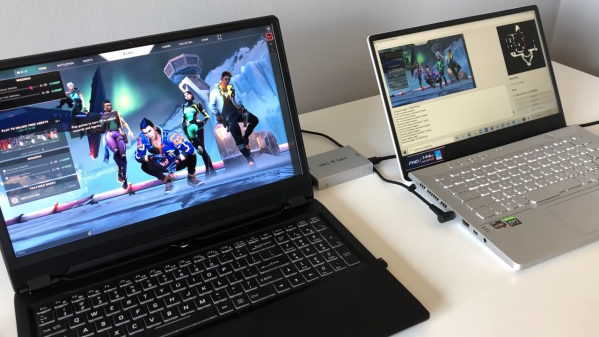
We vote no, and while we take a dim view on cheating in general, there are still some interesting hacks in this AI-powered bot for Valorant. This is a first-person shooter, team-based game that has a lot of action and a Counter-Strike vibe. As [River] points out, most cheat-bots have direct access to the memory of the computer which is playing the game, which gives it an unfair advantage over human players, who have to visually process the game field and make their moves in meatspace. To make the Valorant-bot more of a challenge, he decided to feed video of the game from one computer to another over an HDMI-to-USB capture device.

The second machine has a YOLOv5 model which was trained against two hours of gameplay, enough to identify friend from foe — most of the time. Navigation around the map was done by analyzing the game’s on-screen minimap with OpenCV and doing some rudimentary path-finding. Actually controlling the player on the game machine was particularly hacky; rather than rely on an API to send keyboard sequences, [River] used a wireless mouse dongle on the game machine and a USB transmitter on the second machine.

The results are — iffy, to say the least. The system tends to get the player stuck in corners, and doesn’t recognize enemies that pop up at close range. The former is a function of the low-res minimap, while the latter has to do with the training data set — most human players engage enemies at distance, so there’s a dearth of “bad breath range” encounters to train to. Still, we’re impressed that it’s possible to train a machine to play a complex FPS game at all, let alone this well.

Building Fallout’s Super Sledge

The Fallout series of games has a variety of ridiculous weapons, not least the Super Sledge — a rocket propelled sledgehammer that looks about as dangerous for the wielder as it does for the opponent. [JAIRUS OF ALL] decided he had to recreate this build in real life, risks be damned.

Unwilling to go the single-use, solid rocket route for his build, [JAIRUS] instead elected to go with an electric ducted fan, supplemented with a propane supply for added flames. It’s not really a rocket of any form, and it’s unlikely the burning propane adds any real thrust, but it does shoot huge flames out the back and it is terrifying. The EDF idle speed can be set by a potentiometer on a servo tester hooked up to a speed controller, while there’s a valve for adjusting propane flow. A switch can then be used to boost the EDF speed higher and increase the propane flow, increasing the violence of the flow out the back of the hammer.

Notably, [JAIRUS] doesn’t actually demonstrate swinging the hammer at anything in particular. We’re kind of glad, as we suspect it might end with a sizable explosion, or burns at the very least. Nonetheless, it would easily be the most terrifying prop weapon at most any Halloween party you took it to. It’s in a similar vein to the fire vortex cannon [JAIRUS] also designed. Video after the break.

Continue reading “Building Fallout’s Super Sledge”

Handheld Multimeter Converted For Bench Top Use

A few years ago [Mechatrommer] got one of the low-cost Aneng Q1 multimeters and has converted it into a bench top meter. He first tried and failed to do an LCD modification and set it aside. It remained in a storage box until he needed another meter to repair his rubidium frequency standard. Finding that off-the-shelf bench multimeters were literally off-the-shelf — they were too deep for his bench — he decided to take matters into his own hands.

He dug out the dismantled an Aneng Q1 and undertook a more drastic modification than before, slicing the multimeter into three pieces and mounting each piece in a new enclosure. The power-draining back-lit display of the Q1, problematic in a battery-powered handheld meter, isn’t an issue in a bench top design. [Mechatrommer] replaced the battery pack with a mains powered supply. Next he reconnected all the signals which had been interrupted by the bandsaw, and now the meter lives again.

The resulting meter is pleasing enough (ignore the sideways input jacks) and looks like a typical piece of home-brew test gear. The enclosure has a lot of empty space, which he uses to stow test leads and sandwiches (we saw a similar storage compartment in [Dave Jones]’s recent teardown of a portable Fluke 37 multimeter). Kudos to [Mechatrommer] for coming up with this unusual conversion project.

We’ve written about the differences between these low-cost and more professional multimeters before if you want to learn more.

Thanks to [Adrian] for the tip.

[Emily]’s Eerie Educational Electric Eyeball Entertains

Like many of us, [Emily’s Electric Oddities] has had a lot of time for projects over the past year or so, including one that had been kicking around since late 2018. It all started at the Hackaday Superconference, when [Emily] encountered the Adafruit Hallowing board in the swag bag. Since that time, [Emily] has wanted to display the example code eyeball movement on a CRT, but didn’t really know how to go about it. Spoiler alert: it works now.

See? It’s educational.

Eventually, [Emily] learned about the TV out library for Arduino and got everything working properly — the eyeball would move around with the joystick, blink when the button is pressed, and the pupil would respond visually to changes in ambient light. The only problem was that the animation moved at a lousy four frames per second. Well, until she got Hackaday’s own [Roger Cheng] involved.

[Roger] was able to streamline the code to align with [Emily]’s dreams, and then it was on to our favorite part of this build — the cabinet design. Since the TV out library is limited to black and white output without shades of gray, Emily took design cues from the late 70s/early 80s, particularly the yellow and wood of the classic PONG cabinet. We love it!

Is Your Pet Eye the worst video game ever, as [Emily] proclaims it to be? Not a chance, and we’re pretty sure that the title still rests with Desert Bus, anyway. Even though the game only lasts until the eye gets tired and goes to sleep, it’s way more fun than Your Pet Rock. Don’t miss the infomercial/explanation/demonstration video after the break. If one video is just not enough, learn more about [Emily’s] philosophy of building weird projects from the Supercon talk she presented. It’s also worth mentioning that this one fits right into the Reinvented Retro contest.

Why are eyeballs so compelling? We can’t say for sure, but boy, this eyeball web cam sure is disconcerting.

Continue reading “[Emily]’s Eerie Educational Electric Eyeball Entertains”

Tiny Gasoline Engine Fitted With A Custom Billet Waterpump

We don’t typically use gasoline engines smaller than 50 cc or so on a regular basis. Below that size, electric motors are typically less messy and more capable of doing the job. That doesn’t mean they aren’t cute, however. [JohnnyQ90] is a fan of tiny internal combustion engines, and decided to whip up a little water pump for one of his so it could do something useful besides make noise.

The pump is built out of billet aluminium, showing off [JohnnyQ90]’s machining skills. The two pieces that make up the main body and cover plate of the pump are impressive enough, but the real party piece is the tiny delicate impeller which actually does the majority of the work. The delicate curves of the pump blades are carefully carved out and look exquisite when finished.

The pump’s performance is adequate, and the noise of the tiny gasoline engine makes quite a racket, but it’s a great display of machining skill. If so desired, the pump could also do a great job for a small liquid delivery system if hooked up to a quiet electric motor, too. The aluminium design has the benefit of being relatively leak free when assembled properly, something a lot of 3D printed designs struggle to accomplish.

We’ve seen [JohnnyQ90]’s micro engine experiments before, too — like this small generator build. Video after the break.

Continue reading “Tiny Gasoline Engine Fitted With A Custom Billet Waterpump”

A Look Back On The Oroville Dam With Practical Engineering

Back when it first happened, we covered the Oroville Dam near-disaster. Heavier-than-expected rainfall in California back in early 2017 led to running the dam’s primary spillway at much higher-than-normal levels. February 17, 2017, the operators noticed something odd about the water flow down the spillway, and when they turned off water flowing down the spillway, it was made obvious that they had a major problem on their hands. Several chunks of concrete were missing, and the water had begun gouging into the earth beneath the spillway. It would need repairs before it was properly up to the task of discharging water, but it was still raining.

The rising water level in Lake Oroville put operators in a tricky situation, as they needed to discharge water in the least damaging way possible. They decided to use the emergency spillway to keep water levels at safe levels. Unfortunately, the secondary spillway began to deteriorate even more quickly than the primary had, and continued use could compromise the structure of the entire dam. The difficult decision was made to evacuate downstream residents, and sacrifice the primary spillway to drain the lake to 50 feet below the nominal full level. It worked, and effectively destroyed the bottom two-thirds of the spillway over those 3 months.

With the water at a safe level, the spillways could be repaired, a monumental nearly-2-year process in itself. We’ve covered all this before, but you may be left with the nagging question, what went wrong? [Grady Hillhouse], of the Practical Engineering channel, breaks it down for us in the video embedded below.

Continue reading “A Look Back On The Oroville Dam With Practical Engineering”

Thin Coatings Require An Impressive Collection Of Equipment And Know-How

Let’s be honest — not too many of us have a need to deposit nanometer-thick films onto substrates in a controlled manner. But if you do find yourself in such a situation, you could do worse than following [Jeroen Vleggaar]’s lead as he builds out a physical vapor deposition apparatus to do just that.

Thankfully, [Jeroen] has particular expertise in this area, and is willing to share it. PVD is used to apply an exceedingly thin layer of metal or organic material to a substrate — think lens coatings or mirror silvering, as well as semiconductor manufacturing. The method involves heating the coating material in a vacuum such that it vaporizes and accumulates on a substrate in a controlled fashion. Sounds simple, but the equipment and know-how needed to actually accomplish it are daunting. [Jeroen]’s shopping list included high-current power supplies to heat the coating material, turbomolecular pumps to evacuate the coating chamber, and instruments to monitor the conditions inside the chamber. Most of the chamber itself was homemade, a gutsy move for a novice TIG welder. Highlights from the build are in the video below, which also shows the PVD setup coating a glass disc with a thin layer of silver.

This build is chock full of nice details; we especially liked the technique of monitoring deposition progress by measuring the frequency change of an oscillator connected to a crystal inside the chamber as it accumulates costing material. We’re not sure where [Jeroen] is going with this, but we suspect it has something to do with some hints he dropped while talking about his experiments with optical logic gates. We’re looking forward to seeing if that’s true.

Continue reading “Thin Coatings Require An Impressive Collection Of Equipment And Know-How”