The Case Of The Mysterious Driveline Noise

Spend enough time on the automotive classifieds and you’ll end up finding a deal that’s too good to pass up. The latest of these in one’s own case was a Mercedes-Benz sedan, just past its twentieth birthday and in surprisingly tidy condition. At less than $3,000, the 1998 E240 was too good to pass up and simply had to be seen.

The car in question. Clean bodywork is too tempting to resist, even if there are mechanical issues.

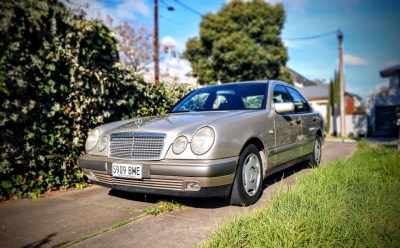
The car was clean, too clean for asking price. Of course, a test drive revealed the car had one major flaw – an annoying hum from the drivetrain that seemed to vary with speed. Overall though, mechanical problems are often cheaper and easier to fix than bodywork, so a gamble was taken on the German sedan. The first order of business was to diagnose and rectify the issue.

Characterise, Research, Investigate

The first step to hunting down any noise is to characterise it as much as possible. In this case, the noise was most noticeable when the car was traveling at speeds from 40 km/h – 60 km/h, present as a vibrational humming noise. The location of the noise source was unclear. Importantly, the noise varied with the speed of the car, raising in pitch at higher speeds and dropping as speeds decreased. Engine speed had no effect on noise whatsoever, and the noise was present regardless of gear selected in the transmission, including neutral. Continue reading “The Case Of The Mysterious Driveline Noise”

Big 3D-Printed Lamp Tries Some New Features

In lamp design, bulbs are usually given generous clearances because they get hot during use. LED bulbs however give off comparatively little heat, which opens a few new doors. [Mark Rehorst] created this huge 3D printed lamp, made with his custom 3D printer and a hefty 1 mm diameter nozzle, and the resulting device not only looks great, but shows off a few neat design features.

The LED filament bulb doesn’t give off much heat, so a PETG partial shade mounted directly to the bulb works fine.

[Mark] printed a partial shade in PETG that is made to sit directly on the bulb itself. The back of the shade is open, allowing light to spill out from behind while the front of the bulb is shielded, making it easier on the eyes. The result is pretty nifty, as you can see here. It sits in the center of the 600 mm tall lamp, which takes up most of the build volume of his self-made CoreXY-based printer, the UMMD.

The LED filament strands in this style of bulb are pretty neat in their own way, and some of you may remember that when they first became available as separate components, no time was lost in finding out what made them tick.

Hands On With The Raspberry Pi POE+ HAT

There’s a lot happening in the world of Pi. Just when we thought the Raspberry Pi Foundation were going to take a break, they announced a new PoE+ HAT (Hardware Attached on Top) for the Pi B3+ and Pi 4, and just as soon as preorders opened up I placed my order.

Now I know what you’re thinking, don’t we already have PoE HATs for the Pis that support it? Well yes, the Pi PoE HAT was released back in 2018, and while there were some problems with it, those issues got cleared up through a recall and minor redesign. Since then, we’ve all happily used those HATs to provide up to 2.5 amps at 5 volts to the Pi, with the caveat that the USB ports are limited to a combined 1.2 amps of current.

PoE vs PoE+
$20 for either of them. Choose wisely.

The Raspberry Pi 4 came along, and suddenly the board itself can pull over 7 watts at load. Combined with 6 watts of power for a hungry USB device or two, and we’ve exceeded the nominal 12.5 watt power budget. As a result, a handful of users that were trying to use the Pi 4 with POE were hitting power issues when powering something like dual SSD drives over USB. The obvious solution is to make the PoE HAT provide more power, but the original HAT was already at the limit of 802.3af PoE could provide, with a maximum power output of 12.95 watts.

The solution the Raspberry Pi Foundation came up with was to produce a new product, the PoE+ HAT, and sell it along side the older HAT for the same $20. The common name for 802.3at is “PoE+”, which was designed specifically for higher power devices, maxing out at 30 watts. The PoE+ HAT is officially rated to output 20 watts of power, 5 volts at 4 amps. These are the output stats, so the efficiency numbers don’t count against your power budget, and neither does the built-in fan.

Continue reading “Hands On With The Raspberry Pi POE+ HAT”

Tetris Handheld Powered By Tritium Cell, Eventually

The idea of a tritium power cell is pretty straightforward: stick enough of the tiny glowing tubes to a photovoltaic panel and your DIY “nuclear battery” will generate energy for the next decade or so. Only problem is that the power produced, measured in a few microwatts, isn’t enough to do much with. But as [Ian Charnas] demonstrates in his latest video, you can eke some real-world use out of such a cell by storing up its power over a long enough period.

As with previous projects we’ve seen, [Ian] builds his cell by sandwiching an array of keychain-sized tritium tubes between two solar panels. Isolated from any outside light, power produced by the panels is the result of the weak green glow given off by the tube’s phosphorus coating as it gets bombarded with electrons. The panels are then used to charge a bank of thin-film solid state batteries, which are notable for their exceptionally low self-discharge rate.

Some quick math told [Ian] that a week of charging should build up enough of a charge to power a knock-off handheld Tetris game for about 10 minutes. Unfortunately, after waiting the prescribed amount of time, he got only a few seconds of runtime out of his hacked together power source.

His best guess is that he got a bad batch of thin-film batteries, but since he could no longer find the exact part number he used originally, he had to design a whole new PCB for the second attempt. After waiting two long months to switch the game on this time, he was able to play for nearly an hour before his homebrew nuclear energy source was depleted.

We wouldn’t consider this terribly practical from a gaming standpoint, but like the solar harvesting handheld game we covered last year, it’s an interesting demonstration of how even a minuscule amount of power can be put to work for intermittent applications. Here it’s a short bout of wonky Tetris, but the concept could just as easily be applied to an off-grid sensor.

Continue reading Tetris Handheld Powered By Tritium Cell, Eventually”

Fixing Noisy Measurements On An Owon XDM2041 Bench Multimeter

After purchasing an Owon XDM2041 bench multimeter for an automated test setup, [Petteri Aimonen] was disappointed to find that at especially the higher mega Ohm ranges, the measured values were jumping around a lot and generally very inaccurate. Since this is an approximately $170 bench multimeter and Owon support wasn’t cooperating, [Petteri] set out to fix the issue, starting with a solid teardown.

As noted by [Petteri], there’s not a whole lot inside one of these multimeters. The main board with the guts of the whole system contains a GigaDevices GD32F103CBT6 MCU coupled with the star of the show: the HYCON Technology Corporation’s HY3131 multimeter chip. After a peek at the HY3131 datasheet, the culprit was quite apparent: while sampling the presence of mains voltage noise is usually suppressed through the selection of an appropriate crystal.

Unfortunately, instead of the recommended 4.9152 MHz crystal per the reference schematic for the HY3131, Owon’s engineers had apparently opted for a 4 MHz crystal instead, and so it’s essentially aliasing the line noise.

[Petteri] figured that the resulting sampling timing might work well enough with 60 Hz line frequency, but clearly with 50 Hz there was a lot of noise sneaking into the measurements. After swapping the crystal with a 3.072 MHz one, there was a marked improvement, as the plot shows.

PlayStation Games On The GBA, With A Few Extra Steps

It might seem impossible, but what you’re looking at is a Sony PlayStation game being played on a Nintendo Game Boy Advance. The resolution is miserable and the GBA doesn’t have nearly enough buttons to do most 3D games justice, but it’s working. There’s even audio support, although turning it on will slow things down considerably.

How does it work? The trick is that creator [Rodrigo Alfonso] is actually emulating the PlayStation on a Raspberry Pi and simply using Nintendo’s handheld as an external display and controller. We say “simply”, but of course, it’s anything but. The GitHub page for the project goes into impressive detail on how the whole thing works, but the short version is that the video data is sent from the Linux framebuffer to a small program running on the GBA over the handheld’s serial port using SPI. In testing he was able to push 2.56 Mbps through the link, which is a decent amount of bandwidth when you’ve only got to keep a 240 × 160 screen filled.

Perhaps the best part is that you don’t even need a flash cart to try it at home. [Rodrigo] is using a trick we’ve seen in other GBA projects, where the program is actually transferred to the handheld over the link cable at boot time.

Nintendo introduced this “multiboot” feature so multiplayer games could be played between systems even if they didn’t all have a physical cartridge, but now that hackers have cracked the code, it means you can run arbitrary code on a completely unmodified console; though it does get wiped as soon as you power it off.

[Rodrigo] provides all the information and software you need to try it at home, you just need a Raspberry Pi, a Game Boy Advance, and Link Cable you don’t mind cutting up; far less hardware than is required by the similar project to run DOOM on the NES. Since he’s tied everything into the popular RetroPie frontend, we imagine it would even work when emulating earlier 2D consoles; which would be a much better fit for the GBA’s display and limited inputs.

Retrotechtacular: The Secret Life Of The Electric Light

Normally, when we pick out something to carry the “Retrotechtacular” banner, it’s a film from the good old days when technology was young and fresh, and filmmakers were paid by one corporate giant or another to produce a film extolling the benefits of their products or services, often with a not-so-subtle “celebrate the march of progress” undertone.

So when we spied this remastered version of The Secret Life of the Electric Light an episode from [Tim Hunkin]’s fabulous educational The Secret Life of Machines TV series, we didn’t really think it would be good Retrotechtacular fodder. But just watching a few minutes reminded us of why the series was must-see TV back in the 1990s (when it first aired widely here in the States), especially for the budding geek. When viewed with eyes more used to CGI animations and high production values, what [Tim] and his collaborator, the late [Rex Garrod], accomplished with each of these programs is truly astounding. Almost every bit of the material, as well as the delivery, has an off-the-cuff quality to it that belies what must have taken an enormous amount of planning and organization to pull off. [Tim] and [Rex] obviously went to a lot of trouble to make it look like they didn’t go to a lot of trouble, and the result is films that home in on the essentials of technology in a way few programs have ever managed, and none since. And the set-piece at the end of each episode — often meeting its pyrotechnic destruction — always were real crowd-pleasers. They still are.

We have to say the remastered versions of The Secret Life episodes, all of which appear to be posted at [Tim]’s YouTube channel, look just great, and the retrospectives at the end of each episode where he talks about the travails of production are priceless. Also posted are his more recent The Secret Life of Components, which is a treasure trove of practical tips for makers and backyard engineers that’s well worth watching too.

Continue reading “Retrotechtacular: The Secret Life Of The Electric Light”