PCB Thermal Design Hack Gets Hot And Heavy

Thanks to the relatively recent rise of affordable board production services, many of the people reading Hackaday are just now learning the ropes of PCB design. For those still producing the FR4 equivalent of “Hello World”, it’s accomplishment enough that all the traces go where they’re supposed to. But eventually your designs will become more ambitious, and with this added complexity will naturally come new design considerations. For example, how do you keep a PCB from cooking itself in high current applications?

It’s this exact question that Mike Jouppi hoped to help answer when he hosted last week’s Hack Chat. It’s a topic he takes very seriously, enough that he actually started a company called Thermal Management LLC dedicated to helping engineers cope with PCB thermal design issues. He also chaired the development of IPC-2152, a standard for properly sizing board traces based on how much current they’ll need to carry. It isn’t the first standard that’s touched on the issue, but it’s certainly the most modern and comprehensive.

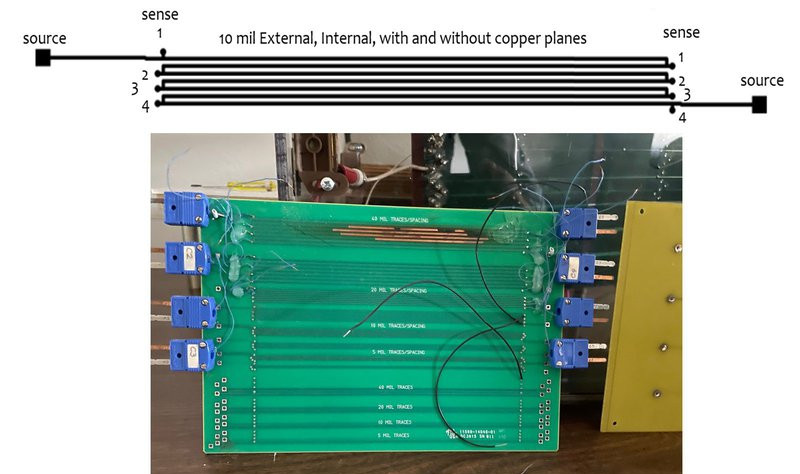
It’s common for many designers, who can be referencing data that in some cases dates back to the 1950s, to simply oversize their traces out of caution. Often this is based on concepts that Mike says his research has found to be inaccurate, such as the assumption that the inner traces of a PCB tend to run hotter than those on the outside. The new standard is designed to help designers avoid these potential pitfalls, though he notes that it’s still an imperfect analog for the real-world; additional data such as mounting configuration needs to be taken into consideration to get a better idea of a board’s thermal properties.

Even with such a complex topic, there’s some tips that are widely applicable enough to keep in mind. Mike says the thermal properties of the substrate are always going to be poor compared to copper, so using internal copper planes can help conduct heat through the board. When dealing with SMD parts that produce a lot of heat, large copper plated vias can be used to create a parallel thermal path.

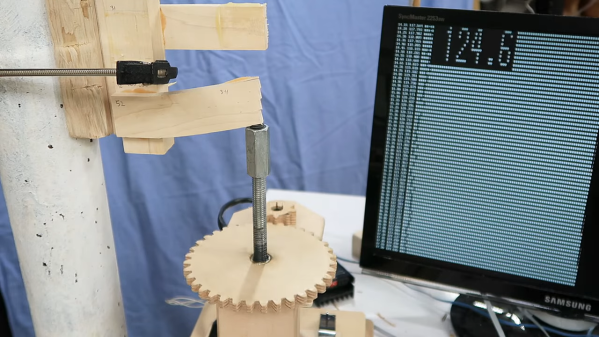
Towards the end of the Chat, Thomas Shaddack chimes in with an interesting idea: since the resistance of a trace will increase as it gets hotter, could this be used to determine the temperature of internal PCB traces that would otherwise be difficult to measure? Mike says the concept is sound, though if you wanted to get an accurate read, you’d need to know the nominal resistance of the trace to calibrate against. Certainly something to keep in mind for the future, especially if you don’t have a thermal camera that would let you peer into a PCB’s inner layers.

A rig used to test thermal properties of different trace configurations.

While the Hack Chats are often rather informal, we noticed some fairly pointed questions this time around. Clearly there were folks out there with very specific issues that needed some assistance. It can be difficult to address all the nuances of a complex problem in a public chat, so in a few cases we know Mike directly reached out to attendees so he could talk them through the issues one-on-one.

While we can’t always promise you’ll get that kind of personalized service, we think it’s a testament to the unique networking opportunities available to those who take part in the Hack Chat, and thank Mike for going that extra mile to make sure everyone’s questions were answered to the best of his ability.


The Hack Chat is a weekly online chat session hosted by leading experts from all corners of the hardware hacking universe. It’s a great way for hackers connect in a fun and informal way, but if you can’t make it live, these overview posts as well as the transcripts posted to Hackaday.io make sure you don’t miss out.

Hackaday Podcast 163: Movie Sound, Defeating Dymo DRM, 3DP Guitar Neck, Biometrics Bereft Of Big Brother

Join Hackaday Editor-in-Chief Elliot Williams and Assignments Editor Kristina Panos as we spend an hour or so dissecting some of the more righteous hacks and projects from the previous week. We’ll discuss a DIY TPM module that satisfies Windows 11, argue whether modern guts belong in retrocomputer builds even if it makes them more practical, and marvel at the various ways that sound has been encoded on film. We’ll also rock out to the idea of a 3D-printed guitar neck, map out some paths to defeating DYMO DRM, and admire a smart watch that has every sensor imaginable and lasts 36+ hours on a charge. Finally, we’ll sing the praises of RS-485 and talk about our tool collections that rival our own Dan Maloney’s catalogue of crimpers.

Check out the links below if you want to follow along, and as always, tell us what you think about this episode in the comments below!

Direct download the show, so you can listen on the go!

Continue reading “Hackaday Podcast 163: Movie Sound, Defeating Dymo DRM, 3DP Guitar Neck, Biometrics Bereft Of Big Brother”

It’s Almost A New Raspberry Pi Compute Module 4. But Not Quite

We know that readers are familiar with the global chip shortage and its effects on product availability. The Raspberry Pi folks haven’t escaped its shadow, for even though they’ve managed to preserve availability of their RP2040 microcontroller, it’s fair to say that some of their flagship Linux-capable boards have been hard to find. All of this has had an unlikely effect in the form of a new Raspberry Pi, but unexpectedly it’s one which few end users are likely to get their hands on.

The Raspberry Pi Compute Module has been part of the range since the early days, and in its earlier versions took a SODIMM form factor. The last SODIMM Compute Module had a Pi 3 processor, and this unexpected new model is reported as having a very similar hardware specification but featuring the Pi 4 processor. It seems that the chip shortage has affected supplies of the earlier SoC, and to keep their many industrial customers for the SODIMM Compute Modules in business they’ve had to produce this upgrade. As yet it’s not surfaced for sale on its own and there’s a possibility it will stay only in the realm of industrial boards, but as the story develops there’s a Raspberry Pi forum topic about it for the latest and you can find the pertinent info in the video below the break.

Of course, the Compute Module of the moment remains the CM4 in its newer form factor, which we see as possibly the most exciting of all the Pi products of the moment. Meanwhile this is not the first custom industrial Raspberry Pi to be seen in the wild.

Continue reading “It’s Almost A New Raspberry Pi Compute Module 4. But Not Quite”

This Week In Security: Vulnerable Boxes, Government Responses, And New Tools

The Cyclops Blink botnet is thought to be the work of an Advanced Persistent Threat (APT) from Russia, and seems to be limited to Watchguard and Asus devices. The normal three and four letter agencies publicized their findings back in February, and urged everyone with potentially vulnerable devices to go through the steps to verify and disinfect them if needed. About a month later, in March, over half the botnet was still online and functioning, so law enforcement took a drastic step to disrupt the network. After reverse-engineering the malware itself, and getting a judge to sign off on the plan, the FBI remotely broke in to 13 of the Watchguard devices that were working as Command and Control nodes. They disinfected those nodes and closed the vulnerable ports, effectively knocking a very large chunk of the botnet offline.

The vulnerability in WatchGuard devices that facilitated the Botnet was CVE-2022-23176, a problem where an “exposed management access” allowed unprivileged users administrative access to the system. That vague description sounds like either a debugging interface that was accidentally included in production, or a flaw in the permission logic. Regardless, the problem was fixed in a May 2021 update, but not fully disclosed. Attackers apparently reversed engineered the fix, and used it to infect and form the botnet. The FBI informed WatchGuard in November 2021 that about 1% of their devices had been compromised. It took until February to publish remediation steps and get a CVE for the flaw.

This is definitely non-ideal behavior. More details and a CVE should have accompanied the fix back in May. As we’ve observed before, obscurity doesn’t actually prevent sophisticated actors from figuring out vulnerabilities, but it does make it harder for users and security professionals to do their jobs. Continue reading “This Week In Security: Vulnerable Boxes, Government Responses, And New Tools”

Astrophotography On The Game Boy Camera

The Game Boy Camera was the first digital camera that many of us ever interacted with. At the time it was fairly groundbreaking to take pictures without film, even though the resolution was extremely low by modern standards, and it could only shoot two-bit color. It’s been long enough since its release that it’s starting to become a popular classic with all kinds of hacks and modifications, like this one which adds modern SLR camera lenses which lets it take pictures of the Moon.

The limitations of the camera make for a fairly challenging build. Settings like exposure are automatic on the Game Boy Camera and can’t be changed, and the system only allows the user to change contrast and brightness. But the small sensor size means that astrophotography can be done with a lens that is also much smaller than a photographer would need with a modern DSLR. Once a mount was 3D printed to allow the lenses to be changed and a tripod mount was built, it was time to take some pictures of the moon.

Thanks to the interchangeability of the lenses with this build, the camera can also capture macro images as well. The build went into great detail on how to set all of this up, even going as far as giving tips for how to better 3D print interlocking threads, so it’s well worth a view. And, for other Game Boy Camera builds, take a look at this one which allows the platform to send its pictures over WiFi.

Continue reading “Astrophotography On The Game Boy Camera”

The shredder after being rebuilt, on the bench top, with the washing machine pulley driving it spinning. It has not yet been fed, but that's about to happen.

Shredder Rebuilt From The Ashes, Aims To Produce More Ashes

What do you do when you buy a broken shredder and, upon disassembly, find its gears in pieces? You might reach towards your 3D printer – this one’s not that kind of shredder, however. [New Yorkshire Workshop] gives us a master class on reviving equipment and putting it to good use – this one’s assigned to help turn their cardboard stores into briquettes for their wood burner.

But first, of course, it had to be fixed – and fixed it was, the crucial parts re-designed and re-built around a sturdy wooden frame. It was made into a machine built to last; an effort not unlikely to have been fueled with frustration after seeing just how easily the stock gears disintegrated. The stock gear-based transmission was replaced with a sprocket and chain mechanism, the motor was wired through a speed controller, and a washing machine pulley was used to transfer power from the motor to the freshly cleaned and re-oiled shredder mechanism itself. This shredder lost its shell along the way, just like a crab does as it expands – and this machine grew in size enough to become a sizeable benchtop appliance.

After cutting loads of cardboard into shredder-fitting pieces, they show us the end result – unparalleled cardboard shredding power, producing bags upon bags of thinly sliced cardboard ready to be turned into fuel, making the workshop a bit warmer to work in. The video flows well and is a sight to see – it’s a pleasure to observe someone who knows their way around the shop like folks over at [New Yorkshire Workshop] do, and you get a lot of insights into the process and all the little tricks that they have up their sleeves.

The endgoal is not reached – yet. The shredder’s output is not quite suitable for their briquette press, a whole project by itself, and we are sure to see the continuation of this story in their next videos – a hydraulic briquette press was suggested as one of the possible ways to move from here, and their last video works on exactly that. Nevertheless, this one’s a beast of a shredder. After seeing this one, if you suddenly have a hunger for powerful shredders, check this 3D printed one out.

Continue reading “Shredder Rebuilt From The Ashes, Aims To Produce More Ashes”

Raspberry Pi Test Stand Tells You Which Glues To Use

Not all glues are created equal; or rather, not every glue is good for every application. But how is one to know which glue to use in which kinds of joints? The answer to that is not always clear, but solid numbers on the comparative strength of different glues are a great place to start.

To quantify what can ordinarily be a somewhat subjective process, there’s probably no one better than woodworker and hacker [Matthias Wandel], equipped as he is with his DIY strength-tester. Using its stepper-driven power to blast apart glued lap joints, [Matthias] measured the yield point of the various adhesives using a strain gauge connected to a Raspberry Pi.

His first round of tests had some interesting results, including the usually vaunted construction adhesive ending up in a distant last place. Also performing poorly, at least relative to its reputation and the mess it can cause, was the polyurethane-based Gorilla Glue. A surprise standout in overall strength was hot glue, although that seemed to have a sort of plastic yield mode. Ever the careful empiricist, [Matthias] repeated his tests using hardwoods, with remarkably different results; it seems that glues really perform better with denser wood. He also repeated a few tests to make sure every adhesive got a fair shake. Check out the video below for the final results.

It’s always good to see experiments like this that put what we often take for granted to the test. [John] over at the Project Farm channel on YouTube does this kind of stuff too, and even did a head-to-head test of epoxy adhesives.

Continue reading “Raspberry Pi Test Stand Tells You Which Glues To Use”