Reverse-Engineering Forgotten Konami Arcade Hardware

When fully-3D video games started arriving in the early 90s, some companies were more prepared for the change than others. Indeed, it would take nearly a decade of experimentation before 3D virtual spaces felt natural. Even then, Konami seems to have shot themselves in the foot at the beginning of this era with their first foray into 3D arcade games. [Mog] shows us the ins-and-outs of these platforms while trying to bring them back to life via MAME.

These arcade machines were among the first available with fully-3D environments, but compared to offerings from other companies are curiously underpowered, even for the time. They include only a single digital signal processor which is tasked with calculating all of the scene geometry while competing machines would use multiple DSP chips to do the same job. As a result the resolution and frame rate are very low. Nonetheless, [Mog] set out to get it working in MAME.

To accomplish this task, [Mog] turned to a set of development tools provided to developers for Konami in the early 90s which would emulate the system on the PCs of the time. It surprisingly still worked on Windows 10 with minor tweaking, and with some other tools provided over the decades of others working on MAME these old Konami machines have some new life with this emulator support.

Not everything works perfectly, but [Mog] reports that most of the bugs and other issues were recently worked out or are being actively worked on by other experts in the field. If you remember these games from the arcade era of the 80s and early 90s, it might be time to grab an old CRT and fire this one up again.

Continue reading “Reverse-Engineering Forgotten Konami Arcade Hardware”

Homebrew Optical Sensor Helps Your Diesel Pass The Smoke Test

We’ve all heard of the smoke test, and we know that it’s the lowest possible bar for performance of an electronic device. If it doesn’t burst into flames when power is applied, you’re good to go for more functional testing. But the smoke test means something else for cars, especially those powered by diesel fuel. And passing diesel exhaust tests can become something of a chore.

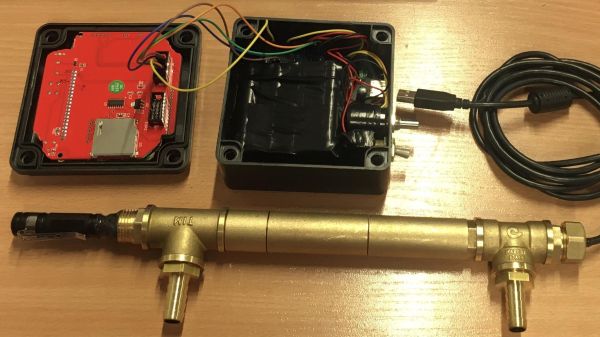
To make passing these tests a little easier, [Janis Alnis] came up with this diesel exhaust monitor that measures the opacity of his car’s emissions. The sensor itself is quite simple, and mimics what commercial exhaust analyzers use: a LED and a photodiode at opposite ends of a tube of a specified length. Soot particles in exhaust passing through the tube will scatter light in a predictable way, and the numbers work out that a passing grade is anything greater than 53% transmission.

The sensor body is cobbled together from brass pipe fittings with glass windows epoxied into each end. Exhaust enters via a tee fitting attached to a hose and sampling tube, and exits through another tee. One window of the sensor has a cheap battery-powered flashlight as a light source, while the other end has a Texas Instruments OPT101 photodiode sensor. The sensor is connected to one of the analog inputs of an Arduino, which also runs a 128×64 pixel LCD display — inspired by this air quality meter — to show the current smokiness both graphically and as a percentage. The video below shows the sensor at work.

While there were some issues with soot buildup and water vapor condensation, using the sensor [Janis] discovered that a little bit of a warm-up drive got things hot enough to clear up his ride’s tendency to smoke a bit, allowing him to pass his inspection. Continue reading “Homebrew Optical Sensor Helps Your Diesel Pass The Smoke Test”

Developing A Custom WearOS Watch Face

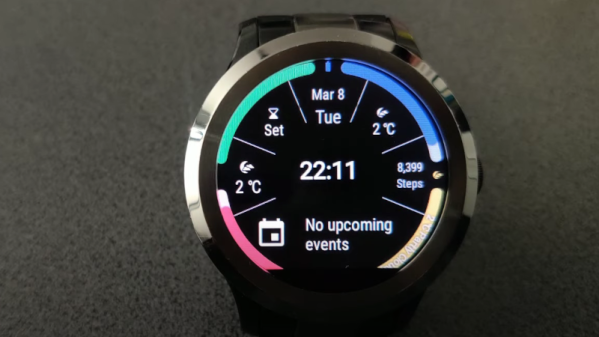
When you think about customizing the face of a smartwatch, you probably imagine something akin to selecting a new wallpaper on an Android device, or maybe tweaking the color scheme a bit. But not [Sebastian SARBU], his plans were a bit grander than all that. So he cracked open Android Studio and started writing a truly custom watch face that would make the most out of the device’s display. Luckily for us, he’s not only released the source code for others to study, but has documented the development process in a series of videos that you can see below the break.

He’s dubbed the new interface his “Pizza Watch Face”, as it breaks the circular screen down into slices complete with a bits of multi-colored “crust” that can show various notifications using the fewest pixels possible. There’s no question the layout is able to pack a lot of information into a relatively small space, and while aesthetics are naturally subjective, we happen to think it looks pretty slick. Continue reading “Developing A Custom WearOS Watch Face”

Atari At 50: The Story Of Our Lives

It’s been a year of anniversaries, what with the 40th birthday of both the Commodore 64 and the Sinclair ZX Spectrum. But there’s another anniversary that in a sense tops them all, today marks 50 years since Nolan Bushnell and Ted Dabney incorporated Atari Inc, a name that will forever be synonymous with the development of the computer game industry. PC Magazine have marked the event with a retrospective, an affectionate look at the progress from Spacewar! coin-ops to the unsuccessful Jaguar console of the 1990s, and it pulls no punches over the lacklustre management that oversaw its decline in later years.

For us the high points of the Atari story were the VCS console and the ST line of computers, which probably best represent the brand’s successes in Europe where this is being written. It’s with something of a wince that we remember watching an Atari Lynx advert in a British cinema, in which the laugh came when the teenager-unaffordably high price was revealed. At least diehard Atari fans can take solace in that by then Commodore was equally being run into the ground.

One criticism PC Magazine makes is that the current Atari incarnation is doing little beyond rehashing past glories, and perhaps they’re right. Last year we covered their release of some new cartridges for the VCS.

Odd Inputs And Peculiar Peripherals: RoenDi Smart Knob Thinks Outside The Box

When it comes to design decisions, we’re often advised to “think outside the box.” It’s generally good advice, if a bit abstract — it could really mean anything. But it appears that someone took it quite literally with this nifty little smart knob display and input device.

[Dimitar]’s inspiration for RoenDi — for “rotary encoder and display” — came from an unusual source: a car dashboard, and specifically, the multipurpose knobs that often crop up in a car’s climate control cluster. Designed for ease of use while driving while causing as little distraction as possible, such knobs often combine a rotary encoder with one or more indicators or buttons. RoenDi builds on that theme by putting a 1.7″ round LCD display in the middle of a ring attached to an Alps rotary encoder, allowing the knob to be customized for whatever you want it to represent. The backplane sports a powerful STM32 microcontroller with a lot of the GPIO pins broken out, so customization and interfacing are limited only by your imagination. The design is open source, so you can either build your own or support the project via Crowd Supply.

Unlike the haptic smart knob we’ve been seeing a bit about lately, which also features a round LCD at its center, RoenDi’s feedback is via the physical detents on the encoder. We think both devices are great, and they fill different niches in the novel input ecosystem.

Continue reading “Odd Inputs And Peculiar Peripherals: RoenDi Smart Knob Thinks Outside The Box”

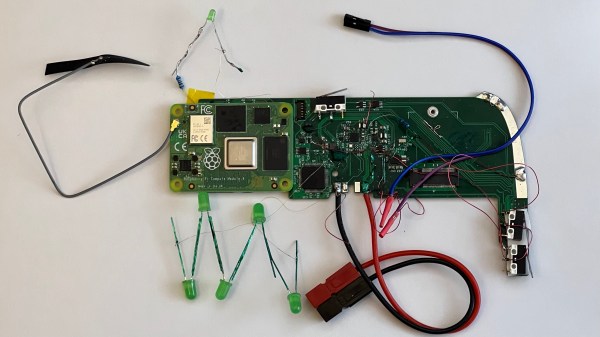
Motherboard on the desk, with a CM4 plugged into it, and all kinds of wires connected to it for purposes of debugging

Hackaday Prize 2022: A CM4 Upgrade For Your Old IPad

There’s no shortage of nicely built tablets out there, but unfortunately many of them are powered by what are by now severely outdated motherboards. Since manufacturers releasing replacement motherboards for their old hardware doesn’t look like its likely to be common practice anytime soon, the community will have to take things into their own hands. This is where [Evan]’s project comes in — designing a Raspberry Pi CM4-powered motherboard for the original iPad. It aims to have support for everything you’d expect: display, touchscreen, audio, WiFi, Bluetooth, and even the dock port. Plus it gives you way more computing power to make use of it all.

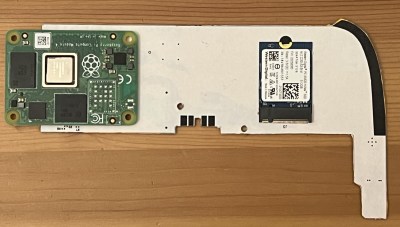
Testing part fitment with some cardboard CAD.

The original iPad got a lot of things right, a factor definitely contributing to its success back when it was released. [Evan]’s high-effort retrofit works with the iPad’s plentiful good parts, like its solid shell, tailored lithium-ion battery, eye-friendly LCD, and reliable capacitive touchscreen. You’d have to fit the new motherboard inside the space available after these parts all come together, and [Evan] has shaped his PCBs to do exactly that – with room for CM4, and the numerous ICs he’s added so as to leave no function un-implemented.

This project has been underway for over a year, and currently, there’s fourteen information-dense worklogs telling this retrofit’s story. Reverse-engineering the capacitive touchscreen and the LCD, making breakouts for all the custom connectors, integrating a custom audio codec, debugging device tree problems, unconventional ways to access QFN pins left unconnected on accident, and the extensive power management design journey. [Evan] has a lot to teach for anyone looking to bring their old tablet up to date!

The hardware files are open-source, paving the way for others to reuse parts for their own retrofits, and we absolutely would like to see more rebuilds like this one. This project is part of the Hack it Back round of the 2022 Hackaday Prize, and looks like a perfect fit to us. If you were looking for an excuse to start a similar project, now is the time.

Metal Detector Gets Help From Smartphone

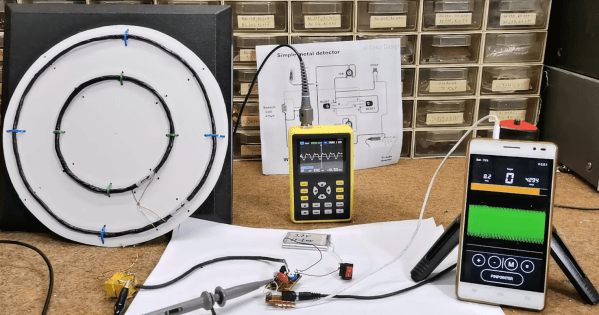
[mircemk] is quite a wizard when it comes to using coils of wires in projects, especially when their application is within easy-to-build metal detectors. There are all kinds of ways to send signals through coiled wire to detect metal objects in the ground, and today [mircemk] is demonstrating a new method he is experimenting with which uses a smartphone to detect the frequency changes generated by the metal detector.

Like other metal detectors, this one uses two coils of wire with an oscillator circuit and some transistors. The unique part of this build, though, is how the detector alerts the user to a piece of metal. Normally there would be an audible alert as the frequencies of the circuit change when in the presence of metal, but this one uses a smartphone to analyze the frequency information instead. The circuit is fed directly into the headphone jack on the smartphone and can be calibrated and used from within an Android app.

Not only can this build detect metal, but it can discriminate between different types of metal. [mircemk] notes that since this was just for experimentation, it needs to be calibrated often and isn’t as sensitive as others he’s built in the past. Of course this build also presumes that your phone still has a headphone jack, but we won’t dig up that can of worms for this feature. Instead, we’ll point out that [mircemk] has shown off other builds that don’t require any external hardware to uncover buried treasure.

Continue reading “Metal Detector Gets Help From Smartphone”