Ceiling Fan Adds CO2 Sensor

Ceiling fans seem to be an oft-misunderstood or overlooked household appliance. As such, they seem to have missed a lot of the IoT wave. Sure, you can get smart controllers for them to plug into your home automation system of choice, but these mostly rely on temperature sensors, simple timers, or voice commands. There’s a lot more to a ceiling fan than maintaining a comfortable temperature, as [EJ] demonstrates with this smarter ceiling fan build.

A big part of the job of a ceiling fan is to improve air circulation, which can help a room from feeling “stuffy”. This feeling is usually caused by excess CO2 as a result of respiration in an area where the air is not moving enough to exhaust this gas. Not only does [EJ]’s controller make use of a temperature monitor for controlling the fan automatically, but there is also a CO2 sensor integrated to improve this aspect of air quality when needed.

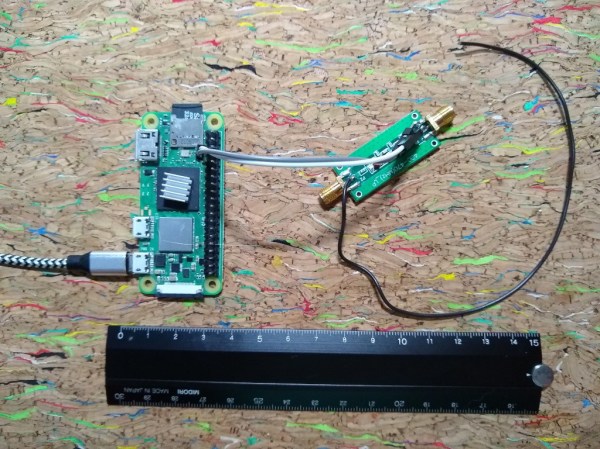
The entire build is based on a Raspberry Pi Zero, and nothing needed to be changed about the ceiling fan itself for this added functionality because it already included a radio-based remote control. With some monitoring of the signals produced by the remote, the Raspberry Pi was programmed to mimic these commands when the surrounding sensors captured a condition where [EJ] would want the fan on. There’s also a manual control button as well, so the fan control is not entirely in the hands of the computer.

For a little more detailed information about this build, there’s a separate project page which details a lot of the information about the RF waveform capturing and recreation. And, if you want to take your fan to the next level, take a look at this one which focuses on building a smartphone app to control the fan instead.

PCB-Filled Dream Desk Will Only Get Cooler With Age

We all have one. Maybe you’re sitting at it now, or just wishing you were — that perfect desk. You know the one — a place for everything and everything in its place, ample acreage, specialized storage, and top-notch looks. Oh, and blinkenlights. Can’t forget those.

It took four months of hard work, but [Build XYZ]’s dream desk has been finely fabricated into fruition. There’s a lot to unpack with this build, which you can appreciate after the break, but it all started with a donated up/down desk from Progressive Desk. After building the base and putting it through its body weight-driven paces, [Build XYZ] set about making the perfect top, which, as you can see, highlights an assortment of PCBs by encasing them for eternity in resin.

But don’t let your admiration stop there, because the woodworking is just as much a part of the show. In addition to the functional blinkenlights that notify [BuildXYZ] when it’s time to stop working for the day or just take a break, there’s a working wireless charger hiding among the FR4. We can’t wait to look back on this desk in 20 years or so and we also can’t wait to see how PCBs will change over the next 20 years.

This tightly-produced video is a fascinating look into the process of forever immortalizing things in resin. So much resin, in fact, that [Build XYZ] came up a gallon short during the pour and had to wait an excruciatingly long time before more resin showed up. Seeing as how you totally can’t tell at all in the final build, we have maximum respect for [Build XYZ]’s inclusion of this part in the first place, which serves as a warning to the rest of us.

Continue reading “PCB-Filled Dream Desk Will Only Get Cooler With Age”

A sliced digital file of a marker light enclosure. Background is a white and grey grid and object itself is a series of print path lines in red, orange, and green.

3D Printing Hard-To-Find Vintage Vehicle Parts

When I was growing up, my dad and I restored classic cars. Combing junkyards for the pieces we needed was a mixture of interesting and frustrating since there was always something you couldn’t find no matter how long you looked. [Emily Velasco] was frustrated by the high price of parts even when she was able to find them, so she decided to print them herself. She wrote an excellent tutorial about designing and 3D printing replica parts if you find yourself in a similar situation.

All four marker lights on [Velasco]’s 1982 Toyota pickup were on their way to plastic dust, and a full set would run her $160. Instead of shelling out a ton of cash for some tiny parts, she set out to replicate the marker lamps with her 3D printer. Using a cheap marker lamp replacement for a more popular model of pickup as a template, she was able to replace her marker lamps at a fraction of the cost of the options she found online. Continue reading “3D Printing Hard-To-Find Vintage Vehicle Parts”

Flux: A Forty Foot Long Kinetic Art Piece

No office space is complete without some eye-catching art piece to gawp at whilst you mull over your latest problem. But LED-based displays are common enough to be boring these days. Kinetic art pieces are where it’s at, and this piece called Flux is a perfect example.

Commissioned for the Toronto office of a very popular e-commerce platform and constructed by [Nicholas Stedman], Flux consists of twenty identical planks on the ceiling, arranged in a line forty feet long. Each plank has a pair of rotating prisms, constructed from a stack of foam sheets, finished with metallic paint. The prisms are spun by individual stepper motors, each of which is driven by a TMC2160-based module, making them whisper-quiet.

A simple 3D printed bracket holds a small PCB holding an AMS AS5600 rotary magnetic encoder, onto the rear of the stepper motor. This allows for closed-loop feedback to the shared Arduino, which is very important for a sculpture such as this. Each Arduino is hooked up to a Raspberry Pi, running a simple application written in node.js which is responsible for coordinating movement, as well as uploading updated firmware images as required. A simple, but very effective build, we think!

Even more fun are kinetic art installations that are reactive to some data source, such as Adad, which visualizes lightning strike data. If these builds are just too big and complex, we’ve seen many examples of smaller desktop toys, such as this 3D printed tumbling chain demo for example.

Continue reading Flux: A Forty Foot Long Kinetic Art Piece”

Engineers: Be Subversive To Be Green

The caterers for the volunteer workforce behind the summer’s MCH hacker camp in the Netherlands served all-vegan food. This wasn’t the bean sprouts and lentils that maybe some of the more meat-eating readers might imagine when confronted with vegan food, nor was it a half-as-good array of substitutes with leathery soy hamburgers and rubbery fake cheese smelling suspiciously of feet.

Instead it was a well-crafted, interesting, and tasty menu that was something to look forward to after several hours driving a vanload of handwashing sinks. It was in one of their meals that I found food for thought when driving a week later past the huge Garzweiler open-cast lignite mine on my way through Germany to Luxembourg’s Haxogreen as part of my European hacker camp summer tour.

The meal was deep-fried soy protein strips and the mine is probably one of Western Europe’s dirtiest and most problematic CO2 sources in a country that likes to imagine itself as environmentally friendly, so where in this unlikely connection did I find a pairing? Continue reading “Engineers: Be Subversive To Be Green”

Hackaday Podcast 188: Zapping Cockroaches, Tricking AIs, Antique 3D Scanning, And Grinding Chips To QFN

It’s déjà vu all over again as Hackaday Editor-in-Chief Elliot Williams gets together with Staff Writer Dan Maloney to look over the best hacks from the past week. If you’ve got a fear of giant cockroaches, don’t worry; we’ll only mention the regular ones when we talk about zapping them with lasers. What do you need to shrinkify an NES? Just a little sandpaper and a lot of finesse.

Did you know that 3D scanning is (sort of) over a century old? Or that the first real microcomputer dates all the way back to 1972 — and isn’t one of those blinkenlight deals? And watch out for what you tell GPT-3 to ignore — it might just take you very seriously. We’ll touch on solar-powered cameras, a compressor of compressors, and talk about all the unusual places to find lithium batteries for your projects. It’s an episode so good you might just want to listen to it twice!

(In case you’re wondering about all this “twice” stuff — Elliot forgot to hit record on the first take and we had to do the entire podcast over again. Oh, the humanity!)

Check out the links below if you want to follow along, and as always, tell us what you think about this episode in the comments!

Direct download here!

Continue reading “Hackaday Podcast 188: Zapping Cockroaches, Tricking AIs, Antique 3D Scanning, And Grinding Chips To QFN”

A CRT Monitor From An Obsolete Logic Analyzer

The designers of older equipment that contained a CRT monitor rarely made the effort to design their own driver and deflection circuitry. Instead they were more likely to buy an off  the shelf assembly from a monitor manufacturer, and simply supply it with their video. [TomV] has an old HP 16500A logic analyzer, and in it he found a Sony monitor chassis. With a quest for a microfiche service manual and a bit of reverse engineering, he was able to hook it up to a VGA port and use it as an extension monitor for his laptop.

The monitor chassis is a Sony CHM-9001-00, which sports their 10″ Trinitron tube. These were among the very best CRT tubes of the day, making it the type of module 1990s hacker would have been very pleased to get their hands on. Here in 2022 a look at the monitor’s 40-pin connector reveals a standard RGB interface which the service manual confirms is within the voltage range to be driven from a VGA output. A Thinkpad X220 is pressed into service, with a 576 by 360 pixel at 60 Hz video mode defined, and there we have it, a modern desktop on an obsolete piece of test equipment.

The intended destination for this monitor is a small arcade cabinet, so it needed to be independent of the HP chassis. The required 120 VDC supply comes from an inverter designed for solar battery charging, which balked at the inrush current from the monitor when fed with 12 V. Increasing the supply voltage on the low voltage side solved that, leading to a very serviceable monitor. We have no use for one, but we’d be lying if we said we didn’t want one.

Perhaps you may have wondered, what made Trinitrons so good?