Watch on the wrist, with all the sensors facing the camera. There's a lot of them, and a lot of wires of all kinds tying everything together.

2022 Cyberdeck Contest: IP00-Minus, A Daring Wearable

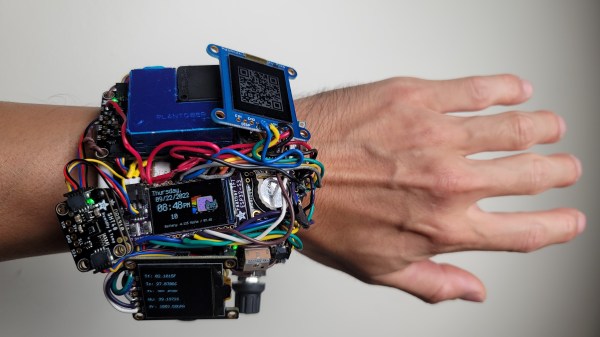
[Rob]’s IP00-Minus watch stands out on the Cyberdeck Contest project list page; it’s clear he decided to go a different path than most other hackers, and we can certainly see the advantages. For example, if there’s no case, there’s no need to redesign it each time you want to add a module — and [Rob] has added many, many modules to this watch.

Picking between regular LCD, memory LCD, and OLED displays can be a tricky decision to make when planning out your gadget, so he just added all three. The CircuitPython firmware initially attempted to resist the trio, but was eventually defeated through patching. Jokes aside, we can almost feel the joy that [Rob] must have felt after having put this watch on for the first time, and this project has some serious creative potential for a hacker.

Watch on the wrist, showing the wrist straps and how the watch sits on the arm.
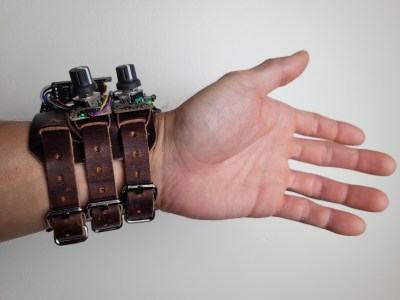
[Rob] has been focusing on day-to-day usability first and foremost, with pleasantly clicky encoders, impeccable performance of its watch duty, unparalleled expandability, and comfortable wrist fit — it provides a feeling no commercial wearable could bring.

Out of the myriad of sensors, the air quality sensor has been the most useful so far, letting him know when to open a window or leave a particularly crowded place. The ESP32-S3 powered watch has been quite a playground for [Rob]’s software experiments, and given the sheer variety of hardware attached, we’re sure it will bring unexpected synergy-driven ideas. Plus, it’s no doubt a great conversation starter in nerd and non-nerd circles alike.

Good things happen when you give hackers a wrist-worn watch full of sensors, whether it’s a particularly impressive event badge, a modified firmware for an open source smartwatch, or a custom piece that pushes the envelope of DIY hardware.

2022 Hackaday Supercon Speakers Will Inspire You

The return of Supercon is taking place in just a month. We’ve got 45 fantastic talks and workshops planned for the three-day weekend, and they are as varied and inspiring as the Hackaday community itself. From molecules to military connectors, here’s an even dozen talks to whet your appetite.

Supercon is the Ultimate Hardware Conference and you need to be there! We’ll continue to announce speakers and workshops over the next couple weeks. Supercon will sell out so get your tickets now before it’s too late. And stay tuned for the next round of talk reveals next week! Continue reading “2022 Hackaday Supercon Speakers Will Inspire You”

The assembled switch PCB in the palm of its creator's hand

TTP223 Brings Simple Touch Controls To A LED Lamp

You can buy small modules with capacitive touch detection ICs — most often it’s the TTP223, a single-button capacitive model with configurable output modes. These are designed to pair with a microcontroller or some simple logic-level input, but [Alain Mauer] wanted was to bring touch control to a simple LED strip. Not to be set deterred, he’s put together a simple TTP223-based switch board.

Initially, he made a prototype using one of the regular TTP223 boards as a module, but then transferred the full schematic onto a single PCB. The final board uses an NPN transistor capable of handling up to 3 amps to do the switching job, and Zener-based regulation to provide 5 V for the TTP223 itself from the 12 V input. [Alain] shares the schematic, as well as BOM together with Gerber files for a 2×3 panel in case you’re interested in adding a few of these handy boards to your parts bin.

The TTP223 is a ubiquitous and quite capable chip – we’ve seen it used for building a mouse with low actuation force buttons, a soft power switch, and even a UV-sensing talisman that’s equal parts miniature electronics and fascinating metalwork.

Continue reading “TTP223 Brings Simple Touch Controls To A LED Lamp”

Thank Magnesium For Water-Activated Batteries

Most of the batteries we use these days, whether rechargeable or not, are generally self-contained affairs. They come in a sealed package, with the anode, cathode, and electrolyte all wrapped up inside a stout plastic or metal casing. All the reactive chemicals stay inside.

However, a certain class of magnesium batteries are manufactured in a dry, unreactive state. To switch these batteries on, all you need to do is add water! Let’s take a look at these useful devices, and explore some of their applications.

Continue reading “Thank Magnesium For Water-Activated Batteries”

A circular wheeled robot sits on a white background. There is a green tank of butane/propane in the center surrounded by wires and electronics.

Doomba: Purifying Your Floors With Fire

If you’ve ever thought that your floor cleaning robot eating the fringe on your rug wasn’t destructive enough, [Kyle Brinkerhoff] is working on a solution — Doomba.

This blazingly fast RC vehicle has a tank of butane/propane gas nestled snugly amid its electronics and drive system to fuel a (not yet implemented) flamethrower. Watching how quickly this little bot can move in the video below certainly made our hearts race with anticipation for the inevitable fireworks glory of completed build. Dual motors and a tank-style drive ensure that this firebug will be able to maneuver around any obstacle.

As of writing, the flamethrower and an updated carriage for the drivetrain are underway. Apparently, spinning very quickly in circles can be just as disorienting for robots as it is for us biological beings. During the test shown below, the robot kicked out one of its drive motors. [Kyle] says the final touch will be putting the whole assembly inside an actual Roomba shell for that authentic look.

With spooky season upon us, it’s always good to have the cleansing power of fire at hand in case you find more than you bargained for with your Ghost-Hunting PKE Meter. While there’s no indication whether Doomba can actually run DOOM, you might be interested in this other Doomba Project that uses Roomba’s maps of your house to generate levels for the iconic shooter.

Continue reading “Doomba: Purifying Your Floors With Fire”

Back of the dock shown. You can see that the dock is milled out of a massive chunk of aluminium, and you can see the charging, HDMI and Ethernet ports being accessible on the back.

Nintendo Switch Stock Dock Imperfect? Mill Your Own!

Despite the seat of honor it enjoys in literally millions of households, the official Nintendo Switch Dock is certainly far from perfect. For one, it’s not milled out of a hefty block of aluminum. A less apparent but no less important issue is that the ports are positioned kind of awkward – [Kevin] from Modified believes that the USB ports should be facing the front side, while the HDMI, Ethernet, and charging inputs should be on the backside — a reasonable position. He set out to fix both of these problems at the same time, and tells us the CNC-heavy rebuild story in a short but captivating video.

The original dock consists of two PCBs, and these two boards are the only thing [Kevin] didn’t redesign from scratch. As they’re connected with a flexible cable, he could freely rotate and thus completely reposition the ports-equipped board without soldering. He added some standoffs to secure this board to the case, and after 3D printing a few iterations for test-fitting, the milling went on for all of us to marvel at.

The resulting dock is pretty, functional, and even has some extra features — for instance, the “i” in the embossed Nintendo logo lights up when the dock is in use. In no small part due to the Nintendo logo, we don’t expect this one to grace store shelves, but we hope that it provides inspiration to other makers to do their builds. If you like this rebuild and crave more, whether you’re looking for inspiration, CNC work insights, or pretty milling videos, [Kevin]’s milled Xbox case project is an excellent “Watch next” choice.

Continue reading “Nintendo Switch Stock Dock Imperfect? Mill Your Own!”

Mouse Finds New Home In Pinball Machine

Restoring pinball machines is an excellent hobby, and can even be more than that as we see businesses like bars and museums focusing on them as a main attraction. There’s all kinds of intrigue to be found, from esoteric mechanical systems to classic electronics and unique artwork. For those building new pinball machines, though, one way to bypass a lot of the hassle of finding antiquated parts is to build a digital machine with an analog feel, like this machine which repurposes a computer mouse in an interesting way.

One of the important design considerations with a more modern system like this is to preserve the mechanical components that the player interacts with, in this case the plunger. This pinball machine is really just a large screen driven by a computer, but the plunger is a spring-loaded one from an old analog machine. Attached to the end of the plunger inside the cabinet is a cloth strap which passes underneath an old optical mouse. When the plunger is pulled and released, the mouse registers the position of the plunger and sends that information to the computer controlling the pinball display.

We really appreciate a KISS-style design like this in general. Mice are a proven, reliable technology and the metal components of the plunger are unlikely to ever wear out, which means that at least this part of the new pinball machine is unlikely to need much maintenance over the lifespan of the cabinet itself. For other ways of preserving the original feel of old machines, take a look at this build which incorporates all kinds of tricks within a MAME cabinet.