Point Out Pup’s Packages With This Poop-Shooting Laser

When you’re lucky enough to have a dog in your life, you tend to overlook some of the more one-sided aspects of the relationship. While you are severely restrained with regard to where you eliminate your waste, your furry friend is free to roam the yard and dispense his or her nuggets pretty much at will, and fully expect you to follow along on cleanup duty. See what we did there?

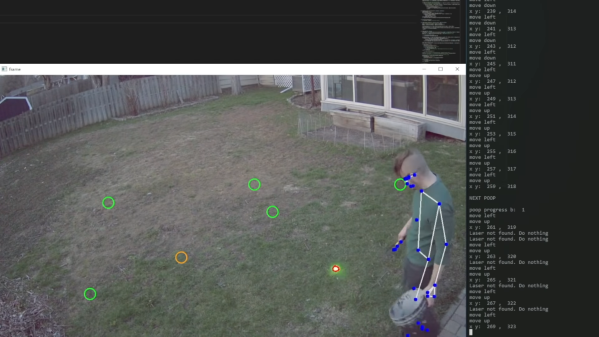
And so dog people sometimes rebel at this lopsided power structure, by leaving the cleanup till later — often much, much later, when locating the offending piles can be a bit difficult. So naturally, we now have this poop-shooting laser turret to helpfully guide you through your backyard cleanup sessions. It comes to us from [Caleb Olson], who leveraged his recent poop-posture monitor as the source of data for where exactly in the yard each deposit is located. To point them out, he attached a laser pointer to a cheap robot arm, and used OpenCV to help line up the bright green spot on each poop.

But wait, there’s more. [Caleb]’s code also optimizes his poop patrol route, minimizing the amount of pesky walking he has to do to visit each pile. And, the same pose estimation algorithm that watches the adorable [Twinkie] make her deposits keeps track of which ones [Caleb] stoops by, removing each from the worklist in turn. So now instead of having a dog control his life, he’s got a dog and a computer running the show. Perfect.

We joke, because poop, but really, this is a pretty neat exercise in machine learning. It does seem like the robot arm was bit overkill, though — we’d have thought a simple two-servo turret would have been pretty easy to whip up.

Continue reading “Point Out Pup’s Packages With This Poop-Shooting Laser”

Untangling The Maze Of Digital TV Upgrades

When we all shifted our television broadcasts to digital, for a moment it looked as though we might have had to upgrade our sets only once and a set-top box would be a thing of the past. In Europe that meant the DVB-T standard, whose two-decade reign is slowly passing to DVB-T2 for higher definition and more channels. All of this might seem simple but for the DVB-T2 standard being a transport layer alone without a specified codec. Thus the first generation of DVB-T2 equipment uses MPEG4 or H.264, while for some countries the most recent broadcasts use HEVC, or H.265. [CyB3rn0id] is there to guide us through the resulting mess, and along the way produce a nifty upgrade that integrates a set-top box on the back of an older DVB-T set.

Simply bolting a set-top box to a TV is not the greatest of hacks, however this one takes matters a little further with a 3D printed bracket and an extension which brings the box’s IR receiver out to the front of the TV on a piece of prototyping board. Along with a laptop power supply plumbed directly into the TV, it gives new life into a set which might otherwise have been headed for landfill.

As long-time readers will know, we quite like a TV retrofit here at Hackaday.

Motorcycle Regulator By Popular Demand

A few weeks ago we posted a build of an avid motorcycle enthusiast named [fvfilippetti] who created a voltage regulator essentially from the ground up. While this was a popular build, the regulator only works for a small subset of motorcycles. This had a large number of readers clamoring for a more common three-phase regulator as well. Normally we wouldn’t expect someone to drop everything they’re doing and start working on a brand new project based on the comments here, but that’s exactly what he’s done.

It’s important to note that the solutions he has developed are currently only in the simulation phase, but they show promise in SPICE models. There are actually two schematics available for those who would like to continue his open-source project. Compared to shunt-type regulators, these have some advantages. Besides being open-source, they do not load the engine when the battery is fully charged, which improves efficiency. The only downside is that they have have added complexity as they can’t open this circuit except under specific situations, which requires a specific type of switch.

All in all, this is an excellent step on the way to a true prototype and eventual replacement of the often lackluster regulators found on motorcycles from Aprilia to Zero. We hope to see it further developed for all of the motorcycle riders out there who have been sidelined by this seemingly simple part. And if you missed it the first time around, here is the working regulator for his Bajaj NS200.

European Roads See First Zero-Occupancy Autonomous Journey

We write a lot about self-driving vehicles here at Hackaday, but it’s fair to say that most of the limelight has fallen upon large and well-known technology companies on the west coast of the USA. It’s worth drawing attention to other parts of the world where just as much research has gone into autonomous transport, and on that note there’s an interesting milestone from Europe. The British company Oxbotica has successfully made the first zero-occupancy on-road journey in Europe, on a public road in Oxford, UK.

The glossy promo video below the break shows the feat as the vehicle with number plates signifying its on-road legality drives round the relatively quiet roads through one of the city’s technology parks, and promises a bright future of local deliveries and urban transport. The vehicle itself is interesting, it’s a platform supplied by the Aussie outfit AppliedEV, an electric spaceframe vehicle that’s designed to provide a versatile platform for autonomous transport. As such, unlike so many of the aforementioned high-profile vehicles, it has no passenger cabin and no on-board driver to take the wheel in a calamity; instead it’s driven by Oxbotica’s technology and has their sensor pylon attached to its centre.

Continue reading “European Roads See First Zero-Occupancy Autonomous Journey”

dual screen cyberdeck

Ditch The Laptop For The Tabletop

The idea of a cyberdeck is simple. A relatively portable case that is primarily a keyboard with some screen attached. Cyberdecks often try to hit a particular aesthetic or vibe rather than focusing on usability or practicality. [Carter Hurd] took a step back and asked himself what would be a cyberdeck-like system that he could practically use every day.

[Carter’s] build is a prototype that allows him to try out the form factor and use it as a daily driver, so many decisions were made to speed up the build and get something functional. For example, rather than spend the time tweaking and printing his own keyboard, he used an off-the-shelf keyboard he knew he liked. While a framework motherboard would have been perfect for something like this, they, unfortunately, weren’t available when [Carter] started the build. So [Carter] used a used gaming laptop for the task. He had hoped to drive the display directly from the motherboard as many laptops use embedded DisplayPort internally. Unfortunately, this didn’t work as the motherboard didn’t support the resolution he was trying to drive at, so he just used the external port to drive the screen. A 3d printed base fits underneath the keyboard to hold the laptop motherboard with little extensions for bits that don’t work well, such as the wifi card. The chassis also has a slot that allows a secondary display to slot right in.

Ultimately, it is something of a modern-day typewriter and something like a cyberdeck. Either way, we love it. Video after the break.

Continue reading “Ditch The Laptop For The Tabletop”

Fighting Back Against Dodgy Dyson Batteries

If you’ve ever worked with multi-cell rechargeable battery packs, you know that the individual cells will eventually become imbalanced. To keep the pack working optimally, each cell needs to be analyzed and charged individually — which is why RC style battery packs have a dedicated balance connector. So if you know it, and we know it, why doesn’t Dyson know it?

It’s that question which inspired [tinfever] to start work on the FU-Dyson-BMS project. As you might have surmised from the name, [tinfever] believes that Dyson has intentionally engineered their V6 and V7 batteries to fail by not using the cell balancing function of the onboard ISL94208 battery management IC. What’s worse, once the cells get as little as 300 mV out of balance, the controller considers the entire pack to be shot and will no longer allow it to be charged.

These missing resistors deserve justice.

Or at least, that’s what used to happen. With the replacement firmware [tinfever] has developed, the pack’s battery management system (BMS) will ignore imbalanced cells so you can continue to use the pack (albeit at a reduced capacity). Of course the ideal solution would have been to enable cell balancing on the ISL94208, but unfortunately Dyson didn’t include the necessary resistors on the PCB. Though it’s worth noting that earlier versions of the board did have unpopulated spots for them, lending some credence to the idea that their omission was intentional on Dyson’s part.

But not everyone is onboard with the conspiracy theory. Over on the EEVBlog forums, some users pointed out that a poorly implemented cell balancing routine can be more problematic than not having one at all. It’s possible that Dyson had some bad experiences with the technology in earlier packs, and decided to move away from it and try to compensate by using higher-quality cells. That said, at least one person in the thread was able to revive their own “dead” battery pack by installing this unofficial firmware, so whether intentional or not, it seems there’s little debate that usable batteries are indeed being prematurely marked as defective.

Proper cell balancing is key even in DIY projects, so we do have to agree that it seems more than a little unusual that Dyson would intentionally turn off this important feature in their packs. But the jury is still out on whether or not Sir James is trying to pull a fast one on his customers — as Hanlon’s Razor states, “never attribute to malice that which is adequately explained by stupidity”.

Continue reading “Fighting Back Against Dodgy Dyson Batteries”

Resulting tweezer assembly, with a 3D printed replacement case for both of the probes

Hackaday Prize 2022: Glue-Hindered Smart Tweezer Repair Involves A Rebuild

[Dan Julio] owns a pair of Miniware multimeter tweezers, a nifty helper tool for all things SMD exploration. One day, he found them broken – unable to recognize any component between the two probes. He thought it could be a broken connection problem, and decided to take them apart. Presence of some screws on their case fooled him – in the end, it turned out that the case was glued together, and could only be opened destructively. For an entry in the “Reuse, Recycle, Revamp” round of 2022 Hackaday Prize, he tells us how he brought these tweezers back from the dead.

During the disassembly, he broke a custom flexible PCB, which wasn’t reassuring either. However, that was no reason to give up – he reverse-engineered the connections and the charging circuitry, then assembled parts of the broken tweezers together using a small generic protoboard as a base. Indeed, it was likely a broken connection between probes, because the reassembled tweezers worked!

Of course, having exposed PCBs wouldn’t do, and from the very start, assembling these tweezers back together was not an option. Instead, he developed a replacement case in OpenSCAD, bringing the tweezers back to life as his trusty tool – and still leaving repairability on the table. If you’re interested in the details, he goes more into how these tweezers are designed when it comes to charging and connectivity, and we recommend that you give his write-up a read!

We’ve been seeing smart tweezers around for over a decade now, from reviews and hacks of commercially made ones, to DIY chopstick-based and PCB-based ones. If you already own a pair of tweezers you’ve grown attached to, you can neatly retrofit them with a capacitance sensing function!