This Standalone Camera Gets The Picture Through With SSTV

These days, sending a picture to someone else is as simple as pulling out your smartphone and sending it by email or text message. It’s so simple a child can do it, but that simple user experience masks a huge amount of complexity, from the compression algorithms in the phones to the huge amount of distributed infrastructure needed to connect them together. As wonderful and enabling as all that infrastructure can be, sometimes it’s just too much for the job.

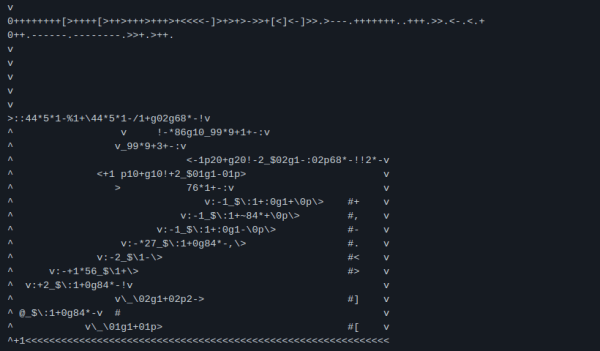
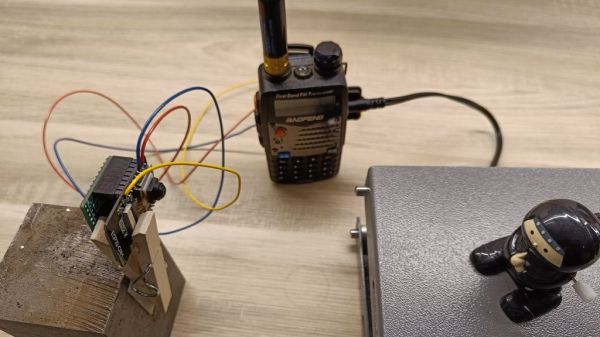
That seems to have been the case for [Dzl TheEvilGenius], who just wanted to send a low-resolution image from a remote location. It turns out that hams solved that problem about 70 years ago with slow-scan television, or SSTV. While most of the world was settling down in front of “I Love Lucy” on the regular tube, amateur radio operators were figuring out how to use their equipment to send pictures around the world. But where hams of yore had to throw a considerable amount of gear at the problem, [Dzl] just used an ESP-32 with a camera and some custom code to process the image. The output from one of the MCU’s GPIO pins is a PWM audio signal which can be fed directly into the microphone input of a cheap portable transceiver.

To decode the signal, [Dzl] used one of the many SSTV programs available. There’s no mention of the receiver, although it could be pretty much anything from another Baofeng to an SDR dongle. The code is available in the article, as is an audio file of an encoded image, if you just want to play around with the receiving and decoding side of the equation.

We could see something like this working for a remote security camera, or even for scouting hunting spots. If you want to replicate this, remember that you’ll need a license if you want to transmit on the ham bands — relax, it’s easy.

A smartphone-sized PCB is in a person's hand. A large blue chip package houses a 486 and the board has a SoundBlaster card and a 40 PIN Raspberry Pi Connector along one edge for attaching a Raspberry Pi Zero.

TinyLlama Is A 486 In Your Pocket

We love retrocomputing and tiny computers here at Hackaday, so it’s always nice to see projects that combine the two. [Eivind]’s TinyLlama lets you play DOS games on a board that fits in your hand.

Using the 486 SOM from the 86Duino, the TinyLlama adds an integrated Crystal Semiconductor audio chip for AdLib and SoundBlaster support. If you populate the 40 PIN Raspberry Pi connector, you can also use a Pi Zero 2 to give the system MIDI capabilities when coupled with a GY-PCM5102 I²S DAC module.

Audio has been one of the trickier things to get running on these small 486s, so its nice to see a simple, integrated solution available. [Eivind] shows the machine running DOOM (in the video below the break) and starts up Monkey Island at the end. There is a breakout board for serial and PS/2 mouse/keyboard, but he says that USB peripherals work well if you don’t want to drag your Model M out of the closet.

Looking for more projects using the 86Duino? Checkout ISA Sound Cards on 86Duino or Using an 86Duino with a Graphics Card.

Continue reading “TinyLlama Is A 486 In Your Pocket”

A working, partially disassembled thermal camera

Cheap Display Fix Brings Thermal Camera Back To Life

When it comes to repairability of electronic devices, much depends on how helpful the original manufacturer is. Some make repairs very easy by publishing detailed service manuals and selling spare parts. Others keep everything under wraps to protect their intellectual property, turning even a supposedly simple fix into a reverse engineering ordeal. When [BuyItFixIt] got his hands on a FLIR multimeter-thermal camera combination instrument with a broken display, he quickly found that FLIR was firmly in the “all our designs are top secret” camp and wouldn’t even tell him what kind of display they had used.

Not to be deterred, [BuyItFixIt] took the meter apart and tried to find out what was going wrong. The signals from the microprocessor seemed to reach the display OK, so the fault was somewhere in the screen itself. The display’s part number didn’t return any useful results online, but AliExpress did have a very similar-looking display available with a slightly different part number. This display seemed to work at first, but the instrument then got caught in a boot loop.

Unlike FLIR, the supplier of the replacement display was happy to supply datasheets, and even had one available for the original FLIR part. With this new information [BuyItFixIt] was able to deduce that the new screen didn’t output one signal that the processor expected to see, causing it to reset itself. A simple workaround was to connect the corresponding pin to a PWM signal from the backlight controller, which fooled the CPU into thinking the proper display was connected.

In this case, a $12 display and a single piece of wire were enough to bring an expensive instrument back to life, but things are not always that simple. More complex machines can take weeks to debug, even if parts are available. If not, you might even need to design your own. Continue reading “Cheap Display Fix Brings Thermal Camera Back To Life”

A Gaggia classic espresso machine with an LCD screen attached to the top, sitting on a table with vase of yellow lily flowers to its left and sunlight coming in from a window from the right.

Homebrew Espresso Maker Modding With Gaggiuino

For those that don’t know, Gaggia is a company that produces a line of affordable “entry-level” espresso coffee makers that offer good quality consumer espresso machines at reasonable prices. The entry level machines don’t offer fine grained control over temperature, pressure and steam which is where the Gaggiuino project comes in.

A schematic of the Gagguino project

The Gaggiuino project is an “after market” modification of many espresso makers, such as the Gaggia classic and Gaggia classic pro. The main additions are a MAX6675 thermocouple module paired with a K-Type thermocouple sensor for closed loop control over the temperature. Options for adding an AC dimmer module that attaches to the pump motor and a 0 Mpa to 1.2 Mpa ranged XDB401 pressure sensor, installed in line between the pump and the boiler, provide further closed loop control over the pressure and flow profiling.

Load cells can be attached to the drip tray to allow for feedback about the pour weight with a Nextion 2.4″ LCD touchscreen provides the user interface for profile selection and other interactivity. The project offers a “base” modification using an Arduino Nano as the microcontroller, in line with its namesake, but has an option for an STM32 Blackpill module that can provide more functionality beyond the scope of the Nano.

The Gaggiuino project is open source with code and extensive documentation available on GitHub. There is also a Discord community for those wanting help with their build or that have the inclination to share their passion for DIY espresso modding with the Gaggiuino. Espresso machine hacks are a favorite of ours and we’ve featured many projects on espresso machine builds and mods ranging from PID control of classic espresso makers to beautifully minimal closed loop homebrew espresso machines.

Continue reading “Homebrew Espresso Maker Modding With Gaggiuino”

See The Forbidden Cigarette Machine In Action

[Fraens] has been designing a number of fantastic 3D printed machines and making great videos that demonstrate how they work. The last installment was an automatic cigarette stuffing machine, and it’s got a number of pretty complex motions, and somehow manages to get the job done.

While [Fraens] usually uploads STL files for all of his machines, this one is forbidden! Selling automatic cigarette loaders is illegal in Europe, and it’s not clear how close to the legal edge posting them up on Thingiverse is. So until the legal dust settles, you’re going to have to be content with the fantastic video, also embedded below.

But honestly, the devil’s sticks aren’t good for your health anyway, and you’re probably just in it for the mechanicals. Think for a moment about the problem – you’ve got a hopper of tobacco fibers that all like to stick together, and you need to pack them into an easily squished lightweight paper tube. These tubes aren’t easy to handle either. The solution to both of these calls for solenoid-powered tappers that agitate both into place.

There’s also a 3D printed rack and pinion to do the pushing, and a cool stepper-driven revolver mechanism to put the empty papers into just the right place. The machine leans heavily on 3D printing, but also on simple hardware-store parts like aluminum and brass tubes. [Fraens]’s builds are always simple but simultaneously very slick, and you’ll learn a lot from watching it all go together.

And when you’re done, check out some others from [Fraens]. We’ve been impressed by his sewing machine, braiding machine, and even a power loom.

Continue reading “See The Forbidden Cigarette Machine In Action”

Colorful Split Keyboard Uses VGA Connections

When it comes to building a split keyboard, you have a lot of options when it comes to the cable. Many will use a standard 3.5 mm TRRS cable, and others might use something more esoteric like RJ-45 to run between the halves. This only works if you’re using two controllers; if you only want one controller, you have to pass the matrix from one side to the other, which typically requires more than the four wires offered by the aforementioned choices. While rummaging around, [Joe Scotto] found a VGA cable and thought, why not use that?

This lovely Barbie-themed peripheral is a split version of an earlier board he built called the ScottoFly, which is a monoblock split with a void in the middle. As with that one, this is hand-wired using thicc brass insulated with heat-shrink, uses a solid 3D-printed plate, and a printed case. And like a madman, [Joe] coiled the cable.

Unfortunately, this proved to be problematic in the wire breakage sense, or so he thought. The real problem turned out to be that the middle row of pins on a VGA connector all act like ground, so they can’t be used to pass rows and columns. However, there were still enough viable pins to send the 4×5 matrix across. Be sure to check out the build video after the break.

Continue reading “Colorful Split Keyboard Uses VGA Connections”

Two Esoteric Programming Languages, One Interpreter

Many of you will have heard of the esoteric programming language Brainf**k_. It’s an example language that’s nearly impossible to use because it’s too simple. It’s basically a Turing computer in code – you can essentially put characters into an array, read them out, increment, decrement, and branch. The rest is up to you. Good luck!

What could be worse? Befunge, a language that parses code not just left-to-right or top-to-bottom, but in any direction depending on the use of ^, v, >, and <. (We love the way that GOTO 10 looks like a garden path in the example.)

Uniting the two, [rsheldiii] brings us BrainFunge, a Brainf**k_ interpreter written in Befunge. And surprisingly, the resulting write-up sheds enough light on both of the esoteric programming languages that they make a little bit of sense. If you try to read along, you’ll definitely be helped out by Esolang Park, which was new to us, and accommodates the non-traditional parsing while displaying the contents of the stack.

If you get a taste of the esoteric, and you find that you’d like a little more, we have a great survey of some of the oddest for you. After cutting your teeth on Befunge, for example, we bet you’ll be ready for Piet.