Walk-Bot Is A Navigation Device For The Vision-Impaired

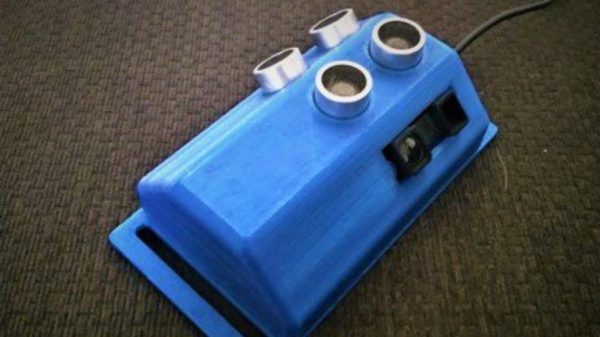
For the vision impaired, there are a wide variety of tools and techniques used to navigate around in the real world. Walk-bot is a device that aims to help with this task, using ultrasound to provide a greater sense of obstacles in one’s surroundings.

Is trigonometry the most useful high school maths out there? There’s an argument that says yes.

Created by [Nilay Roy Choudhury], the device is intended to be worn on the waist, and features two sets of ultrasonic sensors. One set is aimed straight ahead, while the other points upwards at an angle of 45 degrees. An infrared sensor then points downward at an angle of 45 degrees, aimed at the ground.

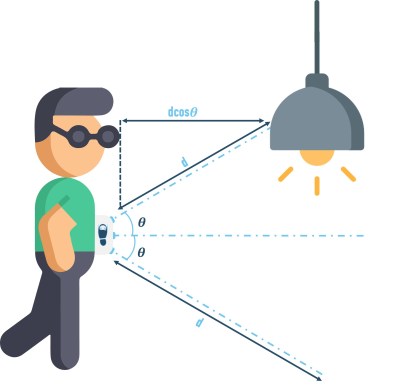
The distance readings from these sensors are then collated by a microcontroller, which uses trigonometry to determine the user’s actual distance to the object. When objects are closer than a given threshold, the device provides feedback to the user via a buzzer and a vibration motor. The combination of three sensors looking out at different angles helps capture a variety of obstacles, whether they be at head, chest, or knee height.

It’s unlikely that a complex electronic device would serve as a direct replacement for solutions like the tried-and-tested cane. However, that’s not to say there isn’t value in such tools, particularly when properly tested and designed to suit user’s needs.

We’ve seen some great projects regarding visual impairment before, like this rig that allows users to fly in a simulator. If you’ve been working on your own accessibility tools, don’t hesitate to drop us a line!

Wizards Slay The Dragon That Lays The Golden Egg

Hail, and well met adventurers! There’s rumors of dark dealings, and mysterious machinations from that group of Western mystics, Wizards of the Coast (WotC). If this pernicious plot is allowed to succeed, a wave of darkness will spread over this land of Open Source gaming, the vile legal fog sticking to and tainting everything it touches. Our quest today is to determine the truth of these words, and determine a defense for the world of open gaming, and indeed perhaps the entire free world! Beware, the following adventure will delve into the bleak magic of licensing, contract law, and litigation.

Ah, Dungeons and Dragons. The original creation of Gary Gygax, refined by countless others, this table-top role-playing game has brought entertainment and much more to millions of players for years. In 2000, WotC made a decision that opened the mechanics of that universe to everyone. The 3rd Edition of Dungeons and Dragons was released under the Open Gaming License, a very intentional port of Open Source licensing to table-top gaming — obviously inspired by the GNU Public License. Ryan Dancey was one of the drivers behind the new approach, and made this statement about it:

I think there’s a very, very strong business case that can be made for the idea of embracing the ideas at the heart of the Open Source movement and finding a place for them in gaming. […] One of my fundamental arguments is that by pursuing the Open Gaming concept, Wizards can establish a clear policy on what it will, and will not allow people to do with its copyrighted materials. Just that alone should spur a huge surge in independent content creation that will feed into the D&D network.

Continue reading “Wizards Slay The Dragon That Lays The Golden Egg”

Variable Width 3D Printing The Hard Way

The problem: you want to produce varying line thicknesses when 3D printing. The solution, if you are the Liqtra company, appears to be to put seven print heads together and enable one for thin lines, all of them for thick lines, and something in between for everything else. The technical details are scant, but from the video below and some pictures, you can get a general idea.

There are some obvious benefits and drawbacks. You’d expect that for the right kind of part, this would be fast since you are essentially laying down seven tracks at once. The downside is your track width varies in pretty course steps, assuming you have to use the maximum width of each nozzle to prevent gaps. New slicing software is a must, too.

The demos and pictures show multiple filament colors because it photographs well, but you’d assume in practice that you would use seven spools of the same material. The good thing is that you could print with a single nozzle where that’s important. We assume all the nozzles are the same size, and that will control the practical layer height, but that’s a small price to pay.

The company claims a much faster print, but as we mentioned, this will depend on the specific printed part. They also claim inter-layer strength increases as well, although we found that surprising. This is probably overkill for home users, but we imagine this would be an interesting technology for people trying to run production quantities through a printer.

We don’t remember seeing this approach with a homebrew printer, although having multiple extruders into one or multiple nozzles isn’t unusual anymore. It seems like you could experiment with this kind of technology pretty readily. Of course, there’s more than one way to speed up production.

Continue reading “Variable Width 3D Printing The Hard Way”

An All-Billet, Single-Piece, Flexure-Based Nutcracker

Typical nutcrackers rely on simple pin hinges to join two handles for the cracking task. However, [adam the machinist] has demonstrated that a single-piece nutcracker is possible by using the flexural properties of the right grade of steel.

The nutcracker is manufactured out of 17-4 PH stainless steel, heat treated to the H900 condition. A flexural spring section at the top of the nutcracker takes the place of the usual hinge, allowing the handles to be squeezed together and the teeth of the cracker to open the nut. Machining the flexural section is first achieved with a series of CNC drill operations on the billet stock, before regular milling is used to shape the rest of the spring section and tool. The video dives deep into the finer points of the CNC operations that produce such a great finish on the final part. It even covers the use of a tiny scissor jack to help hold the handles still during machining.

The result is a highly attractive and desirable nutcracker that looks far more special than the regular fare you might pick up at Walgreens. The all-billet tool is a nutcracker very much fit for a sci-fi set. We’ve seen some other kitchen tools around here before, too, albeit of more questionable utility.

Continue reading “An All-Billet, Single-Piece, Flexure-Based Nutcracker”

CUTTING CABLES CURES TANGLED CORD CHAOS

The Toniebox is a toy that plays stories and songs for kids to listen to. Audio content can be changed by placing different NFC enabled characters that magnetically attach to the top of the toy. It can play audio via its built-in speaker or through a wired headphone connected to the 3.5 mm stereo jack. Using the built in speaker could sometimes be quite an irritant, especially if the parents are in “work from home” mode. And wired headphones are not a robust alternative, specially if the kid likes to wander around or dance while listening to the toy. We guess the manufacturers didn’t get the memo that toddlers and cables don’t mix well together. Surprisingly, the toy does not support Bluetooth output, so [g3gg0] hacked his kids Toniebox to add Bluetooth audio output.

[g3gg0] first played with the idea of transmitting audio via an ESP32 connected to the I²S interface, running a readily available A2DP library. While elegant, it is a slightly complex and time consuming solution. Using the ESP32 would also have affected the battery life, given the ESP32’s power hungry nature. Continue reading “CUTTING CABLES CURES TANGLED CORD CHAOS”

A robotic machine turning the wheel of a safe

Adventures In Robotic Safe Cracking

When [Zach Hipps] was faced with a locked safe and no combination, it seemed like calling a locksmith was the only non-destructive option. Well, that or doing something crazy like building a safe-opening robot. Since you’re reading this on Hackaday, we bet you can guess which path he took.

So far, [Zach] has managed to assemble the custom chuck and spindle for the safe cracker. This construction is then mated with an appropriately precise Trinamic controller for the motor, which is perfect for this heist project. After some early consternation around the motor’s stall detection capabilities, the project was able to move forward with extra microcontroller code to ensure that the motor disengages when sensing a ‘hard stop’ during cracking.

Precision is absolutely essential in a project like this. When dealing with a million potential combinations, any potential misconfiguration of the robot could cause it to lose its place and become out-of-sync with the software. This was encountered during testing — while the half-assembled robot was (spoilers) able to open a safe with a known combination, it was only able to do so at slow speed. For a safe with an unknown combination, this slow pace would be impractical.

While the robot isn’t quite ready yet, the Part 1 video below is a great introduction to this particular caper. While we wait for the final results, make sure to check out our previous coverage of another auto dialing robot cracking the code in less than a minute.

Continue reading “Adventures In Robotic Safe Cracking”

A small 16x2 LCD display housed in a green and yellow hobby box.

Arduino-Powered Info Display For Your Windows Computer

If you’ve been pining for a retro-chic 16×2 LCD display to enhance your Windows computing experience, then [mircemk] has got you covered with their neat Windows-based LCD Info Panel.

Your everyday garden variety Arduino is the hero here, sitting between the computer’s USB port and the display to make the magic happen. Using the ‘LCD Smartie‘ software, the display can serve up some of your typical PC stats such as CPU and network utilization, storage capacity etc. It can also display information from BBC World News, email clients, various computer games and a world of other sources using plugins.

It’s clear that the intention here was to include the display inside your typical PC drive bay, but as you can see in the video below, this display can just about fit anywhere. It’s not uncommon to see similar displays on expensive ‘gamer’ peripherals, so this might be an inexpensive way for someone to bring that same LED-lit charm to their next PC build. You probably have these parts sitting in your desk drawer right now.

If you want to get started building your own, there’s more info over on the Hackaday.io page. And if PC notifications aren’t your jam, it’s worth remembering that these 16×2 displays are good for just about anything, like playing Space Invaders.

Continue reading “Arduino-Powered Info Display For Your Windows Computer”