Hypersonic Speech Jammer Works At A Distance

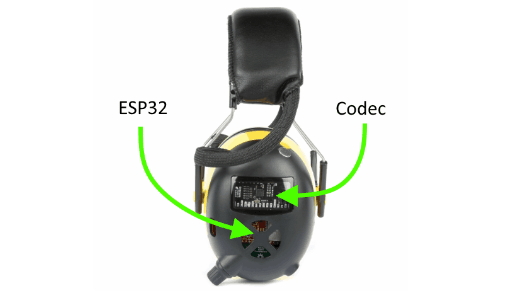
Speech jammers were a meme a little while back. By feeding back delayed voice audio to a person’s ears, it makes it near-impossible for most people to speak, as our speech system runs on a continual feedback loop. [Benn Jordan] decided to try reworking that concept by replacing headphones with a directed sound projector.

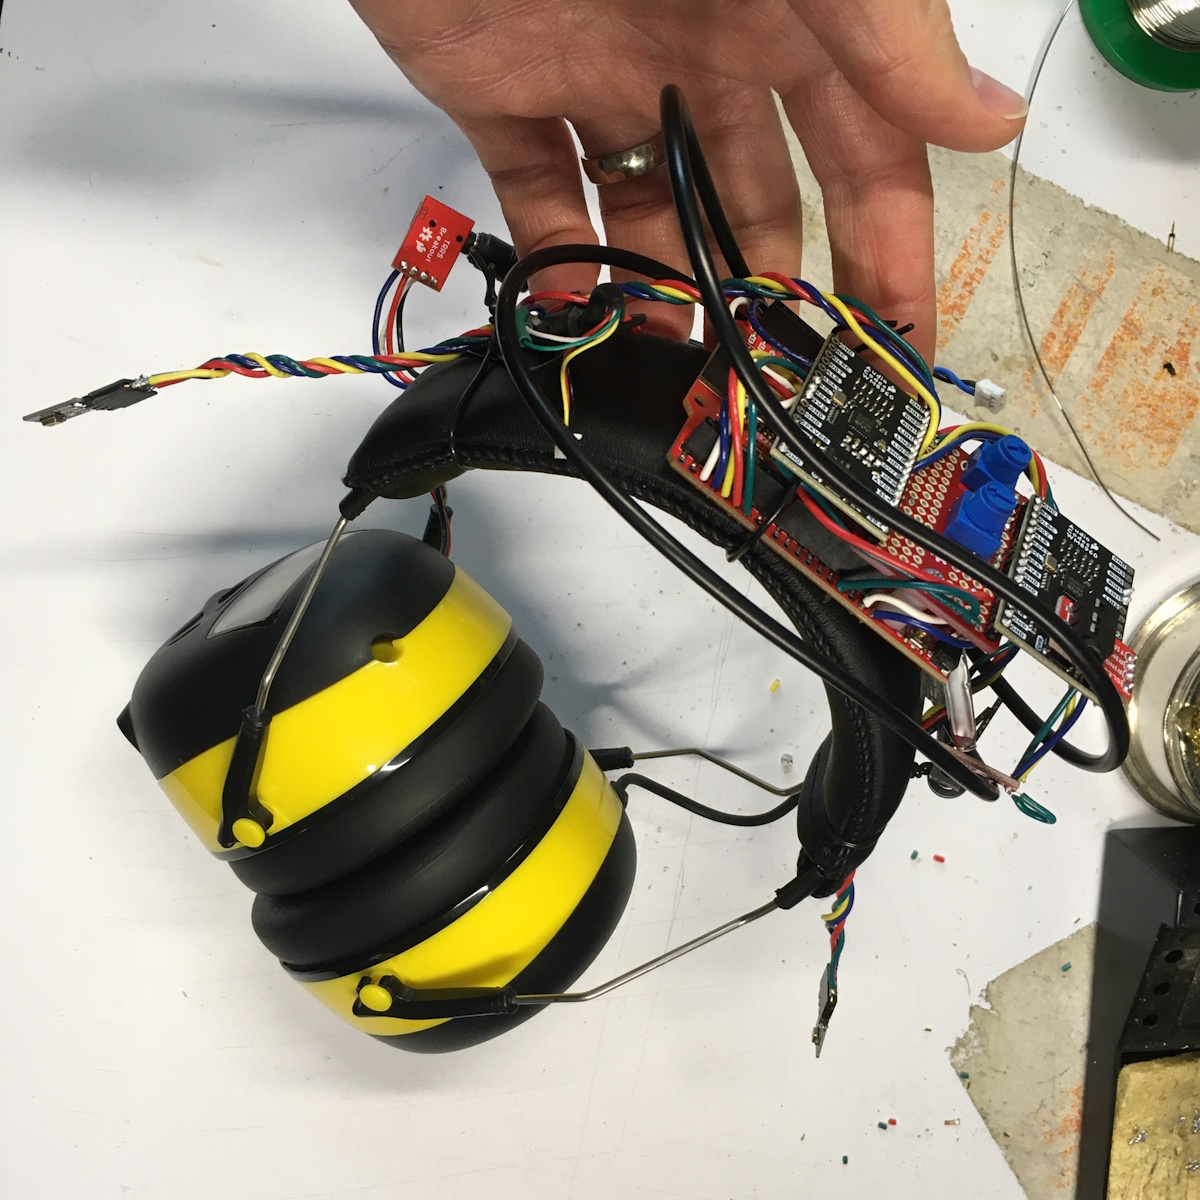
The key to the project is the use of hypersonic sound arrays. These essentially use high-frequency sound beyond the human range of hearing to carry a lower-frequency sound signal. By essentially modulating this higher-frequency carrier to create the perception of lower-frequency sound, it’s possible to create an audible signal that is highly directional. It’s like a “sound laser” that can be pointed directly at a person to allow them to hear it, which is then inaudible when pointed slightly away.

These allow the delayed voice signal to be fired at a person’s head with a relatively narrow spatial spread. When an individual speaks into a microphone hooked up to the device, delayed audio is sent through the hypersonic array back to the speaker’s ears, garbling their speech as their brain gets confused by the feedback.

[Benn] demonstrated the device in public by offering random individuals $100 to read a paragraph out of a book. The speech jammer worked a treat, and [Benn] was able to keep his money… until one amazingly immune individual breezed through the test. Check out our prior coverage of speech jamming technology. Video after the break.

Continue reading “Hypersonic Speech Jammer Works At A Distance”

Dr. Niels Olson uses the Augmented Reality Microscope. (Credit: US Department of Defense)

Google’s Augmented Reality Microscope Might Help Diagnose Cancer

Despite recent advances in diagnosing cancer, many cases are still diagnosed using biopsies and analyzing thin slices of tissue underneath a microscope. Properly analyzing these tissue sample slides requires highly experienced and skilled pathologists, and remains subject to some level of bias. In 2018 Google announced a convolutional neural network (CNN) based system which they call the Augmented Reality Microscope (ARM), which would use deep learning and augmented reality (AR) to assist a pathologist with the diagnosis of a tissue sample. A 2022 study in the Journal of Pathology Informatics by David Jin and colleagues (CNBC article) details how well this system performs in ongoing tests.

For this particular study, the LYmph Node Assistant (LYNA) model was investigated, which as the name suggests targets detecting cancer metastases within lymph node biopsies. The basic ARM setup is described on the Google Health GitHub page, which contains all of the required software, except for the models which are available on request. The ARM system is fitted around an existing medical-grade microscope, with a camera feeding the CNN model with the input data, and any relevant outputs from the model are overlaid on the image that the pathologist is observing (the AR part).

Although the study authors noted that they saw potential in the technology, as with most CNN-based systems a lot depends on how well the training data set was annotated. When a grouping of tissue including cancerous growth was marked too broadly, this could cause the model to draw an improper conclusion. This makes a lot of sense when one considers that this system essentially plays ‘cat or bread’, except with cancer.

These gotchas with recognizing legitimate cancer cases are why the study authors see it mostly as a useful tool for a pathologist. One of the authors, Dr. Niels Olsen, notes that back when he was stationed at the naval base in Guam, he would have liked to have a system like ARM to provide him as one of the two pathologists on the island with an easy source of a second opinion.

(Heading image: Dr. Niels Olson uses the Augmented Reality Microscope. (Credit: US Department of Defense) )

Hackaday Links Column Banner

Hackaday Links: October 1, 2023

We’ve devoted a fair amount of virtual ink here to casting shade at self-driving vehicles, especially lately with all the robo-taxi fiascos that seem to keep cropping up in cities serving as testbeds. It’s hard not to, especially when an entire fleet of taxis seems to spontaneously congregate at a single point, or all it takes to create gridlock is a couple of traffic cones. We know that these are essentially beta tests whose whole point is to find and fix points of failure before widespread deployment, and that any failure is likely to be very public and very costly. But there’s someone else in the self-driving vehicle business with way, WAY more to lose if something goes wrong but still seems to be nailing it every day. Of course, we’re talking about NASA and the Perseverance rover, which just completed a record drive across Jezero crater on autopilot. The 759-meter jaunt was completely planned by the onboard AutoNav system, which used the rover’s cameras and sensors to pick its way through a boulder-strewn field. Of course, the trip took six sols to complete, which probably would result in negative reviews for a robo-taxi on Earth, and then there’s the whole thing about NASA having a much bigger pot of money to draw from than any start-up could ever dream of. Still, it’d be nice to see some of the tech on Perseverance filtering down to Earth.

Continue reading “Hackaday Links: October 1, 2023”

RP2040 picture on left by Phiarc, CC BY-SA 4.0, via Wikimedia

Kaluma Puts JavaScript On The RP2040

With a simple firmware update, Kaluma puts a lightweight JavaScript runtime on the Raspberry Pi Pico (which uses the RP2040 microcontroller), providing handy modules for file systems, graphics, networking, and more. Code for a simple LED blink can then look like:

// index.js
const led = 25;
pinMode(led, OUTPUT);
setInterval(() => {
digitalToggle(led);
}, 1000);

Development can then be done using tools that are very familiar to JavaScript developers, such as npm and flashing new code to a USB-connected Pico with the (Node.js-based) Kaluma command-line interface. Take a look at the GitHub repository for the project, or browse some of the projects made with Kaluma.

Much like with MicroPython, there’s value to be had in putting implementations of high-level languages on microcontrollers. Each new language opens embedded programming to a whole new group of coders. But it’s not just languages making their way to the RP2040. Wonderful projects such as emulating the ZX Spectrum on an RP2040 also happen.

Thanks to [Shri Hari Ram] for the tip!

These DIY Super Headphones Take Sound Seriously

[Pete Lewis] from SparkFun takes audio and comfort seriously, and recently shared details on making a customized set of Super Headphones, granting quality sound and stereo ambient passthrough, while providing hearing protection at the same time by isolating the wearer from the environment.

Such products can be purchased off the shelf (usually called some variant of “electronic hearing protection”), but every hacker knows nothing beats some DIY to get exactly the features one wants. After all, off-the-shelf solutions are focused on hearing protection, not sound quality. [Pete] also wanted features like the ability to freely adjust how much ambient sound was mixed in, as well as the ability to integrate a line-level audio source or Bluetooth input.

Early prototype of Super Headphones (click to enlarge)

On the surface the required components are straightforward, but as usual, the devil is in the details. Microphone selection, for example, required a lot of testing. A good microphone needed to be able to deal with extremely loud ambient sounds without distortion, yet still be sensitive enough to be useful. [Pete] found a good solution, but also muses that two sets of microphones (one for loud environments, and one for quieter) might be worth a try.

After several prototypes, the result is headphones that allow safe and loud band practice in a basement as easily as they provide high-quality music and situational awareness while mowing the lawn. Even so, [Pete]’s not done yet. He’s working on improving comfort by using photogrammetry to help design and 3D print custom-fitted components.

A hot tub with a smartphone in front showing real-time sensor data

ESP32 Keeps Track Of Hot Tub’s Vital Signs

Like swimming pools, hot tubs need regular monitoring to ensure their water stays clean and clear. An average person might take a water quality reading once or twice a week using test strips, but such a low sampling rate obviously won’t do for a hacker. [Stephen Carey] has therefore built a hot tub monitor that checks the water quality every minute and reports it on a neat mobile dashboard.

[Stephen]’s system uses commercially available sensors that track pH levels and Oxidation-Reduction Potential (ORP), both basic measurements that indicate water quality. A second set of sensors keeps track of the temperature of the water and the outside air, which should help in finding insulation failures and keeping energy use under control.

A set of graphs showing a hot tub's pH and ORP over time, with a significant spike in both near the beginningAn ESP32 reads the sensors and sends out the data through WiFi. [Stephen] programmed the ESP32 in MicroPython, using an MQTT driver to connect it to Home Assistant. By looking at the graphs generated, you can tell when someone entered the tub from a step change in pH and ORP. It’s even possible to generate alerts when any of the values drift outside their acceptable range – we can already imagine an alarm going off when someone enters without having showered first.

The system also has a calibration mode to check the sensors against a well-defined buffer solution. As with many chemical sensors, the pH and ORP probes gradually lose their active material and need to be replaced after about a year. Good ones aren’t cheap, but [Stephen] has found pretty decent low-cost alternatives on AliExpress that should be fine for a home setup.

If you also want your tub or pool to be actively managed, you’ll need a more complex system, perhaps even one that can also dispense chemicals. If your hot tub is heated by a wood fire, however, all you need is a way to alert the person tending the fire.

Overclocking Raspberry Pi 5’s SoC To 3 GHz And 1 GHz GPU

Overclocking computer systems is a fun way to extract some free performance, or at least see how far you can push the hardware before you run into practical limitations. The newly released Raspberry Pi 5 with BCM2712 SoC is no exception here, with Tom’s Hardware having a go at seeing how far both the CPU and GPU in the SoC can be pushed. The BCM2712’s quad Cortex-A76 CPU is normally clocked at 2.4 GHz and the VideoCore VII GPU at 800 MHz. By modifying some settings in the /boot/config.txt configuration file these values can be adjusted.

In order to verify that an overclock was stable, the Stressberry application was used, which fully loads the CPU cores. Here something like a combination of stress-ng and glxgears could also be used, to stress both the CPU and GPU. With the official actively cooled heatsink the CPU reached a temperature of 74°C with a whole board power usage of about 10 Watts. At idle this dropped to 3 Watts at 46°C. At these speeds, the multiple Raspberry Pi 5 units OCed by Tom’s Hardware were mostly stable, though one of the team’s boards experienced a few crashes. This suggests that this level of OCing could still be subject to luck of the draw, and long-term stability would have to be investigated as well.

As for the practical use cases of OCing your Raspberry Pi 5, benchmarks showed a marked uplift in compression and Sysbench benchmark scores, but OCing the GPU had no real positive impact on YouTube or 3D performance, leading even to a massive increase in dropped frames with video playback. This probably means that increasing the CPU clock may be beneficial, but OCing the GPU could be futile without also OCing the RAM frequency, if at all possible.

Realistically, the Raspberry Pi SoCs never were speed monsters, with even the Raspberry Pi 4B’s SoC being beaten handily in 2020 by a budget dual-core Intel CPU.  The current Intel Alder-Lake-N-based N100 SoC has a 6 Watt TDP and boosts up to 3.4 GHz while its Xe-LP-based iGPU (with AV1 decoding support) makes for a decent gaming experience within a ~16 Watt power envelope. Clearly, any OCing of the Raspberry Pi boards is more for the challenge of it, but then so is running the latest Intel CPU at 10 GHz with liquid nitrogen cooling.