Thermochromic Treatment Keeps Solderless Breadboards Smokeless

There’s a point in a component’s thermal regime that’s between normal operation and overloaded to the point of obvious failure. That’s a dangerous region, because the component isn’t quite hot enough to release the Magic Smoke, but hot enough to singe any finger you poke around with the see if everything’s running right. So if you’re looking to keep your fingerprints unmodified, but you don’t want to invest in a thermal camera, you might want to let this thermochromic breadboard point the way to overloaded components.

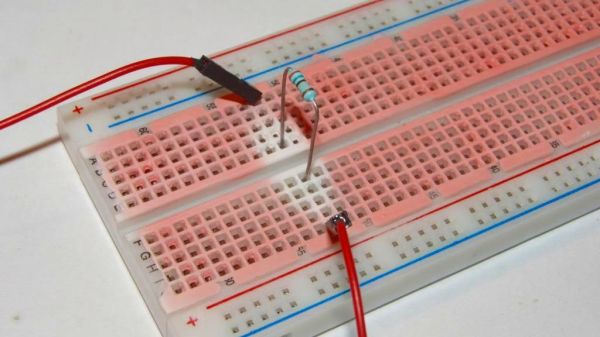
We’re not sure where this tip came from, but judging by the look of the website it was sometime in the late 90s. We’re also not sure who’s behind this little hack, so we’ll just credit [improwis]. The idea is pretty simple — white acrylic paint is mixed with thermochromic pigment, and the mixture is carefully painted onto the plastic surface of a standard-issue solderless breadboard. Care is taken to apply thin coats, lest the paint gets into the contacts and really muck things up. Once the paint is dry you’re ready to build your circuit. We have to admit we’re surprised at how sensitive the paint is; judging by the pictures, the heat coming off a 1/4-watt resistor dissipating 350 mW is plenty, even when the body of the resistor is well above the surface of the breadboard. We’d imagine the paint would point out not only hot components but probably the breadboard contacts too, if things got really toasty.

This seems like such a great application of thermochromism, one that’s a bit more useful than clocks and Pi Day celebrations. If you’re going to try this yourself, you’ll have to track down your own supply of thermochromic pigment, though — the link in the article is long dead. That’s not a problem, though, as Amazon sells scads of the stuff, seemingly aimed mainly at nail salons. The more you know.

Roll Your Own Simple Tube Tester

You can easily get carried away when trying to test things. For example, if you want to know if your car is working, you could measure the timing of the ignition and put the car on a dynamometer. Or you could just start it and figure that if it runs and moves when you put it in drive, it is probably fine.

When [Thomas Scherrer] wanted to test some tubes, he made the same kind of assumption. While tubes can develop wacky failure modes, the normal difference between a working tube and a failing tube is usually not very subtle. He made a simple test rig to test tubes at DC and one operating point. Not comprehensive, but good enough most of the time. Have a look at what he did in the video below.

The tester is just a few resistors, a tube socket, and some bench power supplies. Of course, you may have to adapt it to whatever tube you are testing. If we had a lot of tubes to do, we might make the rig a bit more permanent, but for an afternoon of testing, what he has would be fine.

In addition to the power supplies, you’ll need at least one, preferably two, volt meters. He was able to validate his results with a proper tube tester. The results matched up well. While this won’t solve all your tube testing problems, it will give you a quick start.

You can build your own modern tube tester, of course. Or pick up a vintage one. Our favorite one uses punched cards.

Continue reading “Roll Your Own Simple Tube Tester”

Watch Those 1% Resistors

Decades ago, electronic components were not as easy to acquire as they are today. Sure, you could get some things at Radio Shack. But you might not have many choices, and the price would be on the high side. TV repair components were another option, but, again, big bucks. Some places sold surplus parts, which could be cheap. These often came from manufacturing runs where a company bought 10,000 components and made 8,000 products. But today, you can order parts inexpensively and get them on your doorstep in a day or, sometimes, even less. Are these inexpensive parts really any good? [Denki Otaku] likes to find out. In a recent video, he checks out some Amazon-supplied 1% resistors to find out how good they are. You can watch his results below.

Continue reading “Watch Those 1% Resistors”

A Controller For More Than Thumbs

As virtual reality continues to make headway into the modern zeitgeist, it is still lacking in a few key ways. There’s not yet an accepted standard for correlating body motion to movement within a game, with most of the mainstream VR offerings sidestepping this problem by requiring the user to operate some sort of handheld controller to navigate the virtual world. And besides a brief Kinect fad from the 2010s, there hasn’t been too much innovation in this area. But computers have continued to increase in capabilities and algorithms for tracking movement have improved, so [Fletcher Heisler] aka [Everything Is Hacked] leveraged these modern tools into a full-body controller configurable for any video game.

This project builds heavily on a previous project by [Fletcher] which took body position information and turned it into keyboard input, leveraging OpenCV and posture detection software to map keys to specific body positions. It only needed slight modification to work for gaming with regards to the ability to hold down keys or mash buttons, but essentially works by mapping certain keystrokes from the previous project to commands in games. In addition to that step he also added support for multiplayer by splitting the image captured by the camera into two halves so it can keep track of two people simultaneously.

Continue reading “A Controller For More Than Thumbs”

Russian Weather Satellite Reuses Name, Yields Images

Which Russian weather satellite has the name Meteor 2? According to [saveitforparts], pretty much all of them. He showed how to grab images from an earlier satellite with the same name a while back. That satellite, though, met with some kind of disaster, so he’s posted a new video about reading data from the new Meteor 2 and you can watch it below.

The interesting part, we thought, was that the software he’s using, Raspberry-NOAA v2, doesn’t know about this incarnation of the bird which has only been up for a few weeks. That means he had to find a satellite with similar orbital parameters. Eventually, the program will have the setup for this satellite.

Continue reading “Russian Weather Satellite Reuses Name, Yields Images”

A Shutter Speed Tester With Frickin’ Lasers!

Buying old cameras is one of the best ways yet found to part a geek from their money, but if you don’t mind finding a few duds along the way it’s still possible to pick up something nice without paying the excessive scene tax of an Etsy seller or an online store. The trouble is, in the many decades during which your purchase went from being pride and joy to forgotten in a drawer to lying on the shelf of a thrift store, its performance may have degraded a little. Does the shutter still operate as it should? How long is a split second anyway? You need a shutter speed tester, and luckily for us, [Stuart Brown] has one.

There are no sharks involved in this build, but it does rely on laser diodes as a light source. There are three of them as well as three sensors, packaged photodiodes with a Schmidt trigger. These feed an Arduino which is hooked up to a TFT display, and the software measures how long each diode receives the light. We’re told it can also measure the raise time on curtain shutters, another important metric.

There’s little in the way of usage examples, but we’re guessing it requires positioning the camera between lasers and photodiodes. We’re curious as to how such an instrument would perform on a camera with a fixed lens, or whether it’s only suitable for those with access to the shutter itself. If this subject interests you, it’s not the first shutter speed tester we’ve shown you.

Header image: Runner1616, CC BY-SA 4.0.