Cheap FPGA PCIe Development

Typically, if you want to build an FPGA project inside a PC, you’d need a fairly expensive development board that plugs into the bus. However, [CircuitValley] found some IBM RS-485 boards that are little more than a PCIe board with an Intel FPGA onboard. These are widely avaiable on the surplus market for around $20 shipped. He’s been documenting how to use them.

The FPGA onboard is a Cyclone IV with about 21,000 logic elements and a little over 750 kbits of memory. The board itself has configuration memory, power management, and a few connectors. The JTAG header is unpopulated, but the footprint is there. You simply need to supply a surface-mount pin header and an external JTAG probe, and you can program. Even if you aren’t interested in using an FPGA board, the reverse engineer steps are fun to watch.

The situation reminds us a little of the RTL-SDR — when a device uses a programmable device to perform nearly all of its functions, it is subject to your reprogramming. What would you do with a custom PCIe card? You tell us. Need a refresher on the bus? We can help. Thinking of building some sort of FPGA accelerator? Maybe try RIFFA.

Continue reading “Cheap FPGA PCIe Development”

A Look Inside IKEA’s Vallhorn Motion Sensor Teardown

A good source of hackable home automation parts has come for a while in the form of inexpensive modules offered by large retailers such as Lidl, or IKEA. They’re readily available and easy to play with, they work with open source hubs, so what’s not to like! As an example, [Circuit Valley] has an IKEA Vallhorn motion sensor for a teardown, it’s as you might expect, a passive infrared sensor (PIR) sensor coupled with a Zigbee interface.

Inside the ultrasonic welded case is a small PCB and a Fresnel lens on the inside of the top cover, and a small PCB for the electronics. We applaud the use of a Swiss Army knife can opener as a spudger. The interesting part comes in identifying the individual components: the Silicon Labs EFR32MG21 SoC is easy enough, but another mystery 8-pin chip is more elusive. The part number suggests an Analog Devices op-amp for signal conditioning the PIR output, but the pinout seems not to support it and from here we think it’s too expensive a part for a budget item like this.

There’s a handy header for talking to the SoC, which we’d love to report is open and ready to be hacked, but we’re not getting too optimistic. Even if not hackable though, we’re guessing many of you find uses for these things. Continue reading “A Look Inside IKEA’s Vallhorn Motion Sensor Teardown”

Microchess Remembered

Playing chess has always been a bellwether for computers. The game isn’t trivial, but the rules are managably simple. However, the game is too complex to be easily solved entirely, so you have to use tricky software to play a credible game. Big computers do have an advantage, of course. But Microchess — arguably the first commercial game for home computers — was able to play on tiny machines like the Kim-1. [Joachim Froholt] interviewed [Peter Jennings] — the man behind Microchess to learn the whole story of its creation.

In 1960, [Jennings] was ten years old and had to persuade the local librarian to let him read adult books on electronics and computers. Five years later, a ham radio teletype and some circuitry helped him practice chess openings and was the first of many chess-playing machines he’d build or program.

Microchess itself took six months of painstaking programming, entering hex codes into the computer. Word leaked out from a user’s group meeting (where Microchess beat a human player), and [Jennings] was swamped with requests for the program. In late 1976, the program was offered for sale as a teletype listing or, for an extra $3, a cassette tape.

The program went on to be very successful and moved to other platforms. Commodore even made a special dedicated device based on the Kim-1 to play Microchess, a piece of hardware unique enough that [Michael Gardi] honored it with one of his phenomenal replicas.

The £25,000 Tom Evans Pre-Amp Repair And A Copyright Strike

We were recently notified by a reader that [Tom Evans] had filed a copyright claim against [Mark]’s repair video on his Mend it Mark YouTube channel, taking down said repair video as well as [Mark]’s delightful commentary. In a new video, [Mark] comments on this takedown and the implications. The biggest question is what exactly was copyrighted in the original video, which was tough because YouTube refused to pass on [Mark]’s questions or provide further details.

In this new video the entire repair is summarized once again using props instead of the actual pre-amp, which you can still catch a glimpse of in our earlier coverage of the repair. To summarize, there was one bad tantalum capacitor that caused issues for one channel, and the insides of this twenty-five thousand quid pre-amp looks like an artistic interpretation of a Jenga tower using PCBs. We hope that this new video does stay safe from further copyright strikes from an oddly vengeful manufacturer after said manufacturer event sent the defective unit to [Mark] for a repair challenge.

Since this purportedly ‘audiophile-level’ pre-amplifier uses no special circuits or filtering – just carefully matched opamps – this is one of those copyright strike cases that leave you scratching your head.

Continue reading “The £25,000 Tom Evans Pre-Amp Repair And A Copyright Strike”

Liquid Metal Ion Thrusters Aren’t Easy

What do scanning electron microscopes and satellites have in common? On the face of things, not much, but after seeing [Zachary Tong]’s latest video on liquid metal ion thrusters, we see that they seem to have a lot more in common than we’d initially thought.

As you’d expect with such a project, there were a lot of false starts and dead ends. [Zach] started with a porous-emitter array design, which uses a sintered glass plate with an array of tiny cones machined into it. The cones are coated in a liquid metal — [Zach] used Galinstan, an alloy of gallium, indium, and tin — and an high voltage is applied between the liquid metal and an extraction electrode. Ideally, the intense electric field causes the metal to ionize at the ultra-sharp tips of the cones and fling off toward the extraction electrode and into the vacuum beyond, generating thrust.

Getting that working was very difficult, enough so that [Zach] gave up and switched to a slot thruster design. This was easier to machine, but alas, no easier to make work. The main problem was taming the high-voltage end of things, which seemed to find more ways to produce unwanted arcs than the desired thrust. This prompted a switch to a capillary emitter design, which uses a fine glass capillary tube to contain the liquid metal. This showed far more promise and allowed [Zach] to infer a thrust by measuring the tiny current created by the ejected ions. At 11.8 μN, it’s not much, but it’s something, and that’s the thing with ion thrusters — over time, they’re very efficient.

To be sure, [Zach]’s efforts here didn’t result in a practical ion thruster, but that wasn’t the point. We suspect the idea here was to explore the real-world applications for his interests in topics like electron beam lithography and microfabrication, and in that, we think he did a bang-up job with this project.

Continue reading “Liquid Metal Ion Thrusters Aren’t Easy”

Tis The Season

’Tis the season for soldering! At least at my house. My son and I made some fairly LED-laden gifts for the immediate relatives last year, and he’s got the blinky bug. We were brainstorming what we could make this year, and his response was “I don’t care, but it needs to have lots of LEDs”.

It’s also the season for reverse engineering, apparently, because we’re using a string of WS2812-alike “fairy lights”. These are actually really neat, they look good and are relatively cheap. It’s a string of RGB LEDs with drivers, each dipped in epoxy, and run on a common three-enameled-wire bus. Unlike WS2812s, which pass the data on to the next unit in the line and then display them with a latching pulse at the end of a sequence, these LED drivers seem to count how many RGB packets have been sent down the wire, and only respond to their own number.

This means that if you cut up a string of 200 LEDs, it behaves like a string of 200 WS2812s. But if you cut say 10 LEDs off the string, where you cut them matters. If you cut it off the front of the string, you only have to send 10 color packets. If you cut them off the other end, you need to send 290 dummy packets before they even start listening. Bizarre, but ’tis the season for bizarre hacks.

And finally, ’tis the season for first steps into “software architecture”. Which is to say that my son is appreciating functions for the first time in his life. Controlling one LED is easy, but making a light show is about two more abstraction layers on top of that. We’ve been having fun making them dim, twinkle, and chase so far. We only have two more weekends, though, and we don’t have a final light show figured out yet, but after all, ’tis the season for last minute present hacking.

Printing In Multi-material? Use These Filament Combos

If one has a multi-material printer there are more options than simply printing in different colors of the same filament. [Thomas Sanladerer] explores combinations of different filaments in a fantastic article that covers not just which materials make good removable support interfaces, but also which ones stick to each other well enough together to make a multi-material print feasible. He tested an array of PLA, PETG, ASA, ABS, and Flex filaments with each in both top (printed object) and bottom (support) roles.

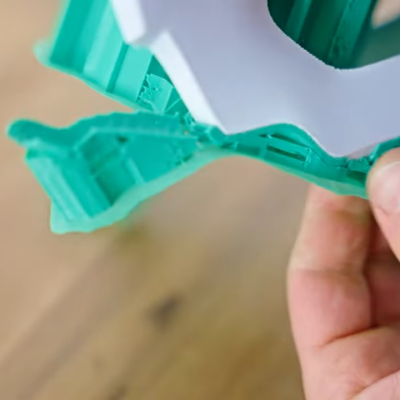
A zero-clearance support where the object prints directly on the support structure can result in a very clean bottom surface. But only if the support can be removed easily.

People had already discovered that PETG and PLA make pretty good support for each other. [Thomas] expands on this to demonstrate that PLA doesn’t really stick very well to anything but itself, and PETG by contrast sticks really well to just about anything other than PLA.

One mild surprise was that flexible filament conforms very well to PLA, but doesn’t truly stick to it. Flex can be peeled away from PLA without too much trouble, leaving a very nice finish. That means using flex filament as a zero-clearance support interface — that is to say, the layer between the support structure and the PLA print — seems like it has potential.

Flex and PETG by contrast pretty much permanently weld themselves together, which means that making something like a box out of PETG with a little living hinge section out of flex would be doable without adhesives or fasteners. Ditto for giving a PETG object a grippy base. [Thomas] notes that flexible filaments all have different formulations, but broadly speaking they behave similarly enough in terms of what they stick to.

[Thomas] leaves us with some tips that are worth keeping in mind when it comes to supported models. One is that supports can leave tiny bits of material on the model, so try to use same or similar colors for both support and model so there’s no visual blemish. Another tip is that PLA softens slightly in hot water, so if PLA supports are clinging stubbornly to a model printed in a higher-temperature material like PETG or ABS/ASA, use some hot water to make the job a little easier. The PLA will soften first, giving you an edge. Give the video below a watch to see for yourself how the combinations act.

Continue reading “Printing In Multi-material? Use These Filament Combos”