The ZX Spectrum Logic Analyzer

We know [Happy Little Diodes] frequently works with logic analyzer projects. His recent wireless logic analyzer for the ZX Spectrum is one of the oddest ones we’ve seen in a while. The heart of the system is an RP2040, and there are two boards. One board interfaces with the computer, and another hosts the controller.

The logic analyzer core is powered by a common open-source analyzer from [Eldrgusman]. This is one of the nice things about open source tools. Most people probably don’t need a logic analyzer that plugs directly into a ZX Spectrum. But if you do, it is fairly simple to repurpose a more generic piece of code and rework the hardware, if necessary.

Continue reading “The ZX Spectrum Logic Analyzer”

A Single-Pixel Camera Without Moving Parts Using Compressed Sensing

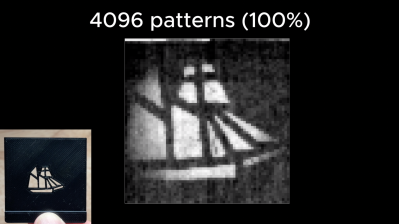
One of the reconstructed images, using all 4,096 matrix patterns as input, next to the original object. (Credit: okooptics, Jon Bumstead)

There’s a strange allure to single-pixel cameras due to the simultaneous simplicity and yet fascinating features that they can offer, such as no set resolution limit. That said, the typical implementations that use some kind of scanning (MEMS) mirror or similar approach suffer from various issues even when you’re photographing a perfectly stationary and static scene due to their complex mechanical nature. Yet there’s a way around this, involving a LED matrix and a single photoresistor, as covered by [Jon Bumstead] in an article with accompanying video.

As he points out, this isn’t a new concept, with research papers cited that go back many years. At the core lies the signal processing technique called compressed sensing, which is incidentally also used with computed tomography (CT) and magnetic resonance imaging (MRI) scanners. Compressed sensing enables the reconstruction of a signal from a series of samples, by using existing knowledge of the signal.

In the case of this single-pixel camera, the known information is the illumination, which is a Hadamard matrix pattern displayed on the 64 x 64 pixel LED matrix, ergo 4,096 possible patterns. A total of 4,096 samples are thus recorded, which are subsequently processed with a Matlab script. As pointed out, even 50% of the maximum possible matrices can suffice here, with appropriately chosen patterns.

While not an incredibly fast method, it is fully solid-state, can be adapted to use other wavelengths, and with some tweaking of the used components probably could cut down the sampling time required.

Continue reading “A Single-Pixel Camera Without Moving Parts Using Compressed Sensing”

Work, Eat, Sleep, Repeat: Become A Human Tamagotchi

When [Terence Grover] set out to build a Tamagotchi-inspired simulator, he didn’t just add a few modern tweaks. He ditched the entire concept and rebuilt it from the ground up. Forget cute wide-eyed blobby animals and pixel-poop. This Raspberry Pi-powered project ditches nostalgia in favour of brutal realism: inflation, burnout, capitalism, and the occasional existential crisis. Think Sims meets cyberpunk, rendered charmingly in Python on a low-res RGB LED matrix.

Instead of hunger and poop meters, this dystopian pet juggles Maslow’s hierarchy: hunger, rest, safety, social life, esteem, and money. Players make real-life-inspired decisions like working, socialising, and going into education – each affecting the stats in logical (and often unfair) ways. No free lunch here: food requires money, money requires mind-numbing labour, and labour tanks your rest. You can even die of overwork à la Amazon warehouse. The UI and animation logic are all hand-coded, and there’s a working buzzer, pixel-perfect sprite movement, and even mini-games to simulate job repetition.

It’s equal parts social commentary and pixel art fever dream. While we have covered Tamagotchi recreations some time ago, this one makes you the needy survivor. Want your own dystopia in 64×32? Head over to [Terence Grover]’s Github and fork the full open source code. We’ll be watching. The Tamagotchi certainly is.

Continue reading “Work, Eat, Sleep, Repeat: Become A Human Tamagotchi”

Unwinding An Unusual Slide Rule

If the Otis King slide rule in [Chris Staecker’s] latest video looks a bit familiar, you might be getting up there in age, or you might remember seeing us talk about one in our collection. Actually, we have two floating around one of the Hackaday bunkers, and they are quite the conversation piece. You can watch the video below.

The device is often mistaken for a spyglass, but it is really a huge slide rule with the scale wrapped around in a rod-shaped form factor. The video says the scale is the same as a 30-inch scale, but we think it is closer to 66 inches.

Continue reading “Unwinding An Unusual Slide Rule”

Semiconductor Simulator Lets You Play IC Designer

For circuit simulation, we have always been enthralled with the Falstad simulator which is a simple, Spice-like simulator that runs in the browser. [Brandon] has a simulator, too, but it simulates semiconductor devices. With help from [Paul Falstad], that simulator also runs in the browser.

This simulator takes a little thinking and lets you build devices as you might on an IC die. The key is to use the drop-down that initially says “Interact” to select a tool. Then, the drop-down below lets you select what you are drawing, which can be a voltage source, metal, or various materials you find in semiconductor devices, like n-type or a dielectric.

It is a bit tricky, but if you check out the examples first (like this diode), it gets easier. The main page has many examples. You can even build up entire subsystems like a ring oscillator or a DRAM cell.

Designing at this level has its own quirks. For example, in the real world, you think of resistors as something you can use with great precision, and capacitors are often “sloppy.” On an IC substrate, resistors are often the sloppy component. While capacitor values might not be exact, it is very easy to get an extremely precise ratio of two capacitors because the plate size is tightly controlled. This leads to a different mindset than you are used to when designing with discrete components.

Of course, this is just a simulation, so everything can be perfect. If, for some reason, you don’t know about the Falstad simulator, check it out now.

Illustrated Kristina with an IBM Model M keyboard floating between her hands.

Keebin’ With Kristina: The One With The MingKwai Typewriter

Sometimes, a little goes a long way. I believe that’s the case with this tiny media control bar from [likeablob] that uses an ESP32-C3 Super Mini.

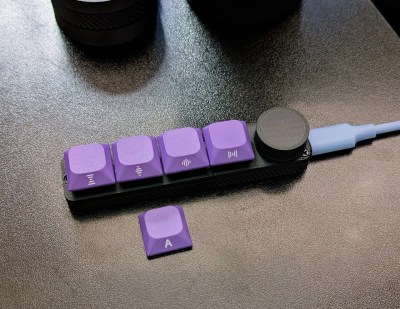
An in-line media control bar with four purple-capped key switch buttons and a knob.
Image by [likeablob] via Hackaday.IO
From left to right you’ve got a meta key that allows double functions for all the other keys. The base functions are play/pause, previous track, and next track while the knob handles volume.

And because it uses this Wi-Fi-enabled microcontroller, it can seamlessly integrate with Home Assistant via ESPHome.

What else is under the hood? Four low-profile Cherry MX Browns and a rotary encoder underneath that nicely-printed knob.

If you want to build one of these for yourself, all the files are available on GitHub including the customizable enclosure which [likeablob] designed with OpenSCAD. Continue reading “Keebin’ With Kristina: The One With The MingKwai Typewriter”

Print PLA In PLA With A Giant Molecular Model Kit

It isn’t too often we post a hack that’s just a pure 3D print with no other components, but for this Giant Molecular Model kit by [3D Printy], we’ll make an exception. After all, even if you print with PLA every day, how often do you get to play with its molecular bonds? (If you want to see that molecule, check out the video after the break.)

There are multiple sizes of bonds to represent bond lengths, and two styles: flexible and firm. Flexible bonds are great for multiple covalent bonds, like carbon-carbon bonds in organic molecules. The bonds clip to caps that screw in to the atoms; alternately a bond-cap can screw the atoms together directly. A plethora of atoms is available, in valence values from one to four. The two-bond atom has 180 and 120-degree variations for greater accuracy.  In terms of the chemistry this kit could represent, you’re only limited by your imagination and how long you are willing to spend printing atoms and bonds.

[3D Printy] was kind enough to release the whole lot as CC0 Public Domain, so we might be seeing these at craft fairs, as there’s nothing to keep you from selling the prints. Honestly, we can only hope; from an educational standpoint, this is a much better use of plastic than endless flexy dragons.

If you’d prefer your chemistry toys help you do chemistry, try this fidget spinner centrifuge. Perhaps you’d rather be teaching electronics instead?

Continue reading “Print PLA In PLA With A Giant Molecular Model Kit”