Teardown Of A Cheapish EBL Multi-Cell NiMH Charger

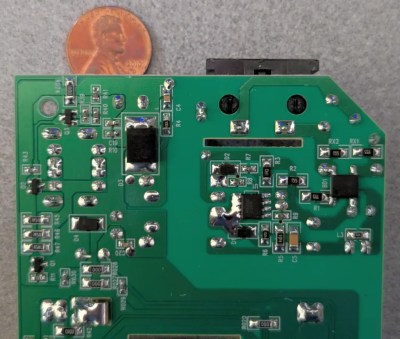
Bottom of the PCB with most of the ICs. (Credit: Brian Dipert, EDN)

People think about NiMH cell chargers probably as much as they think about batteries, unless it’s time to replace the cells in whatever device they’re installed in. This doesn’t make a teardown of one of these marvels any less interesting, especially when you can get an 8-bay charger with eight included NiMH cells for a cool $25 brand new. The charger even has USB ports on it, so it’s got to be good. Cue a full teardown by [Brian Dipert] over at EDN to see what lurks inside.

Of note is that [Brian] got the older version of EBL’s charger, which requires that two cells of the same type are installed side-by-side instead of featuring per-bay charging. This is a common feature of cheaper chargers, and perhaps unsurprisingly the charger was struggling with NiMH cells that other chargers would happily charge.

Opening up the unit required hunting for plastic clips, revealing the rather sparse internals. Unsurprisingly, there wasn’t a lot to look at, with the two USB ports apparently wired directly into the AC-to-DC section. There’s a CRE6536 AC-DC power management IC, the full-bridge rectifier and an unmarked 16-pin IC that presumably contains all of the charger logic. On the positive side, the mains-powered charger didn’t catch on fire (yet), but for anyone interested in leaving battery chargers unattended for extended periods of time, perhaps look at a more reputable brand.

Reverse Engineering A (Toy) Fire Engine

Your kid has a toy remote control fire truck. You have an RTL SDR. See where this is going? [Jacob] couldn’t resist tearing into the why and how of the truck’s remote control protocol.

The entire process began with a basic GNU Radio setup to determine the exact frequency of the signal. Then a little analysis suggested that it might be using amplitude shift keying. That is, the information is in the amplitude of the signal, where one possible amplitude is completely off in some cases.

Continue reading “Reverse Engineering A (Toy) Fire Engine”

Camera And ChArUco Keep The Skew Out Of Your 3D Prints

Do you or a loved one suffer from distorted 3D prints? Does your laser cutter produce parallelograms instead of rectangles? If so, you might be suffering from CNC skew miscalibration, and you could be entitled to significant compensation for your pain and suffering. Or, in the reality-based world, you could simply fix the problem yourself with this machine-vision skew correction system and get back to work.

If you want to put [Marius Wachtler]’s solution to work for you, it’s probably best to review his earlier work on pressure-advance correction. The tool-mounted endoscopic camera he used in that project is key to this one, but rather than monitoring a test print for optimum pressure settings, he’s using it to detect minor differences in the X-Y feed rates, which can turn what’s supposed to be a 90-degree angle into something else.

The key to detecting these problems is the so-called ChArUco board, which is a hybrid of a standard chess board pattern with ArUco markers added to the white squares. ArUco markers are a little like 2D barcodes in that they encode an identifier in an array of black and white pixels. [Marius] provides a PDF of a ChArUco that can be printed and pasted to a board, along with a skew correction program that analyzes the ChArUco pattern and produces Klipper commands to adjust for any skew detected in the X-Y plane. The video below goes over the basics.

For as clever and useful as ChArUco patterns seem to be, we’re surprised we haven’t seen them used for more than this CNC toolpath visualization project (although we do see the occasional appearance of ArUco). We wonder what other applications there might be for these boards. OpenCV supports it, so let us know what you come up with.

Continue reading “Camera And ChArUco Keep The Skew Out Of Your 3D Prints”

No Plans For The Weekend? Learn Raytracing!

Weekends can be busy for a lot of us, but sometimes you have one gloriously free and full of possibilities. If that’s you, you might consider taking a gander at [Peter Shirley]’s e-book “Learning Raytracing in One Weekend”.

This gradient is the first image that the book talks you through producing. It ends with the spheres.

This is very much a zero-to-hero kind of class: it starts out defining the PPM image format, which is easy to create and manipulate using nearly any language. The book uses C++, but as [Peter] points out in the introduction, you don’t have to follow along in that language; there won’t be anything unique to C++ you couldn’t implement in your language of choice.

There are many types of ray tracers. Technically, what you should end up with after the weekend ends is a path tracer. You won’t be replacing the Blender Cycles renderer with your weekend’s work, but you get some nice images and a place to build from. [Peter] manages to cram a lot of topics into a weekend, including diffuse materials, metals, dialectrics, diffraction, and camera classes with simple lens effects.

If you find yourself with slightly more time, [Peter] has you covered. He’s also released books on “Raytracing: The Next Week.” If you have a lot more time, then check out his third book, “Raytracing: The Rest of Your Life.”

This weekend e-book shows that ray-tracing doesn’t have to be the darkest of occult sciences; it doesn’t need oodles of hardware, either. Even an Arduino can do it..

The Most Personalized Font Is Your Own Handwriting

When making a personal website, one will naturally include a personal touch. What could be more personal than creating a font from your own handwriting? That’s what [Chris Smith] has done, and it looks great on his blog, which also has a post summarizing the process.

Like most of us [Chris] tried to use open-source toolkits first, but the workflow (and thus the result) was a bit wanting. Still, he details what it takes to create a font in Inkscape or Font Forge if anyone else wants to give it a try. Instead he ended up using a web app called Calligraphr designed for this exact use case.

Above is hand written; below is the font. Aside from the lighting the difference isn’t obvious.

Fair warning: the tool is closed-source and he needed to pay to get all the features he wanted — specifically ligatures, glyphs made from two joined letters. By adding ligatures his personalized font gets a little bit of variation, as the ‘l’ in an ‘lf’ ligature (for example) need not be identical to the stand-alone ‘l’. In a case of “you get what you pay for” the process worked great and to the credit of the folks at Calligraphr, while it is Software-As-Service they offer a one-time payment for one month’s use of the “pro” features. While nobody likes SaS, that’s a much more user-friendly way to do it — or perhaps “least-user-hostile”.

All [Chris] had to do was write out and scan a few sheets that you can see above, while the software handled most of the hard work automagically. [Chris] only had to apply a few tweaks to get the result you see here. Aside from websites, we could see a personalized font like this being a nice touch to laser cut, CNC or even 3D printed projects. If you don’t want a personalized touch, the “Gorton” lettering of retro machinery might be more to your liking.

Knowing That It Is Possible

We like to think that we can do almost anything. Give me a broken piece of consumer electronics, and I’ll open it up and kick the capacitors. Give me an embedded Linux machine, and I’ll poke around for a serial port and see if it’s running uboot. But my confidence suddenly pales when you hand me a smartphone.

Now that’s not to say that I’ve never replaced a broken screen or a camera module with OEM parts. The modern smartphone is actually a miracle of modularity, with most sub-assemblies being swappable, at least in principle, and depending on your taste for applying heat to loosen up whatever glue holds the damn things together.

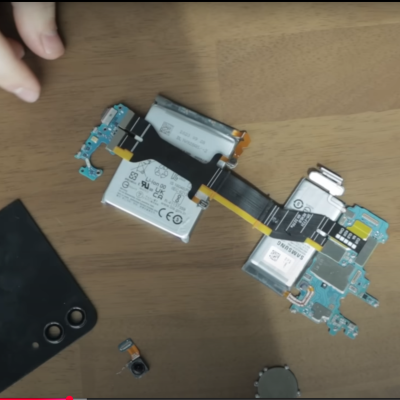
But actually doing hardware hacking on smartphones is still outside of my comfort zone, and that’s a shame. So I was pretty pleased to see [Marcin Plaza] attempt gutting a smartphone, repackaging it into a new form factor, and even adding a new keyboard to it. The best moment in that video for me comes around eight minutes in, when he has completely disassembled all of the modules and is laying them out on his desk to see how little he needs to make the thing work. And the answer is batteries, motherboard, USB-C, power button, and a screen. That starts to seem like a computer build, and that’s familiar turf.

That reminded me of [Scotty Allen]’s forays into cell-phone hackery that culminated in his building one completely from parts, and telling us all about it at Supercon ages ago. He told me that the turning point for him was realizing that if you have access to the tools to put it together and can get some of the impossibly small parts manufactured and/or assembled for you, that it’s just like putting a computer together.

So now I’ve seen two examples. [Scotty] put his together from parts, and [Marcin] actually got a new daughterboard made that interfaces with the USB to add a keyboard. Hardware hacking on a cellphone doesn’t sound entirely impossible. You’d probably want a cheap old used one, but the barrier to entry there isn’t that bad. You’ll probably have to buy some obscure connectors – they are tiny inside smartphones – and get some breakout boards made. But maybe it’s possible?

Anyone have more encouragement?

Spinning Top Chair Revisited

Designer furniture generally comes with excellent aesthetics and (sometimes) functionality. However, such furniture comes with a price to match. One such piece of furniture is the Magis Spun Chair. It’s a striking piece with a fun party trick to match: it works like a top spinning while you sit inside. However, it has a prohibitively expensive price tag of $1,200 to match. That’s why [Morley Kert] is on a mission to build one for less. 

This isn’t [Morley]’s first time building a spinning chair. The first attempt featured numerous 3D printed pieces glued together. It did not inspire confidence in spinning, nor was it a striking piece of furniture. So a revisit was in order.

This time around the chair’s construction was CNC milled plywood. Some surfaces featured 3D carving, but the majority were left raw with carving the final shape handled manually. Despite its size, the chair only took four and a half sheets of 3/4 inch plywood by hollowing out the base allowing for more efficient use of material. Once the router had completed the pieces, they were stacked and glued together. Each layer was aligned with hidden dowels making the assembly process fairly straightforward.

However, while usable, the chair looked rather unfinished, so [Morley] went to town on it with a power carving angle grinder. To ensure even carving on the circular profile of the chair, he placed it, or for some sections glued it, on an electronic lazy Susan. After some practice, the carving process turned out really well with a well-shaped and professional looking chair. Some wood varnish and a large amount of sanding finished up the chair very nicely for a total material cost of under $500.

We were happy to see the completion of this chair building saga. If you want to see [Morley] make even more designer furniture for cheap, make sure to check out his other 3D printed chair!

Continue reading “Spinning Top Chair Revisited”