Throughout history, mankind has been at the mercy of the weather. Planning a major outdoor event like a wedding or a naval battle? Better hope for clear skies! Man doesn’t have the ability to change mother nature at will quite yet, but hackers are working on it! Until then, we can measure the current conditions and predict the weather in the near future. A bit of help from cloud based computer models and global sensing even allows us to model and predict weather patterns days in advance. It’s no surprise that makers, engineers, and hackers love weather projects. We’ve found there are two basic project groups (with a some overlap between them): Sensing projects and display projects. This week’s hacklet focuses on some of the best weather sensing projects on Hackaday.io!
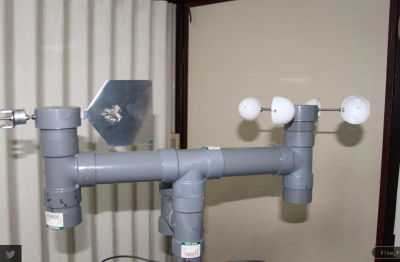 We start with [diysciborg] and Modular Weather Station. This 2014 Hackaday Prize entrant is a DIY outdoor weather station. [diysciborg] went with easily available PVC pipe and sheet metal for most of his mechanical build. His anemometer alone is a work of art. Mounting 8 magnetic reed switches in slots cut in a PCB allows for a thin device which can easily sense the speed of the wind. Other sensors include a TLS230R light to frequency converter for sunlight measurement, CO, wind direction, and more. An Arduino Pro Mini is at the center of it all.
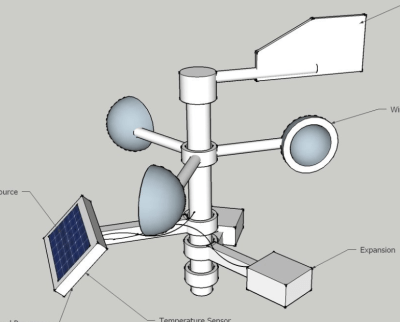
 [Clovis Fritzen] is saving the planet from global warming with his project FacilTempo. FacilTempo is a weather station, and an entry in the 2015 Hackaday Prize. The idea is to make a simple and low-cost setup which can be built in bulk and placed anywhere on the Earth. [Clovis] plans to measure temperature, humidity, atmospheric pressure, sunlight, and rain. He also hopes to add a Sparkfun sensor to monitor wind speed and direction. All the data will be transmitted via a radio link. [Clovis] is adding the ability for FacilTemp to communicate via 433 MHz, WiFi, or Bluetooth. The entire sensor suite and its on-board ATmega328 will be powered by a LiPo battery. The battery will be charged by solar or wind power, depending upon what is available on site. With 8 project logs already in the can, FacilTempo is well on its way to beating back global warming!
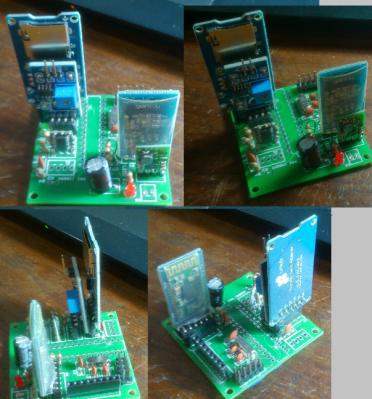
 [Ulf Winberg] is building the Low Cost Weather Station, his entry in the 2015 Hackaday Prize. Low Cost Weather Station aims to be a $50 sensor suite for local weather conditions. [Ulf] plans to power the entire device using wind and solar energy. He’s hoping to avoid batteries by storing his power in a supercapacitor. Power calculations have been taking up quite a bit of his design time so far. The $50 bill of materials limit is one that [Ulf] is serious about. He’s keeping careful eye on his component selections to keep that goal attainable. The system will transmit wind speed, wind direction, sun, and other data through a Laird BL600 Bluetooth low energy transceiver.
 Finally we have [Greg Miller] taking it back to basics with Weather Station Zeta. Zeta is [Greg’s] first big project. He’s only just recently learned to solder, but he’s already squeezing a lot of performance out of a little Arduino. The idea is to create a two station system. The outdoor station will monitor the weather, including temperature, humidity, and barometric pressure. Data will be transmitted to an indoor station with a similar set of sensors. The indoor station will also include a 20 line x 4 column character LCD to display the data. [Greg] has the indoor section of the system just about done, and he’s working on learning the ins and outs of XBee data radios. He’s also going to include an Adafriut CC3000 breakout board to Web enable the weather station. We love seeing ambitious early projects like this one!
If you want to see more projects like these, check the Weather Sensing Projects list on Hackaday.io.
That’s it for this week’s Hacklet, As always, see you next week. Same hack time, same hack channel, bringing you the best of Hackaday.io!


 Last week’s prize was a
 Next up is [AKA] with


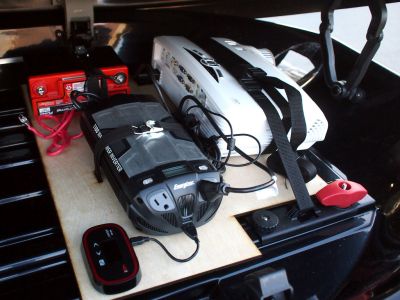 The projector itself is the HD25-LV, a 3500 Lumen model from Optima. the HD25-LV is capable of 1080p, though in this situation, brightness is much more important than resolution. [Mikeasaurus] mounted the projector along with a gel cell battery and 900 watt DC to AC inverter to power it. A mobile WiFi hotspot fills out the rooftop kit. Leaving an expensive setup like that on top of a car is a recipe for disaster – be it from rain, rocks, or theft. [Mikeasaurus] thought ahead and strapped his setup down inside a roof mounted cargo box. A plastic covered hole in the front of the box allows the projector to shoot down on the road while protecting its lens. We’d want to add a vent and fan to ensure that projector gets a bit of airflow as well.


