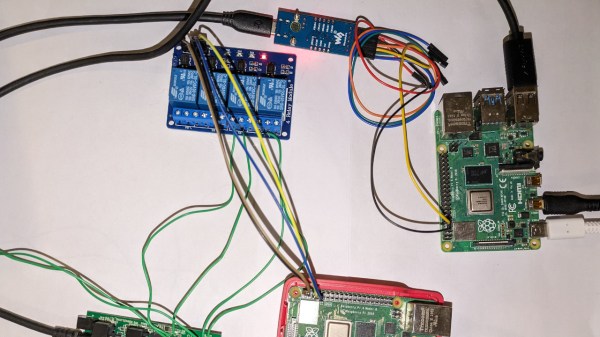
anfractuosity's test setup showing the Pi under test and a few pieces of equipment used to perform the attack

Cold Boot Attack You Can Do With A Pi

A cold boot attack is a way to extract RAM contents from a running system by power cycling it and reading out RAM immediately after loading your own OS. How easy is it for you to perform such an attack? As [anfractuosity] shows, you can perform a cold boot attack with a Raspberry Pi, with a reasonably simple hardware setup and a hefty chunk of bare-metal code.

[anfractuosity]’s setup is simple enough. The Pi 4 under attack is set up to boot from USB drive, and a relay board has it switch between two possible USB drives to boot from: one with a program that fills RAM with , and another with a program that extracts RAM out through UART. The process is controlled by another Pi controlling the relays through GPIOs, that also monitors the target Pi’s UART and uses it as a channel to extract memory.

The outcomes are pretty impressive. After 0.75s of power-down, most of the image could be extracted. That’s without any cooling, so abusing a can of electronics duster is likely to improve these results dramatically. Want to play with cold boot attacks? [anfractuosity]’s code is great for getting your feet wet. Furthermore, the code examples provided serve as a wonderful playground for general memory attack research.

Raspberry Pi not fun enough for you anymore? Well then, you can always start playing with Android phones!
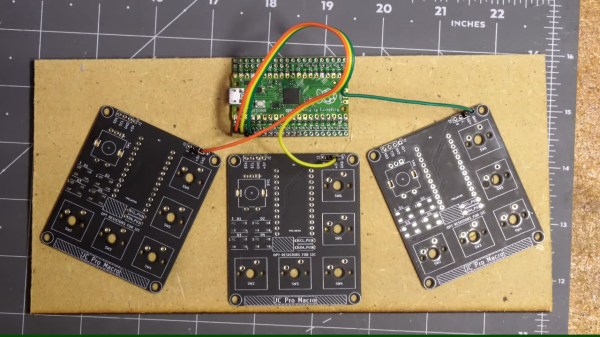
The board in question, with a Pi Pico soldered on, with old PCBs for macropads being used as captouch electrodes

Give Your Pi Pico Captouch Inputs For All Your Music Needs

Unlike many modern microcontrollers, RP2040 doesn’t come with a native capacitive touch peripheral. This doesn’t mean you can’t do it – the usual software-driven way works wonderfully, and only requires an external pullup resistor! In case you wanted a demonstration or you have a capacitive touch project in mind, this lighthearted video by [Jeremy Cook] is a must watch, and he’s got a healthy amount of resources for you in store, too!

In this video, [Jeremy] presents you with a KiCad schematic and an PCB design you can use to quickly add whole 23 capacitive touch sensing inputs to a Pi Pico! The board is flexible mechanically, easy to assemble as [Jeremy] demonstrates, and all the pins involved can still be used as regular GPIOs if you’d like. Plus, it’s fully open-source, can easily be assembled on your own, and available on Tindie too!

Of course, such a board doesn’t get created for no reason – [Jeremy] has a healthy amount of musical creations and nifty ideas to show off. We quite liked the trick of using old PCBs as capacitive touch sensing, using copper fills as electrodes – which has helped create an amusing “macropad of macropads”, and, there’s quite a bit more to see.

If capacitive touch projects ever struck a chord with you and you enjoy music-related hacking, [Jeremy]’s got a whole YouTube channel you ought to check out. Oh, and if one of the musical projects in the video caught your eye, it might just be the one we’ve featured previously! Continue reading “Give Your Pi Pico Captouch Inputs For All Your Music Needs” →

PCB Design Review: ESP32-S3 Round LCD Board

For our next installment, I have a lovely and daring PCB submitted by one of our readers, [Vas]. This is an ESP32-S3 board that also has an onboard round TFT display, very similar to the one we used on the Vectorscope badge. The badge is self-sufficient – it has an ESP32, it has a display, a programming connector, two different QWIIC ports you could surely use as GPIOs – what’s not to love?

This is a two-layer board, and I have to admit that I seriously enjoy such designs. Managing to put a whole lot of things into two layers is quite cool in my book, and I have great fun doing so whenever I get the opportunity. There’s nothing wrong with taking up more layers than needed – in fact, if you’re concerned about emitted/received noise or you have high-speed interfaces, four-layer is the way to go. But making complex boards with two layers is a nice challenge, and, it does tend to make these boards cheaper to manufacture as a very nice bonus.

Let’s improve upon it, and support [Vas]’s design. From what I can see looking at this board, we can help [Vas] a lot with ease of assembly, perhaps even help save a hefty amount of money if they go for third-party PCBA instead of sitting down with a stencil – which you could do with this board pretty easily, since all of the components on it, save for the display, are the ones you’d expect JLCPCB to stock.

Continue reading “PCB Design Review: ESP32-S3 Round LCD Board” →

Lithium-Ion Batteries Power Your Devboards Easily

Last summer, I was hanging out with a friend from Netherlands for a week, and in the middle of that week, we decided to go on a 20 km bike trip to a nearby beach. Problem? We wanted to chat throughout the trip, but the wind noise was loud, and screaming at each other while cycling wouldn’t have been fun. I had some walkie-talkie software in mind, but only a single battery-powered Pi in my possession. So, I went into my workshop room, and half an hour later, walked out with a Pi Zero wrapped in a few cables.

I wish I could tell you that it worked out wonders. The Zero didn’t have enough CPU power, I only had single-core ones spare, and the software I had in mind would start to badly stutter every time we tried to run it in bidirectional mode. But the battery power solution was fantastic. If you need your hack to go mobile, read on.

Continue reading “Lithium-Ion Batteries Power Your Devboards Easily” →

PCB Design Review: DPI-LVDS Sony Vaio LCD Devboard

Ordering a PCB with mistakes sucks. We should help each other avoid such mistakes – especially newcomers. One of the best ways to avoid these mistakes, especially if it’s your first one, is to get a few other people to look at it. You deserve to get a PCB that is as functional and as helpful as humanly possible, so that you can be happy with your project, and feel ever so slightly more confident in yourself in whatever you shall set out to do next.

At the end of last year, I put out a call for design review submissions, and we’ve received enough projects to make me feel overwhelmed for a bit. A design review has always felt like a personal thing, and here we are doing them in public. But in that sense, we hope that everyone can learn from them, and we hope to push forward a healthy review culture.

What’s more, these articles won’t just be design review. Every project I’m highlighting is worthy of a Hackaday feature just on its own, so tune in and learn more about them!

Today’s Contestant

For this example, I will be walking through a review I’ve already given someone with a pretty cool board, for a pretty cool project I’ve already shown you. Remember the Sony Vaio remake project? A fair bit of people have reached out to me afterwards, and one of them, [Exentio] also had the same Sony Vaio rebuild idea in mind. We started chatting, and he decided to tackle one of the project’s milestones, and perhaps the most crucial one – adapting the LCD.

Continue reading “PCB Design Review: DPI-LVDS Sony Vaio LCD Devboard” →

Share Your Projects: KiCad Automations And Pretty Renders

I have a pretty large GitHub repository, with all of my boards open-sourced there. Now, I’m finally facing the major problem it has – it can be uncomfortable for others to work with. I don’t store Gerber files in the repository because that will interfere with how Git functions – you’re supposed to only have source files in the repo. Yet, when someone needs Gerbers for my PCB, or a schematic PDF, or just to see how the board looks before they clone the entire repository, I often don’t have a good option for them.

In my experience as a hacker, being able to find others’ PCBs on GitHub is simply wonderful, but a PCB repository without a README feels barren, and a PCB README without pictures makes me sad. On the other hand, not having these files autogenerate is uncomfortable – updating a picture every time is a major drawback in particular.

Let’s take a look at some KiCad Git integrations, and see what they have to offer.

kicad_cli

We’ve mentioned kicad_cli back when KiCad 7 got released, and in the recently released KiCad 8, it’s only become more powerful. Before, it could do gerbers and schematic PDFs, but now, it can even do DRC checks – which is ideal if you want to add a hook for any pull requests you might encounter.

Continue reading “Share Your Projects: KiCad Automations And Pretty Renders” →

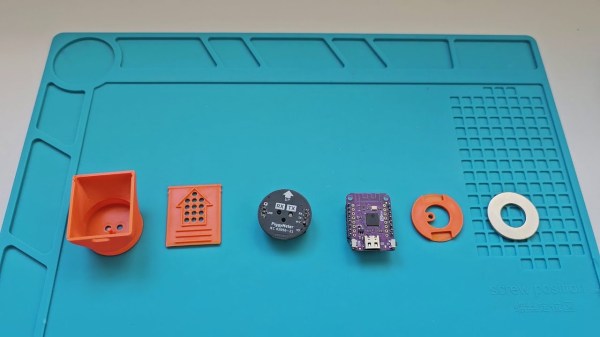
All the components of the Piggymeter interface laid out on a silicon mat

Simple Optical Meter Sets New Standards For Documentation

PiggyMeter is a wonderful example of a device that you never knew you needed – simple, elegant, easy to build, and accompanied by amazing documentation. It’s a snap-on interface for electric meters, dubbed so because its 3D printable shell looks like a pig nose, and it works with IEC62056-21 compliant meters. If you want to learn about your home’s power consumption in real time and your meter happens to fit the bill, look into building a PiggyMeter, it’s the kind of DIY project that a hacker was destined to design at some point.

All you need is a printed shell, a Wemos-compatible development board with an ESP32 MCU, an optical interface board, and a few small parts like a ring magnet. The optical interface board is not open source, but there’s drawings available, and the design is pretty simple, so it should be trivial to recreate. Plus, it’s also reasonably inexpensive if you don’t want to build your own board. Got parts? Simply put them all together, flash the firmware, and you have a meter adapter added to your smart home device family.

This device works with HomeAssistant, and it’s incredibly easy to set up, in part because of just how clearly everything is outlined in the blog post. Seriously, the documentation is written with love, and it shows. If you’re looking to learn how to document a device in a helpful way, take notes from the PiggyMeter. And, if you’d like to learn more about optically coupled power meter interfaces, here’s a different open source project we’ve covered before!