Hybrid Lab Power Supply From Broken Audio Amp

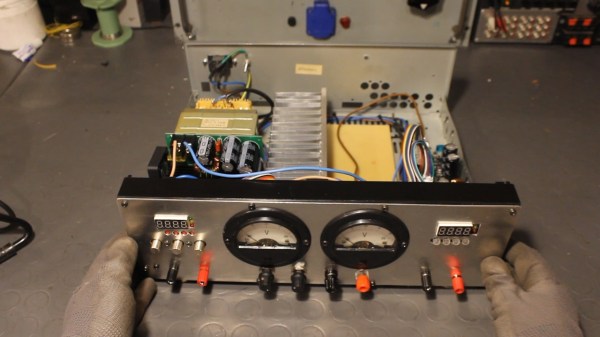
The lab power supply is an essential part of any respectable electronics workbench. However, the cost of buying a unit that has all the features required can be eye-wateringly high for such a seemingly simple device. [The Post Apocalyptic Inventor] has showed us how to build a quality bench power supply from the guts of an old audio amplifier.

We’ve covered our fair share of DIY power supplies here at Hackaday, and despite this one being a year old, it goes the extra mile for a number of reasons. Firstly, many of the expensive and key components are salvaged from a faulty audio amp: the transformer, large heatsink and chassis, as well as miscellaneous capacitors, pots, power resistors and relays. Secondly, this power supply is a hybrid. As well as two outputs from off-the-shelf buck and boost converters, there is also a linear supply. The efficiency of the switching supplies is great for general purpose work, but having a low-ripple linear output on tap for testing RF and audio projects is really handy.

The addition of the linear regulator is covered in a second video, and it’s impressively technically comprehensive. [TPAI] does a great job of explaining the function of all the parts which comprise his linear supply, and builds it up manually from discrete components. To monitor the voltage and current on the front panel, two vintage dial voltmeters are used, after one is converted to an ammeter. It’s these small auxiliary hacks which make this project stand out – another example is the rewiring of the transformer secondary and bridge rectifier to obtain a 38V rail rated for twice the original current.

The Chinese DC-DC switching converters at the heart of this build are pretty popular these days, in fact we’re even seeing open source firmware being developed for them. If you want to find out more about how they operate on a basic level, here’s how a buck converter works, and also the science behind boost converters.

Continue reading “Hybrid Lab Power Supply From Broken Audio Amp”

Searchable KiCad Component Database Makes Finding Parts A Breeze

KiCad, the open source EDA software, is popular with Hackaday readers and the hardware community as a whole. But it is not immune from the most common bane of EDA tools. Managing your library of symbols and footprints, and finding new ones for components you’re using in your latest design is rarely a pleasant experience. Swooping in to help alleviate your pain, [twitchyliquid64] has created KiCad Database (KCDB). a beautifully simple web-app for searching component footprints.

The database lets you easily search by footprint name with optional parameters like number of pins. Of course it can also search by tag for a bit of flexibility (searching Neopixel returned the footprint shown above). There’s also an indicator for Kicad-official parts which is a nice touch. One of our favourite features is the part viewer, which renders the footprint in your browser, making it easy to instantly see if the part is suitable. AngularJS and material design are at work here, and the main app is written in Go — very trendy.

The database is kindly publicly hosted by [twitchyliquid64] but can easily be run locally on your machine where you can add your own libraries. It takes only one command to add a GitHub repo as a component source, which then gets regularly “ingested”. It’s great how easy it is to add a neat library of footprints you found once, then forget about them, safe in the knowledge that they can easily be found in future in the same place as everything else.

If you can’t find the schematic symbols for the part you’re using, we recently covered a service which uses OCR and computer vision to automatically generate symbols from a datasheet; pretty cool stuff.

Blinging Up A Scope: Scale Your Divisions In Style

When a hacker owns an oscilloscope, it’s more than a possession. Weary nights are spent staring at the display, frantically twiddling the dials to coax out vital information. Over time, a bond is formed – and only the best will do for your scope. So why settle for the stock plastic dials when you could go for gold? Well in case you hadn’t noticed, we’re partial to a bit of over-engineering here at Hackaday, and [AvE] has upgraded his Rigol scope by adding metal knobs.

Employing his usual talent in the shop, [AvE] first turns the basic knob shapes from the stock, before drilling them and milling the outer texture pattern at an angle. Voilà: six custom knobs for 100% more torque and traction control. No matter how trivial the project, it’s always good to watch him at work. This [AvE] video doesn’t come with the usual fruity language warning; instead this build is set to the swelling tones of Beethoven. “Less Talk – More Action!” says the title, but we have to say that we miss his quips. That said, he still manages to deliver his signature humour through action alone.

For some slightly more functional oscilloscope upgrades, you can read about adding a hybrid touchscreen interface, or hacking a Rigol scope’s software to unlock greater bandwidth, storage depth and more.

Continue reading “Blinging Up A Scope: Scale Your Divisions In Style”

Hacked RC Transmitters Control All The Things

If you have lots of RC creations about, each with their own receiver, you’ll know that the cost of a new one for each project can quickly mount up – despite RC receivers being pretty cheap these days. What if you could use a NRF24L01+ module costing less than $3?

That’s just what [Rudolph] has done for his Hackaday Prize entry, rudRemoteThough many people already spin their own RC link with the NRF24 modules, this sets itself apart by being a complete, well thought out solution, easily scalable to a large number of receivers.

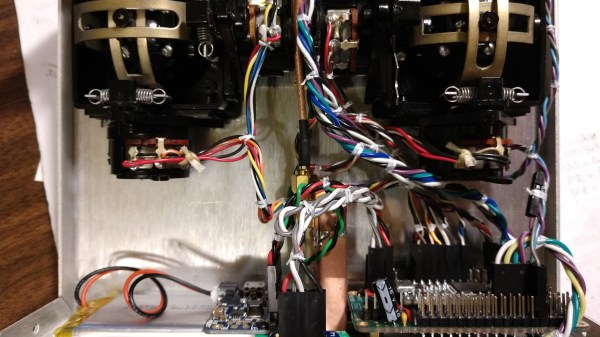
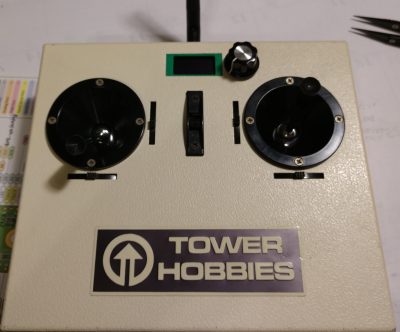
The transmitter can be made of anything to hand; stick an NRF24 module and Teensy inside, some gimbals if needed, and you have a rudRemote transmitter. Gaming controllers, sandwich boxes and piles of laser cut parts are all encouraged options. [Rudolph] used some 40-year-old transmitters for his build – on the outside they remain unchanged, apart from a small OLED and rotary encoder for the function menu. The gimbal connections are simply re-routed to the Teensy I/O.

The protocol used is CRTP (Crazy RealTime Protocol); this is partly because one of the things [Rudolph] wanted to control is a CrazyFlie quadcopter. It’s a protocol that can easily be used to control anything you like, providing it fits into the 29-byte payload space. The CrazyFlie only uses 14 bytes of that, so there’s plenty of headroom for auxiliary functions.

We’d be interested to see the latency of this system – we’ve some surprising results when it comes to measuring cheap RC transmitter latency.

Microsoft Confirms GitHub Acquisition

After recent talks, Microsoft has now officially confirmed that it will be merging GitHub to master. The acquisition will cost $7.5 billion, and has received mixed reactions so far. A staple of the open source community, GitHub is well known to Hackaday readers, and has played a key role in developing an incredible amount of the software we use on a daily basis.

Microsoft has embarked on a community crusade of late, seemingly trying to win some respect from developers and makers. Under the encouragement of Satya Nadella, we’ve had Visual Studio Code, Typescript, the Ubuntu-on-Windows saga, and many more. It’s hard to tell whether these endeavours have succeeded in winning the hearts of the community or not, but those who distrust Microsoft may be looking to make a move away from GitHub. In fact, since murmurs started about the possibility of the acquisition, GitLab, one of GitHub’s major competitors, has reported 10x the number of normal repositories moving to GitLab.

How does GitHub make money? Mainly through paid private repositories plans, and GitHub Enterprise for businesses. This provides GitHub with enough cash to allow free public repositories for the community. It will be interesting to see what changes in business and culture are made (if any) by Microsoft’s Nat Friedman (founder of Ximian) who will be taking the role of GitHub CEO.

To keep a close eye on your GitHub activity, you can monitor your repositories with an LED matrix.

Reverse Engineered Media Controller From Car Is Best Friends With Android

The CAN bus is a rich vein to mine for a hacker: allowing the electronic elements of most current vehicles to be re-purposed and controlled with ease. [MikrocontrollerProjekte] has reverse engineered a CAN bus media and navigation controller and connected it to an STM32F746G-Discovery board. The STM32 is in turn connected to an Android phone, and allows the media controller to trigger a large number of functions on the phone, including music playback, maps, and general Android navigation.

When reverse engineering the controller, [MikrocontrollerProjekte] employed a variety of approaches. A small amount of information was found online, some fuzzing was done with random CAN bus IDs and messages, as well as some data logging with the device inside the car to identify message data to the relevant IDs on the bus.

The STM32F746G-Discovery board acts as a Human Interface Device (HID), emulating a mouse and keyboard connected to the Android phone via USB OTG. The LCD screen shows the output of the keystrokes and touchpad area. We’re not sure how useful the mouse-emulation would be, given that the phone has a touchscreen, but the media functions work really well, and would also make a really snazzy music controller for a PC.

We’ve covered plenty of other cool CAN bus hacks, like reverse-engineering this Peugeot 207, or this general purpose CAN sniffer.

Continue reading “Reverse Engineered Media Controller From Car Is Best Friends With Android”

Serial Connection Over Audio: Arduino Can Listen To UART

We’ve all been there: after assessing a problem and thinking about a solution, we immediately rush to pursue the first that comes to mind, only to later find that there was a vastly simpler alternative. Thankfully, developing an obscure solution, though sometimes frustrating at the time, does tend to make a good Hackaday post. This time it was [David Wehr] and AudioSerial: a simple way of outputting raw serial data over the audio port of an Android phone. Though [David] could have easily used USB OTG for this project, many microcontrollers don’t have the USB-to-TTL capabilities of his Arduino – so this wasn’t entirely in vain.

At first, it seemed like a simple task: any respectable phone’s DAC should have a sample rate of at least 44.1kHz. [David] used Oboe, a high performance C++ library for Android audio apps, to create the required waveform. The 8-bit data chunks he sent can only make up 256 unique messages, so he pre-generated them. However, the DAC tried to be clever and do some interpolation with the signal – great for audio, not so much for digital waveforms. You can see the warped signal in blue compared to what it should be in orange. To fix this, an op-amp comparator was used to clean up the signal, as well as boosting it to the required voltage.

Prefer your Arduino connections wireless? Check out this smartphone-controlled periodic table of elements, or this wireless robotic hand.

Continue reading “Serial Connection Over Audio: Arduino Can Listen To UART”