Dual Brushed Motor Controller Doesn’t Care How It Receives Commands

The simple DC brushed motor is at the heart of many a robotics project. For making little toy bots that zip around the house, you can’t beat the price and simplicity of a pair of brushed motors. They’re also easy to control; you could roll your own H-bridge out of discrete transistors, or pick up one of the commonly used ICs like the L298N or L9110S.

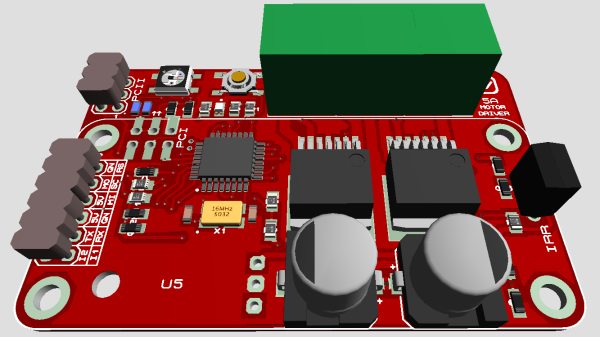
But what if you want an all-in-one solution? Something that will deliver enough current for most applications, drive dual motors, and deal with a wide range of input voltages. Most importantly, something that will talk to any kind of input source.  For his Hackaday prize entry, [Praveen Kumar] is creating a dual brushed motor controller which can handle a multitude of input types. Whether you’re using an IR remote, a Pi communicating over I2C, an analog output or Bluetooth receiver, this driver can handle them all and will automatically select the correct input source.

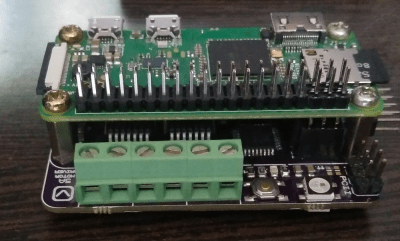
The board has an ATmega328p brain, so Arduino compatibility is there for easy reprogramming if needed. The mounting holes and header locations are also positioned to allow easy stacking with a Pi, and there’s a status LED too. It’s a great module that could easily find a place in a lot of builds.

If you need even more control over your brushed motor, you can soup up its capabilities by adding a PID loop for extra smarts.

Supersize DIY R/C Servos From Windscreen Wipers

We’re all familiar with the experience of buying hobby servos. The market is awash with cheap clones which have inflated specs and poor performance. Even branded servos often fail to deliver, and sometimes you just can’t get the required torque or speed from the small form factor of the typical hobby servo.

Enter [James Bruton] and his DIY RC servo from a windscreen wiper motor. Windscreen wiper motors are cheap as chips, and a classic salvage. The motor shaft is connected to a potentiometer via a pulley and some string, providing the necessary closed-loop feedback. Instead of using the traditional analog circuitry found inside a servo, an Arduino provides the brains. This means PID control can be implemented on the ‘duino, and tuned to get the best response from different load characteristics. There’s also the choice of different interfacing options: though [James]’ Arduino code accepts PWM signals for a drop-in R/C servo replacement, the addition of a microcontroller means many other input signal types and protocols are available. In fact, we recently wrote about serial bus servos and their numerous advantages.

We particularly love this because of the price barrier of industrial servomotors; sure, this kind of solution doesn’t have the precision or torque that off-the-shelf products provide, but would be sufficient for many hacks. Incidentally, this is what inspired one of our favourite open source projects: ODrive, which focuses on harnessing the power of cheap brushless motors for industrial use.

Continue reading “Supersize DIY R/C Servos From Windscreen Wipers”

Vintage Headphones Bluetooth Conversion Goes The Extra Mile

[KaZjjW] wanted to retrofit a pair of nicely styled vintage headphones to be able to play wirelessly over Bluetooth. In principle this is an easy task: simply stick a Bluetooth audio receiver on the line-in, add a battery, and you’re all set. However, [KaZjjW] wanted to keep the aesthetic changes to the headphones at an absolute minimum, retaining the existing casing and volume control, whilst cramming the electronics entirely inside and out of sight.

With the inherent space constraints inside the cups of the headphones, this proved to be quite a challenge. The existing volume potentiometer which hung half outside the case was remounted on an ingenious hinge made of two PCBs, with the pot floating next to a surface mounted switch. This allowed it to not only control the volume, but also act as an on/off switch for the Bluetooth. The only other existing cuts in the casing were a circular hole for the audio cable, and a slit for the cable strain relief. These worked perfectly for an LED status indicator and micro-USB battery charging.

The main chip used for receiving audio over Bluetooth was the BM62 by Microchip. It’s a great all-in-one solution for this kind of project as it has built-in battery charging, an on-board DAC and audio amp, as well as a serial control interface. In part 2 of the project log, the process of programming the BM62 was documented, and it was painful – it’s a shame that the software support lets it down. But a hacker will always find a way, and we’ve seen some pretty neat hacks for reprogramming existing chips in off-the-shelf Bluetooth headphones.

Two PCBs for the pot button hinge, one for the LED and micro-USB connector, as well as one for the Bluetooth receiver and a PIC. That’s four PCBs in a pretty small space, enabled by some commendable design effort both electronically and mechanically. It certainly paid off, as the finished product looks very slick.

Continue reading “Vintage Headphones Bluetooth Conversion Goes The Extra Mile”

On The Right Tracks: Electric Wheelchair Guts Find New Life As Tank

Every hacker has dreamt of building their own tank at some point. Or maybe that’s just us. [Peter Sripol] and [Sam Foskuhl] have built one at a scale which is big enough to be rideable, but small enough that neighbors don’t get concerned.

An electric wheelchair is at the heart of the build. After ripping out its internals, the two motors with gearboxes are directly connected to the two tracks, allowing differential steering. Holding everything together is a solid welded steel frame – essential for years of reliable sieging.

The tracks themselves are simple strips of wood, cut and assembled by hand onto a nylon belt. Meanwhile the track wheels and drive assembly are designed in CAD and cut with a CNC router from some plywood, a great choice for adding some precision to the most mechanically challenging part of the build. As always in [Peter]’s videos, a large portion is dedicated to testing – in this case with a rather large array of fireworks. We certainly wouldn’t want to be in his bad books considering his other souped-up weapons.

A small, hacked, novelty electric vehicle? Sounds like it would find some good friends at EMF Camp, especially at the Hacky Racers event.

Continue reading “On The Right Tracks: Electric Wheelchair Guts Find New Life As Tank”

Drawing Lines In The Sand: Taking Beach Graffiti To The Next Level

When strolling down the beach, there’s always an urge to draw in the sand – it seems compulsory to make your mark by inscribing something. But there’s a dilemma: how do you go about physically drawing it? You could opt to remain standing and attempt to deploy a toe, but that requires a level of dexterity few possess. The only other option is to bend down and physically use your hands. Ultimately, there’s no way to draw anything in the sand without losing your dignity.

The solution? A robot, of course – the brainchild of [Ivan Miranda]. The idea is simple and elegantly executed: make a large linear actuator, place it on wheels, and attach a servo which can position an etching tool to be either in the sand or above it. The whole contraption moves forward one column at a time, making a vertical pass with the marker being engaged or disengaged as required. The columns are quite thin, giving relatively high-resolution text, though this does mean it take a while. Adding another servo and marking two adjacent columns at the same time would be an easy way to instantly double the speed.

The wheels are big and chunky, to ensure the horizontal distance travelled does not change between the top and the bottom. Of course, when making big parts like these it always helps if you’ve already built a giant custom 3D printer. If you want to read more of [Ivan]’s large scale 3D printing antics, checkout his tank with suspension, or plus-sized seven-segment clock.

Continue reading “Drawing Lines In The Sand: Taking Beach Graffiti To The Next Level”

Simple Quadcopter Testbed Clears The Air For Easy Algorithm Development

We don’t have to tell you that drones are all the rage. But while new commercial models are being released all the time, and new parts get released for the makers, the basic technology used in the hardware hasn’t changed in the last few years. Sure, we’ve added more sensors, increased computing power, and improved the efficiency, but the key developments come in the software: you only have to look at the latest models on the market, or the frequency of Git commits to Betaflight, Butterflight, Cleanflight, etc.

With this in mind, for a Hackaday prize entry [int-smart] is working on a quadcopter testbed for developing algorithms, specifically localization and mapping. The aim of the project is to eventually make it as easy as possible to get off the ground and start writing code, as well as to integrate mapping algorithms with Ardupilot through ROS.

The initial idea was to use a Beaglebone Blue and some cheap hobby hardware which is fairly standard for a drone of this size: 1250 kv motors and SimonK ESCs, mounted on an f450 flame wheel style frame. However, it looks like an off-the-shelf solution might be even simpler if it can be made to work with ROS. A Scanse Sweep LIDAR sensor provides point cloud data, which is then munched with some Iterative Closest Point (ICP) processing. If you like math then it’s definitely worth reading the project logs, as some of the algorithms are explained there.

It might be fun to add FPV to this system to see how the mapping algorithms are performing from the perspective of the drone. And just because it’s awesome. FPV is also a fertile area for hacking: we particularly love this FPV tracker which rotates itself to get the best signal, and this 3D FPV setup using two cameras.

Nvidia Transforms Standard Video Into Slow Motion Using AI

Nvidia is back at it again with another awesome demo of applied machine learning: artificially transforming standard video into slow motion – they’re so good at showing off what AI can do that anyone would think they were trying to sell hardware for it.

Though most modern phones and cameras have an option to record in slow motion, it often comes at the expense of resolution, and always at the expense of storage space. For really high frame rates you’ll need a specialist camera, and you often don’t know that you should be filming in slow motion until after an event has occurred. Wouldn’t it be nice if we could just convert standard video to slow motion after it was recorded?

That’s just what Nvidia has done, all nicely documented in a paper. At its heart, the algorithm must take two frames, and artificially create one or more frames in between. This is not a manual algorithm that interpolates frames, this is a fully fledged deep-learning system. The Convolutional Neural Network (CNN) was trained on over a thousand videos – roughly 300k individual frames.

Since none of the parameters of the CNN are time-dependent, it’s possible to generate as many intermediate frames as required, something which sets this solution apart from previous approaches.  In some of the shots in their demo video, 30fps video is converted to 240fps; this requires the creation of 7 additional frames for every pair of consecutive frames.

The video after the break is seriously impressive, though if you look carefully you can see the odd imperfection, like the hockey player’s skate or dancer’s arm. Deep learning is as much an art as a science, and if you understood all of the research paper then you’re doing pretty darn well. For the rest of us, get up to speed by wrapping your head around neural networks, and trying out the simplest Tensorflow example.

Continue reading “Nvidia Transforms Standard Video Into Slow Motion Using AI”