Supercapacitors In A Servo: The “Forever” Flashlight

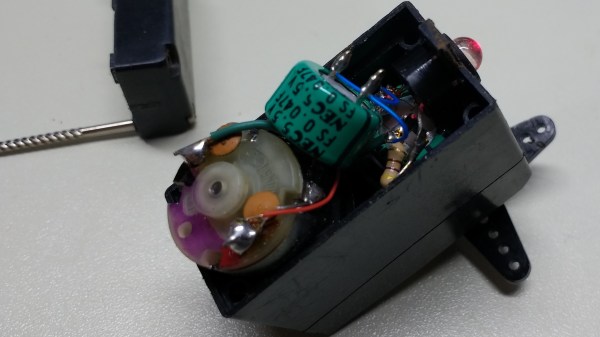
The principle is well understood: use a motor in reverse and you get a generator. Using this bit of knowledge back in 2001 is what kick-started [Ted Yapo]’s Hackaday Prize entry. At the time, [Ted] was searching for a small flashlight for astronomy, but didn’t like dealing with dead batteries. He quickly cobbled together a makeshift solution out of some supercapacitors and a servo-as-a-generator, hacked for continuous rotation.
A testament to the supercapacitors, 17 years later it’s still going strong – leading [Ted] to document the project and also improve it. The original circuit was as simple as a servo, protection diode, some supercapacitors, and a LED with accompanying resistor; but now greater things are afoot.

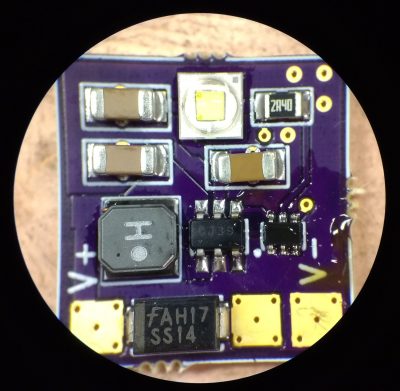
A DC-DC boost converter enables constant power through the LED, regardless of the capacitor voltage. This is achieved by connecting the feedback pin of an MCP1624 switcher to an INA199 current-shunt monitor. The MCP1624 kicks in at 0.65V and stays active down to 0.35V. This is all possible due to the supercapacitors, which happily keep increasing current as voltage drops – all the way to 0.35V. Batteries are less ideal in this situation, as their internal resistance increases as voltage drops, as well as increasing with age.

When testing the new design, [Ted] found that the gears on his servos kept stripping when he was using them to charge capacitors. Though at first he attributed it to the fact that the gears were plastic, he realized that his original prototype from 2001 had been plastic as well. Eventually, he discovered the cause: modern supercapacitors are too good! The ones he’d been using in 2001 were significantly less advanced and had a much higher ESR, limiting the charging current. The only solution is to use metal gear servos

Want to read more about boost converter design? We have the pros and cons of microcontrollers for boost converters, or this neat Nixie driver for USB power.

USB Reverse Engineering: A Universal Guide

Every hacker knows what it is to venture down a rabbit hole. Whether it lasts an afternoon, a month, or decades, finding a new niche topic and exploring where it leads is a familiar experience for Hackaday readers.

[Glenn ‘devalias’ Grant] is a self-proclaimed regular rabbit hole diver and is conscious that, between forays into specific topics, short-term knowledge and state of mind can be lost. This time, whilst exploring reverse engineering USB devices, [Glenn] captured the best resources, information and tools – for his future self as well as others.

His guide is impressively comprehensive, and covers all the necessary areas in hardware and software. After formally defining a USB system, [Glenn] refers us to [LinuxVoice], for a nifty tutorial on writing a linux USB driver for an RC car, in Python. Moving on to hardware, a number of open-source and commercial options are discussed, including GoodFET, FaceDancer, and Daisho – an FPGA based monitoring tool for analysing USB 3.0, HDMI and Gigabit Ethernet. If you only need to sniff low speed USB, here’s a beautifully small packet snooper from last year’s Hackaday prize.

This is a guide which is well-informed, clearly structured, and includes TL;DR sections in the perfect places. It gives due credit to LibUSB and PyUSB, and even includes resources for USB over IP.

If you’re worried about USB hacks like BadUSB, perhaps you should checkout GoodUSB – a hardware firewall for USB devices.

Header image: Ed g2s (CC-SA 3.0).


Restoring A 1930s Oscilloscope – Without Supplying Power

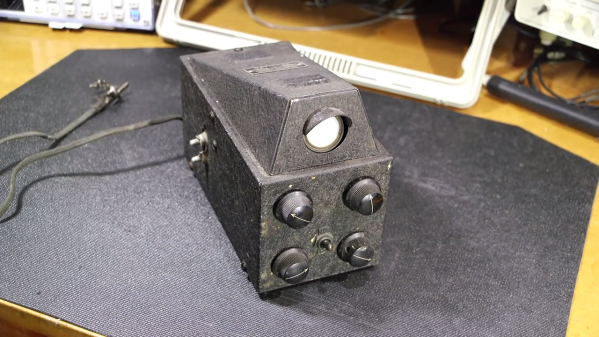
We’ve all done it: after happening across a vintage piece of equipment and bounding to the test bench, eager to see if it works, it gets plugged in, the power switch flipped, but… nothing. [Mr Carlson] explains why this is such a bad idea, and accompanies it with more key knowledge for a successful restoration – this time revitalising a tiny oscilloscope from the 1930s.

Resisting the temptation to immediately power on old equipment is often essential to any hope of seeing it work again. [Mr Carlson] explains why you should ensure any degraded components are fixed or replaced before flipping the switch, knowing that a shorted/leaking capacitor is more than likely to damage other components if power is applied.

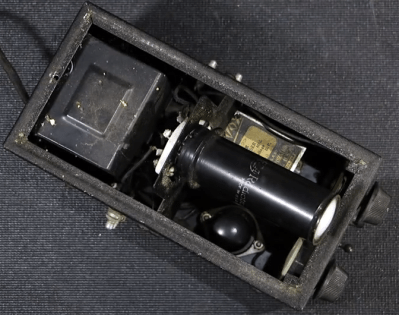
The oscilloscope he is restoring is a beautiful find. Originally used by radio operators to monitor the audio they were transmitting, it features a one inch CRT and tube rectification, in a tight form factor.

[Mr Carlson] uses his capacitor leakage tester to determine if the main filter capacitor needs replacing – it does, no surprises there – as well as confirming the presence of capacitors potted into the power transformer itself. These have the potential to not only derail the restoration, but also cause a safety hazard through leakage to the chassis.

After replacing and rewiring everything that’s relevant, the scope is hooked up to an isolation transformer, and it works first time – showing the value of a full investigation before power-up. [Mr Carlson] quips, “It really doesn’t have a choice; when it’s on this bench, it’s going to work again”, a quote which will no doubt resonate with Hackaday readers.

[Mr Carlson] promises to integrate the scope into a new piece of test equipment in the near future, but in the meantime you can read about his soldering station VFD mod, or his walk-in AM radio transmitter.

Continue reading “Restoring A 1930s Oscilloscope – Without Supplying Power”

Reflowduino: Put That Toaster Oven To Good Use

There are few scenes in life more moving than the moment the solder paste melts as the component slides smoothly into place. We’re willing to bet the only reason you don’t have a reflow oven is the cost. Why wouldn’t you want one? Fortunately, the vastly cheaper DIY route has become a whole lot easier since the birth of the Reflowduino – an open source controller for reflow ovens.

This Hackaday Prize entry by [Timothy Woo] provides a super quick way to create your own reflow setup, using any cheap means of heating you have lying around. [Tim] uses a toaster oven he paid $21 for, but anything with a suitable thermal mass will do. The hardware of the Reflowduino is all open source and has been very well documented – both on the main hackaday.io page and over on the project’s GitHub.

The board itself is built around the ATMega32u4 and sports an integrated MAX31855 thermocouple interface (for the all-important PID control), LiPo battery charging, a buzzer for alerting you when input is needed, and Bluetooth. Why Bluetooth? An Android app has been developed for easy control of the Reflowduino, and will even graph the temperature profile.

When it comes to controlling the toaster oven/miscellaneous heat source, a “sidekick” board is available, with a solid state relay hooked up to a mains plug. This makes it a breeze to setup any mains appliance for Arduino control.

We actually covered the Reflowduino last year, but since then [Tim] has also created the Reflowduino32 – a backpack for the DOIT ESP32 dev board. There’s also an Indiegogo campaign now, and some new software as well.

If a toaster oven still doesn’t feel hacky enough for you, we’ve got reflowing with hair straighteners, and even car headlights.

RC Paper Airplane From Guts Of Quadcopter

Mini indoor drones have become an incredibly popular gift in the last few years since they’re both cool and inexpensive. For a while they’re great fun to fly around, until the inevitable collision with a wall, piece of furniture, or family member. Often not the most structurally sound of products, a slightly damaged quad can easily be confined to a cupboard for the rest of its life. But [Peter Sripol] has an idea for re-using the electronics from a mangled quad by building his own RC controlled paper aeroplane.

[Peter] uses the two rear motors from a mini quadcopter to provide the thrust for the aeroplane. The key is to remove the motors from the frame and mount them at 90 degrees to their original orientation so that they’re now facing forwards. This allows the drone’s gyro to remain facing upwards in its usual orientation, and keep the plane pointing forwards.

The reason this works is down to how drones yaw: because half of the motors spin the opposite direction to the other half, yaw is induced by increasing the speed of all motors spinning in one direction, mismatching the aerodynamic torques and rotating the drone. In the case of the mini quadcopter, each of the two rear motors spin in different directions. Therefore, when the paper plane begins to yaw off-centre, the flight controller increases power to the appropriate motor.

Mounting the flight controller and motors to the paper plane can either be achieved using a 3D-printed mount [Peter] created, or small piece of foam. Shown here is the foam design that mounts the propellers at wing level but the 3D printed version has then under the fuselage and flies a bit better.

Making paper planes too much effort? You could always use the one-stroke paper plane folder, or even the paper plane machine gun.

Continue reading “RC Paper Airplane From Guts Of Quadcopter”

Pick And Place Machine Is Mirror Image Of 3D Printer

For his Hackaday prize entry, [Daren Schwenke] is creating an open-source pick-and-place head for a 3D printer which, is itself, mostly 3D printable. Some serious elbow grease has gone into the design of this, and it shows.

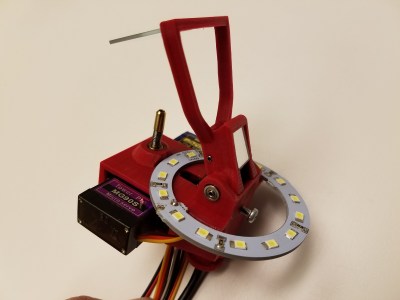
The really neat part of this project comes in the imaging of the part being placed. The aim is to image the part whilst it’s being moved, using a series of mirrors which swing out beneath the head. A Raspberry Pi camera is used to grab the photos, an LED halo provides consistent lighting, and whilst it looks like OpenPnP may have to be modified slightly to make this work, it will certainly be impressive to see.

Two 9g hobby servos are used: one to swing out the mirrors (taking 0.19 seconds) and one to rotate the part to the correct orientation (geared 2:1 to allow 360 degrees part rotation). Altogether the head weighs 59 grams – lighter than an E3D v6.

In order to bring this project to its current state, [Daren] has had to perform some auxiliary hacks.  The first was an aquarium to vacuum pump conversion – by switching around the valves and performing some other minor mods, [Daren] was able to produce a vacuum of 231mbar. The second was hacking a two-way solenoid valve from a coffee machine into a three-way unit. As [Daren] says, three-way valves are not expensive, but “a part in hand is worth two on Alibaba.”

Stomping On Microcontrollers: Arduino Mega Guitar Effects Pedal

Effects pedals: for some an object of overwhelming addiction, but for many, an opportunity to hack. Anyone who plays guitar (or buys presents for someone who does) knows of the infinite choice of pedals available. There are so many pedals because nailing the tone you hear in your head is an addictive quest, an itch that must be scratched. Rising to meet this challenge are a generation of programmable pedals that can tweak effects in clever ways.

With this in mind, [ElectroSmash] are back at it with another open source offering: the pedalSHIELD MEGA. Aimed at musicians and hackers who want to learn more about audio, DSP and programming, this is an open-hardware/open-software shield for the Arduino MEGA which transforms it into an effects pedal.

The hardware consists of an analog input stage which amplifies and filters the incoming signal before passing it to the Arduino, as well as an output stage which does the DAC-ing from the Arduino’s PWM outputs, and some more filtering/amplifying. Two 8-bit PWM outputs are used simultaneously to make pseudo 16-bit resolution — a technique you can read more about in their handy forum guide.

The list of effects currently implemented covers all the basics you’d expect, and provides a good starting point for writing custom effects. Perhaps a library for some of the commonly used config/operations would be useful? Naturally, there are some computational constraints when using an Arduino for DSP, though it’s up to you whether this is a frustrating fact, or an opportunity to write some nicely optimised code.

[ElectroSmash] don’t just do pedals either: here’s their open source guitar amp.

Continue reading “Stomping On Microcontrollers: Arduino Mega Guitar Effects Pedal”