3D Printed SMD Tool

We’ve seen pick and place tools in the form of tweezers, mechanical pencils adapted to aquarium pumps, but never as a 3D printed tool optimized for standard blunt-nose needles in a comfortable, ergonomic shape.

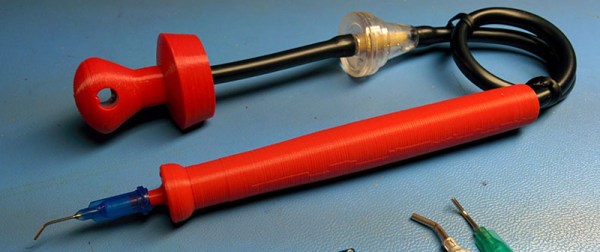
[Zapta] created this 3D printed SMD hand picker to populate a few boards. The tool is mostly 3D printed parts that come together for an airtight enclosure. The needles are the standard eBay affair, with the smallest he could find easily lifting 0402 and 0603 components from their tape reel. There’s also the option to switch over to larger needles for bigger components.

There are files available for two versions of this vacuum picker – one with a hole in the handle for those of us who would rather connect this thing directly to a modified aquarium pump, and one for the geniuses among us who use a foot pedal and pneumatic valve to release the tiny part. Other than the pump, the only a few bits of tubing are required to turn this bit of 3D printed plastic into a useful tool.
Reflowing An Entire MacBook Pro

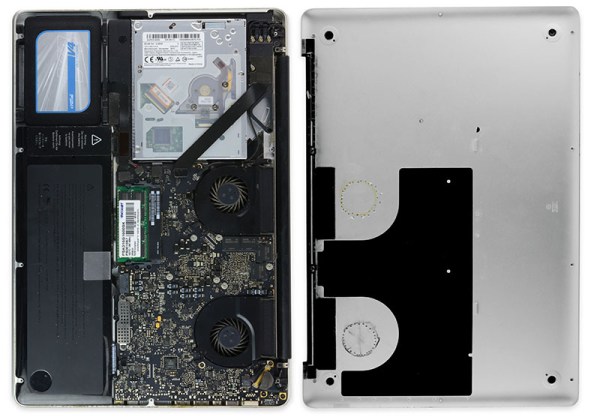
[Sterling]’s MacBook Pro has a propensity to heat up at times. Some of this overheating is due to to what he uses his Mac for – gaming and making music. A larger part of this overheating is that this laptop is a consumer electronics device – it’s going to die sooner or later. One day in March, this laptop bit the bullet, and that’s where this story gets interesting.

Before the MacBook died, [Sterling] was logging temps between 80 and 90ºC, with a maximum of 102º. The simple fixes, compressed air, a laptop stand, and running the fans full blast all the time didn’t help. When the laptop died, [Sterling] was pretty sure some solder joints came loose. Sending the logic board off to a place that specializes in reflowing would take weeks. A more drastic plan of attack was necessary.

[Sterling] disconnected all the wires, connectors, and heat sinks and preheated his oven to 340º F. The logic board was placed on a cookie tray and stuffed into the oven for seven long minutes. Thermal paste was reapplied, heat sinks reinstalled, connectors connected, and the machine booted. It worked great for about eight months with temperatures averaging around 60 or 70º C.

Two weeks ago, the laptop died again. This time it was reflowed with a heat gun and ran for about an hour. The third attempt was the cookie sheet again, only this time [Sterling] added something. Speed holes. Or vents, or whatever else you want to call them.

Now there’s a noticeably increased airflow in the Mac, much better than before. Average temps are back down to 40 or 50º C, lower than they were with just a reflow. The jury is still out if this new addition can go the distance, but with any luck, this mod might make it through 2015.

Thanks [Doug] for the tip.

Flashing Chips With A CNC

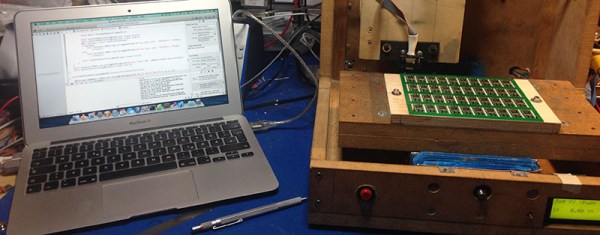
[Eberhard] needed to flash several hundred ATMegas for a project he was working on. This was a problem, but the task did have a few things going for it that made automation easy. The boards the ‘Megas were soldered to weren’t depanelized yet, and he had a neat and weird bed of nails programming connector. There was also a CNC machine close by. This sounds like the ideal situation for automation, and it turns out the setup was pretty easy.

The boards in question were for FPV/radio control telemetry adapter and thankfully the assembly house didn’t depanelize the 40 PCBs on each board before shipping them out. A very cool ATMega flashing tool handled the electrical connections between the computer and the microcontroller, but a real, live human being was still required to move this flashing tool from one chip to the next, upload the firmware, and repeat the process all over again.

The solution came by putting a few metal pins in the bed of a CNC mill, 3D print an adapter for the flashing tool, and writing a little code to move the flashing tool from one chip to the next. An extremely simple app takes care of moving the programmer to an unflashed chip, uploading the firmware, and continuing on to the next chip.

There’s still some work to be done that would basically tie together the Gcode and AVRdude commands into a single interface, but even now a complete panel of 40 PCBs can be programmed in a little over 10 minutes. You can check out a video of that below.

Continue reading “Flashing Chips With A CNC”

Z80, CP/M, And FAT File Formats

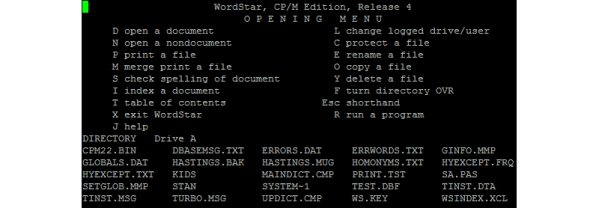
[Gary Kildall] and CP/M are the great ‘also ran’ of the computing world; CP/M could run on thousands of different 1980s computers, and [Gary] saw a few million in revenue each year thanks to CP/M’s popularity. Microsoft, DOS, and circumstances have relegated [Kildall] and CP/M to a rather long footnote in the history of microcomputers, but that doesn’t mean CP/M is completely dead yet. [Marcelo] wrote a Z80 emulator running CP/M inside an Arduino Due, and he did it in such a way that it’s actually convenient and useful to use.

Instead of using CP/M disk images, [Marcelo]’s emulator emulates CP/M disk drives on top of a regular FAT file system. Drives are mapped to folders in the FAT file system, so a folder named ‘A’ will show up as the A: disk in CP/M. Drives up to P: are supported, the maximum number of drives available under CP/M. The BIOS resides in the root directory of the SD card, and so far Microsoft Basic, Turbo Pascal, UCD Micromumps, and Wordstar work just fine.

The Arduino project was built upon one of [Marcelo]’s earlier projects that put the CP/M emulator on Windows. The version for the Due works exactly how you think it would, with a serial connection and terminal emulator providing the IO, and the huge amount of processing power and RAM available on the Due doing all the heavy lifting.

Demodulating BPSK31 With OpAmps And 555s

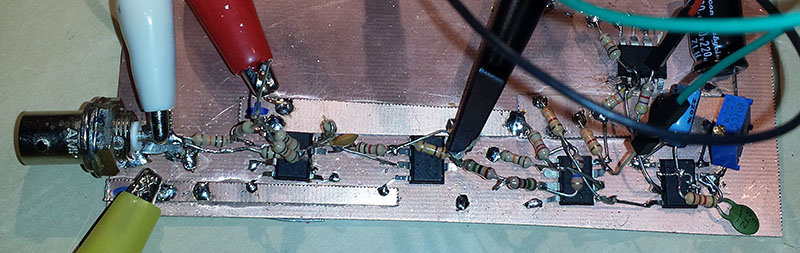
BPSK31 is an extremely popular mode for amateur radio operators; it’s efficient and has a narrow bandwidth and can be implemented with a computer sound card or an Arduino. Just like it says on the tin, it’s phase shift keying, and a proper implementation uses a phase detection circuit or something similar. [Craig] thought it would be fun to build an analog BPSK31 demodulator and hit upon the idea of doing this with amplitude demodulation. No, this isn’t the way you’re supposed to do it, but it works.

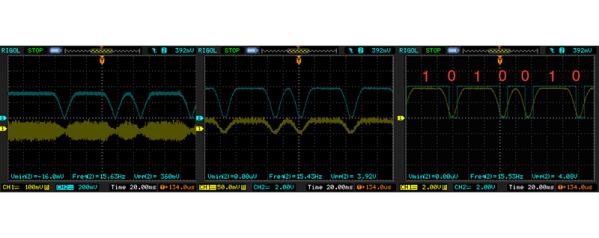
Data is transmitted via BPSK31 with a phase shift of 180 degrees being a binary 0, and no phase shift being a binary 1. [Craig]’s circuit uses an op-amp and a pair of diodes to do a full wave rectification of the signal, which basically makes a binary 1 logic high, and binary 0 logic low.

This rectified signal is then fed into a comparator, making the output go high when the signal is above 2V, and low when the signal is below 1V. That’s all you need to do to get bits out of the signal, all [Craig] had to do after that was figure out a way to sample it.

A 555 set up in astable mode running at 31.25 Hz provides the clock, synchronized with the signal by connecting the comparator’s output to the 555 trigger input. The timer clock ends up being slightly slower, but thanks to the varicode character set, the maximum number of binary ones the circuit will see is nine; every time the trigger sees a zero, the timer’s trigger is reset, re-synchronizing the receiver’s clock.

Yes, it’s a hack, and no, this isn’t how you’re supposed to receive PSK. It does, however, work, and you can thank [Craig] for that.

board

Project Binky, Putting A Celica In A Mini The Hard Way

The old Mini – not the new one, mind you – was a fantastic rally car, but fifty odd horsepower won’t get you very far today. The name of the game is souping up a pile of rust from 1980 to create one of the fastest Minis on the planet. That’s the goal of Bad Obsession Motorsport, a project by [Nik Blackhurst], [Richard Brunning], and [Rex Hamilton] as [Abraham Lincoln].

[Nik] has a 1980 Mini 1000, a car-shaped pile of rust. The plan for this multi-year build is to stuff the engine, gearbox, and suspension from a Toyota Celica ST185 GT4 into the old Mini. If you’re wondering, that’s a two liter, turbocharged engine with 200 horsepower and four-wheel drive in a Mini that originally had 50 or 60 horsepower. No, the engine doesn’t fit, but that’s not going to stop these guys.

This isn’t the kind of build you just dive into. Once the guys had the Mini in the garage, a load of measurements were taken from both cars, written down, and the car stripped down. This is not a simple mod, and a few pieces of equipment were custom-made just for this build. The biggest of these is a custom jig the Mini chassis can be bolted down to. This jig gives [Nik] and [Richard] the ability to mount the Mini and engine on rollers, and rotate the entire chassis 90 degrees for easy welding of the underside of the car.

Already there are eight videos covering a year and a half of work, and only now is there a light at the end of the tunnel. Most of the old body panels from the Mini were removed and replaced with reproduction parts. Those parts were quickly ruined with a cutting disk and some custom fabricated panels were put in place. Somehow, it still looks like a Mini but it’s massively strengthened and cut to accommodate the much larger suspension and engine from the Celica.

Grab a cup of coffee (or tea, if you’re into that) and check out the videos below. It’s incredible how much time and work went into this build, and we can’t wait to see the next update in a few months or so.

Continue reading “Project Binky, Putting A Celica In A Mini The Hard Way”

Hackaday Links Column Banner

Hackaday Links: The Last One Of 2014

The guy behind the Microslice, a tiny Arduino-controlled laser cutter, has a new Kickstarter out. It’s called the Multibox PC, and it’s exactly what you need if you want to turn a Raspi, Banana Pi, HummingBoard, or Odroid U3 into an all-in-one desktop. 14″ 1366 x 768 LCD, and speakers turns dev boards into a respectable little Linux box.

If you’re learning to design schematics and lay out PCBs, you should really, really think about using KiCAD. It’s the future. However, Eagle is still popular and has many more tutorials. Here’s another. [Mushfiq] put together a series of tutorials for creating a library, designing a schematic, and doing the layout.

Another kickstarter wristwatch. But wait, this thing has a circular display. That’s really cool. It’s a 1.4″ 220×220 pixel, 262k color display. No, the display doesn’t use a polar coordinate system.

[Jari] wrote a digital logic simulator, Atanua, started selling licenses, and figured out it wasn’t worth developing on his own anymore. As promised, Atanua is now open source. If you want to look at the finances behind Atanua, here you go.

In 1970, you didn’t have a lot of options when it came to memory. One of the best options was Intel’s 1405 shift register – 512 bits of storage. Yes, shift registers as memory. [Ken Shirriff] got his hands on a memory board from a Datapoint 2200 terminal. Each of the display boards had 32 of these shift registers. Here’s what they look like on the inside

There’s a lot of talk about North Korean hackers, and a quick review of the yearly WordPress stats for Hackaday puts a tear in our eye. This year, there were fifty-four views from the Democratic People’s Republic of Korea. That’s just great. It’s awesome to see the hacker ethos make it to far-flung lands and through highly restricted firewalls. There’s still a long road ahead of us, though, and we’ll redouble our efforts on bringing the hacker mindset to Tuvalu and Saint Helena in the year 2015.